How to Make a Product Demo Video (Without a Video Editor)
Step-by-step guide to recording polished product demo videos on Mac without video editing. Record, auto-zoom on click, trim, export — in minutes.
A product demo video is a screen recording that shows how software works — a specific feature, workflow, or use case. A good one lets a prospect or user understand the product in 60–90 seconds without reading documentation or sitting through a live call.
The problem: most screen recordings don't look like that. They look like someone navigating a full-screen desktop where you can't read anything, often with awkward pauses or ambient noise. Making a demo that looks polished usually means either spending 20–30 minutes in a video editor adding zoom keyframes per recording, or using a tool that handles the zoom automatically during capture.
This guide covers the second approach: record your screen, let auto-zoom handle the detail shots, trim, and export. No Premiere Pro. No Final Cut. No editing session.
We built Rekort — one of the tools in this guide — so we'll be direct about that. We'll also tell you when a different tool is the right call.
What makes a product demo video work#
Before getting into workflow, it's worth understanding what separates a demo that converts from one that doesn't.
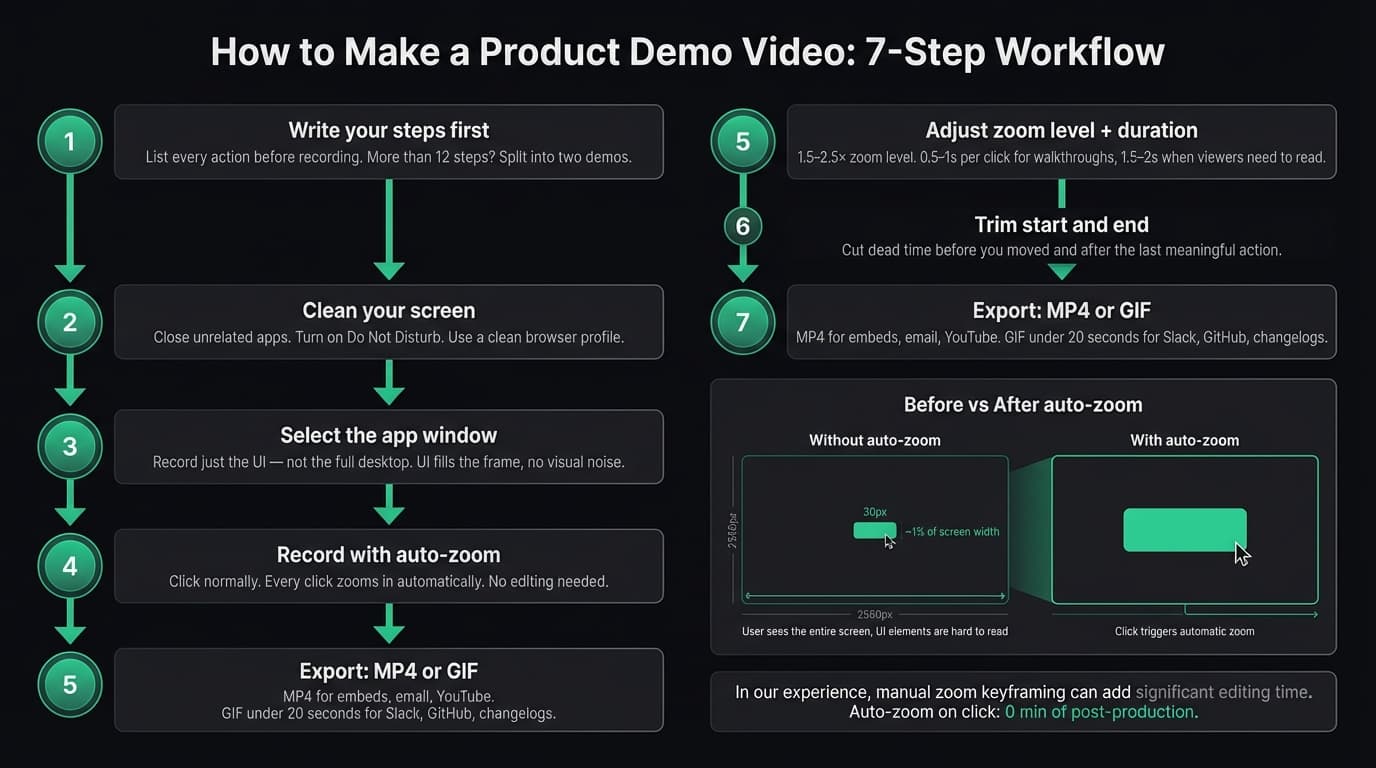
Viewers can see what you're clicking. On a 2560×1600 Retina display, a 30px button takes up roughly 1% of the screen. If you record at native resolution and export at 1080p, that button is a few pixels wide in the final video. Nobody can see what you clicked. This is the single biggest quality gap between polished demos and flat ones. Auto-zoom on click closes it.
The demo shows a complete workflow, not just a feature. Clicking a button in isolation means nothing. A demo that shows the trigger, the action, and the result teaches viewers what the software actually does for them. Start after the relevant UI is already open. Walk through the action. End on the completed output.
Dead time is cut. The 3 seconds before you start moving your mouse, the pause while a page loads, the fumbled navigation you corrected — all of it dilutes the demo. Trim the start and end at minimum. For longer recordings, cut obvious pauses in the middle too.
Everything else is secondary. Custom video backgrounds, rounded corners, cursor sparkle effects — these are nice to have but don't affect whether viewers understand your product.
The editing problem#
The reason most product demos are bad isn't laziness. It's that adding zoom to a recording requires manual work by default.
In a standard screen recorder and video editor workflow, every time you want to zoom into a click, you set keyframes: zoom to a specific x/y coordinate, hold for a beat, zoom back out. On a 2-minute demo with 15 clicks, that's 15 separate zoom sequences — each requiring you to scrub to the right timestamp, set keyframes, preview, and adjust. Manual zoom keyframing takes 20–30 minutes per recording — for a demo that took 3 minutes to record.
Most people don't do it, so their demos look flat. The ones who do spend their afternoon in a timeline editor.
Auto-zoom on click records the zoom as part of the capture. The tool tracks where you click during recording and applies zoom automatically in the preview. You adjust the zoom level and duration once and it applies to every click. That 30 minutes of keyframe work becomes zero.
Step-by-step: recording a product demo#
Here's the full workflow from blank screen to exported file.
Step 1: Write your steps before opening a recorder#
A demo recorded without a plan wanders. Before opening any recording tool, write a numbered list of every action you'll perform:
- Open the app
- Click "New project"
- Name it "Demo"
- Click "Add asset"
- Select file from Finder
- Click "Export"
If your list has more than 12 steps, split the demo into two separate recordings. Shorter demos are easier to follow and easier to get right without mistakes.
Do a dry run of your steps before recording. The worst recording experience is realizing mid-take that a step takes 8 seconds to load, or that you forgot a prerequisite.
Step 2: Clean your screen#
Everything visible in the recording matters. Before starting:
- Close unrelated apps and browser tabs
- Turn on Do Not Disturb (Control Center > Focus on macOS Sonoma+)
- Use a clean browser profile for web app demos — no personal bookmarks, logged-in accounts, or browser extensions that might be distracting
- Hide the Dock or move it to a position outside the recording area
- Set your desktop background to something neutral
This takes 2 minutes and makes an immediate visual difference.
Step 3: Record a focused area, not the full screen#
Select only the part of the screen relevant to your demo. If you're demoing a web app, select that browser window. If you're demoing a desktop app, select that app window.
Two effects follow from this: the UI appears larger in the final video because it fills the frame rather than sharing it with a menu bar and other windows, and there's no visual noise from other running apps.
For a web app at 1440px wide, selecting just that window gives you a recording where every UI element is twice as large as it would be in a full-screen 2560px capture.
Step 4: Record — let auto-zoom handle the detail shots#
With a tool like Rekort or Screen Studio, you don't do anything special during recording. Click normally, type normally, navigate normally. Every click is tracked automatically and will be zoomed into in the preview.
One thing to do deliberately: pause for 1–2 seconds after each key action before moving on. If you complete an action and immediately move to the next one, the zoom won't have settled before the next click fires. A brief pause after each meaningful click gives viewers time to read the zoomed content and register what happened.
Step 5: Preview and adjust zoom settings#
After recording, you'll see a preview with zoom applied to every click. Two adjustments matter here:
Zoom level. How close does the zoom go? For most UI elements, 1.5–2.5× is the right range. Higher than that and the crop is too tight for viewers to understand context. Lower and small text remains hard to read on a Retina display.
Zoom duration. How long does the recording stay zoomed in at each click? 0.5–1 second works for fast feature walkthroughs where you want quick, punchy pacing. For demos where viewers need to read a result — a filled form, a configuration screen, a generated output — 1.5–2 seconds lets them absorb the content before the recording moves on.
Step 6: Trim start and end#
Every recording has dead time at the start (before you started moving) and at the end (after the last meaningful action). Trim both. If your recorder supports mid-clip trimming, also cut obvious pauses — a 3-second load screen, a navigated-wrong-and-corrected sequence — anything that breaks pace.
Step 7: Export in the right format#
Choose your format based on where the demo goes:
- MP4: Demos embedded on a website, sent via video link, shared in email, uploaded to YouTube, embedded in documentation
- GIF: Short clips under 20 seconds for Slack, GitHub READMEs, pull requests, and product changelogs where a video player isn't supported
GIF files are significantly larger than MP4 at the same quality and duration. A 30-second recording exported as GIF can reach 15–40MB, which is too large for most email clients and slow on mobile connections. For anything over 20 seconds, MP4 is almost always the right choice.
For a deeper comparison of GIF tools and workflows on Mac, see our GIF screen recorder for Mac guide.
Continue reading
Product Demos Without the Editing
Record a walkthrough and Rekort handles the zoom. Export a polished demo in minutes.
Tools: what to use and when#
| Tool | Price | Auto-zoom | Best for |
|---|---|---|---|
| Rekort | $79 or $9/mo | Yes | Product demos, feature walkthroughs, async demos |
| Screen Studio | $229 or $29/mo | Yes | Daily polished demos with webcam overlay |
| ScreenFlow | $169 | No (manual) | Long edited tutorials with cuts and narration |
| QuickTime | Free (built-in) | No | Informal captures, bug reports |
| OBS Studio | Free | No | Streaming and multi-source recording |
When to use Rekort#
Rekort is built for the workflow in this guide: select an area, record with auto-zoom on click, trim, export as MP4 or GIF. It captures system audio and microphone natively — no BlackHole workaround needed. The right choice if you record demos regularly and want polished output without Screen Studio's price or feature complexity.
What Rekort doesn't have: webcam overlay, custom video backgrounds, or advanced cursor effects. If you need those, Screen Studio is the better tool.
See our software demo recording guide for a detailed walkthrough of the recording workflow.
When to use Screen Studio#
Screen Studio is the better choice if you produce customer-facing videos daily and need webcam overlay with background removal, custom video backgrounds, and cursor effects. At $229 one-time or $29/month (as of March 2026), it's the most feature-complete auto-zoom tool available. For occasional recordings or workflows where you only need the zoom, the price is hard to justify. For a full comparison, see our best screen recorder for Mac guide.
When to use QuickTime#
For informal captures: bug reports, internal Slack videos, quick notes to yourself. QuickTime is already on your Mac — File > New Screen Recording, done. It doesn't zoom, can't capture system audio without setting up a virtual audio device, and doesn't export GIFs — but for a quick informal grab, it's the fastest path.
When to use ScreenFlow#
For longer edited tutorials that need cuts, titles, and chapter markers — 5–10 minute YouTube tutorials, full product walkthroughs with narration edits, onboarding videos with multiple recorded segments joined together. ScreenFlow is a video editor with screen recording built in. It doesn't auto-zoom (you add zoom keyframes manually), but it has every editing capability you'd need for long-form content. At $169 one-time, it's a reasonable choice for teams producing high-volume edited video content.
When to use OBS Studio#
OBS is designed for live streaming and multi-source layouts. If you need to record your screen, a webcam feed, and a slide deck simultaneously in one composite layout, OBS handles it. For product demos, it's significantly more complex than the workflow requires.
Export format guide: MP4 vs GIF#
| Scenario | Use | Why |
|---|---|---|
| Website embed | MP4 | Small file, plays in all browsers |
| MP4 via link | GIFs over 1MB fail in many clients | |
| Slack | GIF (under 30s) or MP4 link | GIFs play inline, MP4 needs a click |
| GitHub README | GIF | Video players aren't supported in markdown |
| GitHub PR comment | GIF | Same as README |
| YouTube | MP4 | Required format |
| Documentation | MP4 | Better quality, smaller file |
| Product changelog | GIF (under 20s) or MP4 | GIF for social/Slack, MP4 for pages |
| Twitter/X | MP4 or GIF | Both work; MP4 has better quality |
GIF file size note: GIF uses a 256-color palette per frame and lossless compression, which produces large files for screen recordings with many UI colors. A 15-second recording with a colorful UI can reach 10–20MB as a GIF. Keep GIFs under 20 seconds and record a focused area (not the full screen) to keep file sizes manageable.
Demo types and what each requires#
Sales prospect demos#
Async demos sent to a specific prospect before or after a call. These typically run 60–90 seconds and focus on one specific pain point or use case relevant to that prospect. Keep them short, start at the relevant feature, don't introduce the entire product. MP4, shared via a video link or embedded in an email.
Feature announcement videos#
Short recordings that show a new feature in action. Typically 20–60 seconds. Sent via Slack, Twitter/X, product emails, or changelog pages. These work well as GIFs if they're under 20 seconds, or as MP4 if they have audio narration. See our changelog video guide for the specific workflow.
Tutorial and documentation videos#
Step-by-step recordings that show users how to complete a task. Typically 2–5 minutes per task. These go in help documentation, YouTube, and onboarding flows. Auto-zoom matters a lot here — viewers watching a tutorial need to see exactly what button to click, not just hear about it. For more on this format, see our how to make tutorial videos guide.
Onboarding demo videos#
Full product walkthroughs shown during trial signup or first login. These run 5–10 minutes and typically cover the core workflow from account creation to first result. Break them into chapters or short segments rather than one continuous recording — a 10-minute unbroken demo has low completion rates. Each segment records and trims separately, then combines.
Internal team demos#
Bug reproductions, design feedback recordings, PR walkthroughs. These don't need to be polished. QuickTime works for most internal captures. Use a third-party tool with zoom if the bug involves clicking on a small UI element that viewers need to see clearly.
Common mistakes#
Recording the full desktop. The most common quality issue in demo videos. Select just the app window. Everything outside the app is visual noise, and full-screen on a Retina display makes UI elements tiny.
Moving too fast. Every click happens at the same pace as actual use, but viewers aren't watching the cursor — they're reading the UI. Slow down 30% on key actions, and pause briefly after each meaningful click.
No Do Not Disturb. A notification appearing mid-recording means a retake. Turn it on before every session.
Too many steps in one demo. If a demo takes more than 90 seconds to complete, it covers too much. Split it. A "Getting started" demo and an "Advanced settings" demo perform better than one 3-minute overview.
Using GIF for long recordings. GIFs over 20–30 seconds produce very large files. They load slowly in browsers, often fail in email clients, and have noticeably lower quality than MP4 at comparable file sizes. Use MP4 for anything substantial and GIF only for short clips.
Recording before doing a dry run. If you discover mid-take that a step requires a prerequisite you haven't completed, or that a loading screen takes longer than expected, you're starting over. One dry run prevents most of this.
Forgetting to capture system audio when it matters. If the software plays sounds that reinforce what's happening — a success chime, a processing animation with audio — recording without system audio loses that signal. QuickTime can't capture system audio without setting up BlackHole. Rekort, Screen Studio, and ScreenFlow capture it natively.
How auto-zoom changes the workflow#
The difference auto-zoom makes is clearest when you compare the two workflows side by side:
Without auto-zoom (traditional workflow):
- Record the screen
- Open video editor
- Scrub to first click
- Set keyframes: zoom in, hold, zoom out
- Repeat for every click
- Preview the whole recording
- Adjust individual keyframe timings
- Export
That's 20–30 minutes of editor work for a 2-minute recording with 10–15 clicks.
With auto-zoom on click:
- Record the screen (every click is tracked automatically)
- Preview the recording with zoom already applied
- Adjust zoom level and duration once (applies to all clicks)
- Trim start and end
- Export
The editor session disappears entirely. Zoom adjustment takes 2–3 minutes instead of 20–30.
This isn't a minor time saving. It's the difference between a workflow that takes an hour and one that takes 10 minutes — which determines whether you actually record demos regularly or treat it as an occasional project.
For a technical breakdown of how zoom-on-click works and which tools support it, see our screen recording with zoom effect guide.
Screen preparation: a pre-recording checklist#
Before every recording session, run through this list:
- Steps written as a numbered list
- Dry run completed
- Do Not Disturb turned on
- Unrelated apps closed
- Browser profile clean (or dedicated demo profile)
- Desktop background set to something neutral
- Dock hidden or positioned outside the recording area
- Recording area selected (app window, not full screen)
- Test audio: mic level set, no clipping
- System audio capture confirmed if needed
Two minutes before recording saves the retake.
What to expect from auto-zoom#
Auto-zoom on click is a specific solution to a specific problem. It tracks where you click during recording and applies a smooth zoom-in on that coordinate in the preview. You see each click zoomed into during playback and adjust level and duration once.
What it doesn't do: it doesn't fix bad takes, remove pauses from the middle of recordings, or add voiceover narration. If you fumble navigation during recording, you need to re-record that section. If you need narration with edits — pausing, restarting, timing adjustments — you need a video editor for that audio track.
Auto-zoom handles the zoom problem completely. The rest of the recording quality depends on the steps above.
Decision guide#
"I need a demo for a sales prospect by end of day." Record with Rekort or Screen Studio. Trim, export as MP4, share via a video link. 10–15 minutes total if your dry run is solid.
"I want a GIF for a GitHub README or Slack message." Record with Rekort (under 20 seconds). Export as GIF. Keep it focused on one interaction.
"I need a full onboarding walkthrough with narration and chapter markers." Use ScreenFlow. Plan to spend a few hours. Break content into 3–5 minute segments.
"I need to show a bug to a developer." QuickTime. File > New Screen Recording. Already on your Mac.
"I produce demos every day and need webcam overlay plus custom backgrounds." Screen Studio at $229 has the best overall feature set: auto-zoom, webcam with background removal, custom backgrounds, cursor effects.
"I want auto-zoom without Screen Studio's price." Rekort. Auto-zoom on click, system audio, MP4 and GIF export. $79 lifetime or $9/month. No webcam overlay or custom backgrounds.
The most common reason product demo videos are bad isn't tool selection — it's skipping the 2-minute preparation. Steps list, clean screen, Do Not Disturb. Set up deliberately, record, trim. Most demos don't need more than that.
For specific recording tips that apply directly to tutorial content, see our screen recording for tutorials guide.
Ready to record?
Rekort auto-zooms every click so your screen recordings look professional. No video editing required.
Download for MacmacOS 14+ · From $9/month or $79 lifetime
Related Articles
SaaS Demo Video: How to Make One That Actually Converts
7 min read
How to Record Training Videos (Without a Video Editor)
7 min read
Best Video Messaging Tools (Beyond Loom) in 2026
8 min read
How to Record Software Demos That Convert
7 min read
Screen Recording with Zoom Effect: Why Clicks Should Pop
8 min read