How to Record Training Videos (Without a Video Editor)
Step-by-step guide to recording software and employee training videos on Mac. Make polished training content without editing skills or video production tools.
Most training videos fail before the first replay.
Not because the content is wrong. Because viewers can't see what the instructor is clicking. A full-screen screen recording for training on a Retina display makes every button 8 pixels wide. The person recording can follow along fine; the person watching has no idea what just happened.
The fix isn't a video editor. It's a screen recorder that zooms in automatically when you click.
Here's how to record training videos on Mac that people actually watch through.
What works well as a screen-recorded training video#
Screen recording is well-suited for software training because you're showing real, clickable software. The viewer can follow along on their own machine.
These use cases work especially well:
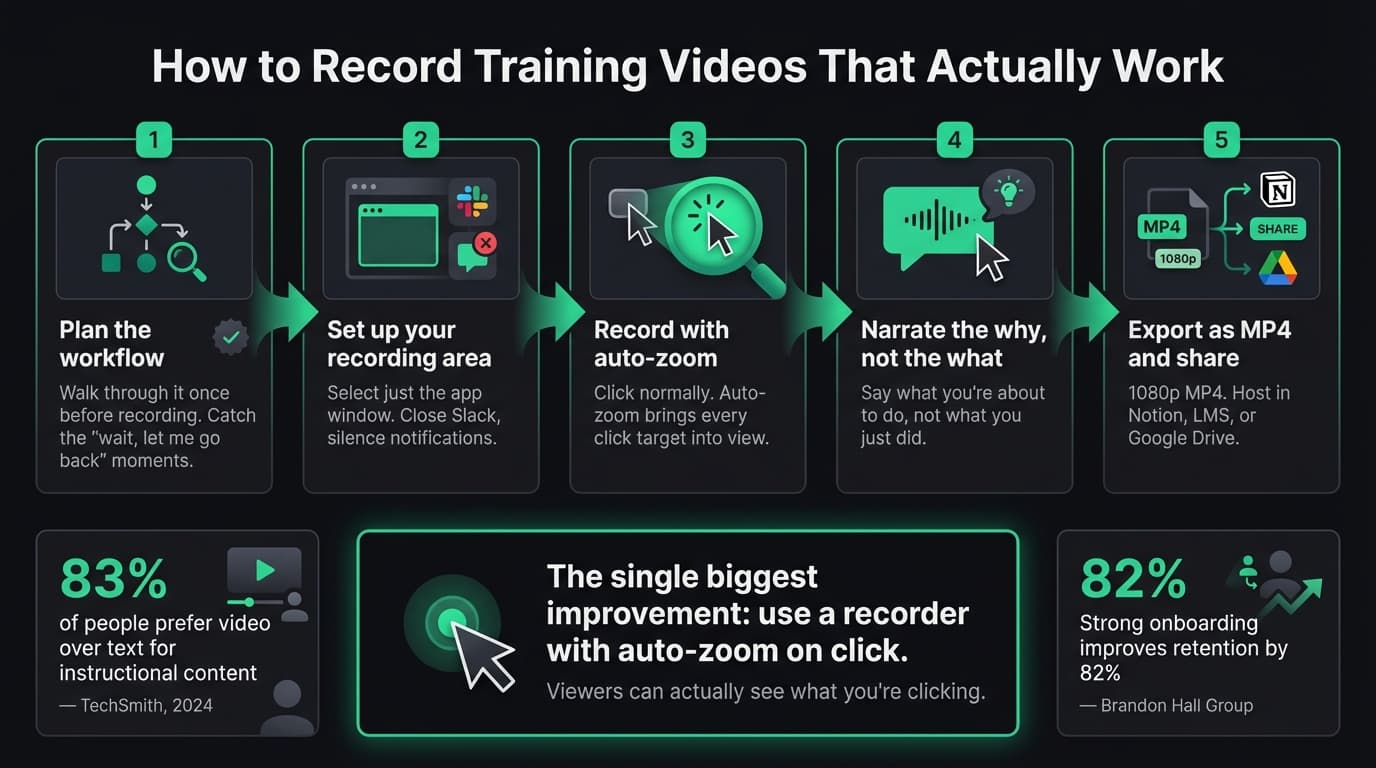
Software onboarding. Walk new employees or users through the interface, step by step. Record once, share it every time someone joins. According to the Brandon Hall Group, strong onboarding improves new hire retention by 82%.
SOP documentation. Standard operating procedures for recurring tasks. Record the workflow in the actual app rather than writing a list of steps that goes out of date.
Internal tool walkthroughs. Any custom dashboard, admin panel, or internal tool where written documentation leaves people confused.
Bug reproduction. Show your engineering team exactly what you clicked to trigger the issue. Faster than writing steps, harder to misinterpret.
Customer support. "Here's exactly how to do X in our product" — faster to record than to write, easier to follow than a screenshot guide.
According to the TechSmith Video Viewer Study 2024, 83% of people prefer video over text or audio for instructional content. For software walkthroughs specifically, video shows the workflow rather than describing it.
For more on structuring video training content, see our screen recording for tutorials guide.
Continue reading
Product Demos Without the Editing
Record a walkthrough and Rekort handles the zoom. Export a polished demo in minutes.
What you need before you start#
A screen recorder that zooms on click. This is the one thing that separates useful training videos from recordings nobody can follow. Without zoom, you're showing a tiny-button slideshow. With zoom, the viewer's attention follows exactly what you're doing.
A microphone. Your Mac's built-in microphone is fine for internal training content. If you're recording customer-facing material, a dedicated USB microphone removes the room echo and makes audio noticeably cleaner.
A quiet environment. Keyboard sounds, background noise, and HVAC all end up in the recording. Record when it's quiet, or at minimum close a window and silence notifications.
A focused recording area. Don't record your full display. Select the app window you're demonstrating. Less visual noise, smaller file size, easier for viewers to follow.
That's it. No studio, no video editing skills, no script (unless the content is complex enough to need one).
Recording step by step#
1. Walk through the workflow before recording. A dry run helps you find the moments where you'd normally say "wait, let me go back" on camera. Doing it once beforehand makes the recording smoother.
2. Set up your recording area. Open the app you're demonstrating. Close Slack, turn off notifications, and remove anything that might pop up unexpectedly. You want the viewer's focus on the software, not on your desktop background or calendar reminders.
3. Start recording with auto-zoom enabled. Tools like Rekort let you select the area you want to capture, then record normally. Every click automatically zooms in to the click target — you don't have to do anything extra.
4. Narrate as you go. Speak naturally. Describe what you're about to do, not what you just did. "I'm going to click Settings, then go to Users" is easier to follow than a post-click "I clicked Settings." Explain the why when it's not obvious.
5. Click deliberately. With auto-zoom, every click gets a zoom. Click once, wait for the UI to respond, then move on. Rapid clicks through menus can make the auto-zoom feel jerky, so give the interface a moment to settle.
6. Pause before stopping. After the final step, hold still for 2–3 seconds before stopping the recording. It gives the viewer time to absorb the last action and makes trimming the end much easier.
The zoom problem#
Most screen recorders capture what's on screen. They don't do anything to make it easier to see.
Training videos for software fail when the viewer can't tell what you clicked. This is the default outcome with QuickTime, OBS, or any recorder without zoom. You end up with a recording that makes perfect sense to you — because you know the interface — and makes no sense to someone who doesn't.
Auto-zoom on click fixes this. Instead of a static full-screen capture, the video pans and zooms to your click target so the viewer can see exactly which button, field, or link you activated. The recorder does this automatically based on where your cursor was when you clicked.
For training content specifically, this is worth more than any post-production editing. See our screen recording with zoom effect guide for a deeper explanation of how it works.
Export and share#
For most training use cases, MP4 at 1080p is the right format. It plays in any browser, embeds in Notion, Confluence, or any LMS, and doesn't require special software to view.
Resolution: Record at your native display resolution and export at 1080p. Most LMS platforms and intranets cap streaming at 1080p anyway.
GIF vs. MP4: GIF works for short process illustrations in documentation — under 20 seconds. For full training walkthroughs, GIF files get large and quality degrades. Use MP4 for anything over 30 seconds.
Where to host: For internal training, upload to your LMS, Notion, Confluence, or Google Drive. For external customer training, a private YouTube link or a Loom upload both work. The viewer needs somewhere they can pause, rewind, and replay.
Tips to improve your training recordings#
One video, one task. A 5-minute video covering one workflow has a much higher completion rate than a 25-minute onboarding marathon. Chunk your content.
Record in segments if you make mistakes. You don't need to start over. Pause the recording, reset to the step you were at, and resume. Trim the gap in preview before exporting.
Show errors on purpose. If there's a common mistake users make at a specific step, make the mistake intentionally and show how to recover. This makes training videos significantly more useful than a smooth, error-free walkthrough.
Test your audio before the full recording. Record 30 seconds, listen back with headphones. Check for echo, background noise, and clipping. Fixing audio issues beforehand takes 5 minutes; fixing them after takes much longer — and often isn't worth it.
Keep narration concise. The video shows what you're doing. The narration explains why. You don't need to describe what's already visible on screen.
For more on the overall workflow, see our guides to how to make tutorial videos and how to make a product demo video.
Recording training videos doesn't require editing skills. It requires a recorder that makes the content easy to follow, a microphone that doesn't embarrass you, and the discipline to keep each video focused on one task.
Auto-zoom is what makes viewers actually learn from the recording instead of losing track of what you clicked. Everything else is optional.
Ready to record?
Rekort auto-zooms every click so your screen recordings look professional. No video editing required.
Download for MacmacOS 14+ · From $9/month or $79 lifetime
Related Articles
How to Make a Product Demo Video (Without a Video Editor)
16 min read
SaaS Demo Video: How to Make One That Actually Converts
7 min read
Best Video Messaging Tools (Beyond Loom) in 2026
8 min read
How to Record Software Demos That Convert
7 min read
Screen Recording with Zoom Effect: Why Clicks Should Pop
8 min read