How to Make Tutorial Videos (No Editing Required)
A practical guide to recording software tutorial videos on Mac — no video editor needed. Covers planning, recording, zoom, and export in under 10 minutes.
Good tutorial videos are short, focused, and show exactly what to click. The biggest reason tutorials fail isn't production quality — it's viewers squinting at a full-screen recording trying to figure out which small element the presenter just clicked.
This guide covers how to make tutorial videos on Mac without spending time in a video editor. If you also need to record demos for customers or product launches, see our guide to making product demo videos.
What makes a tutorial video work#
A tutorial video succeeds when the viewer can follow every step without rewinding. Three things determine that:
One topic per video. "How to set up your first project" works. "How to use our app" doesn't. Each video should cover exactly one task from start to finish.
Visible click targets. On a 2560×1600 display, a button can be 8 pixels wide in a full-screen recording. Viewers can't follow a tutorial if they can't see what you're clicking. Auto-zoom on click solves this without editing — the recording zooms into each click automatically.
Clean audio. Background noise breaks concentration. Record in a quiet room. A USB microphone helps, but even a phone headset mic records better than most built-in laptop mics.
Educational content on YouTube averages 42% audience retention, well above the platform average of 23.7% (RetentionRabbit, 2025 Benchmark Report). Tutorials that answer a specific question hold attention better than broad overviews.
Continue reading
Product Demos Without the Editing
Record a walkthrough and Rekort handles the zoom. Export a polished demo in minutes.
What you actually need#
For software tutorials, you need two things:
- A screen recorder that captures your area of interest
- A microphone (built-in is fine to start)
Optional but useful:
- Auto-zoom on click (removes the need for a video editor)
- System audio capture (needed if your tutorial involves sound from the software)
You don't need a camera, external lighting, or a video editor for most software tutorials. The recording is the content.
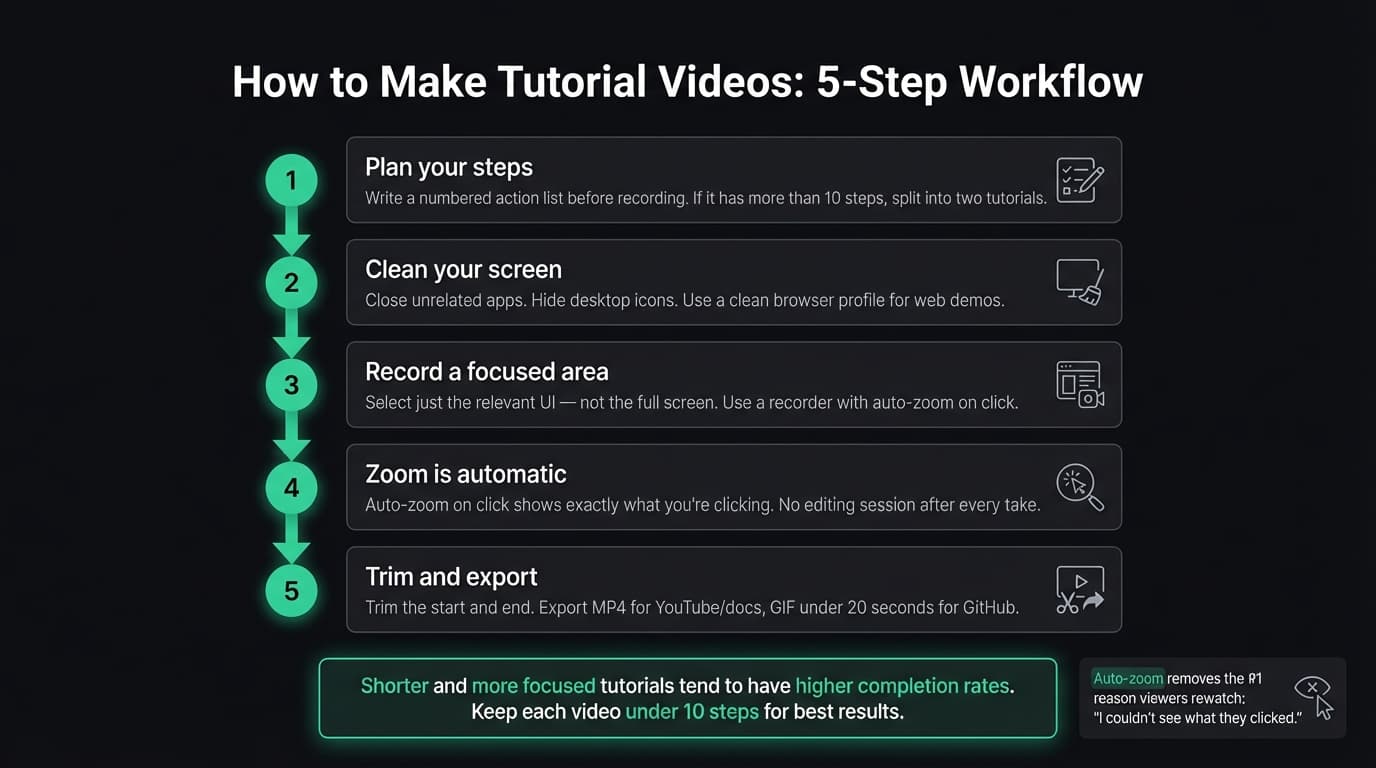
Step 1: Plan the steps#
Write out what you'll show before you record. A numbered list of actions is enough — you don't need a full script.
A plan for a 2-minute tutorial might look like:
- Open the app
- Click "New Project"
- Name the project and choose settings
- Import a file
- Show the output
Run through it once before hitting record. You'll catch steps you forgot and record a cleaner take.
Keep each tutorial to a single task. If your plan has more than 8-10 steps, it's probably two tutorials.
Step 2: Clean up your screen#
Before recording:
- Close everything except the app you're demoing
- Hide desktop icons if they're cluttered (right-click desktop → Use Stacks, or move files to a folder temporarily)
- Set your display to native resolution — scaling can make UI elements blurry in recordings
- Use a clean browser profile if you're demoing a web app, so personal bookmarks don't appear
A clean screen looks professional without any production work.
Step 3: Record#
On Mac, you have a few options:
QuickTime Player (free, built-in): File → New Screen Recording, or Cmd+Shift+5 to open the Screenshot toolbar. Select a specific area and click Record. Works for basic tutorials, but captures the screen flat — no zoom, no system audio.
Rekort or Screen Studio: Select your area, record normally, and every click automatically zooms in. Both capture system audio natively without any BlackHole workaround. For a full comparison of Mac screen recorders, see our screen recorder guide.
A few tips for a cleaner recording:
- Record a slightly wider area than you think you need — you can't zoom out after the fact
- Pause between steps, not during them — it's easier to trim a pause than a mid-action cut
- If you make a mistake, pause, say "starting over," and redo that section — you can trim the mistake later
Step 4: Handle zoom#
If your recorder doesn't have auto-zoom, you'll need to add zoom manually in a video editor. For a 3-minute tutorial with 20 clicks, that's 30-60 minutes of editor work.
Auto-zoom handles this automatically. Every click becomes a zoom event. You can adjust the zoom level and duration in the preview, then export. The whole process takes minutes instead of an hour.
If you're deciding which screen recorder to use for tutorials, auto-zoom is the feature that most affects the time from recording to published. See our screen recording with zoom effect guide for details on how it works.
Step 5: Trim and export#
You don't need a video editor for most tutorials. Basic trim — cut the start (where you hit Record) and the end (where you stopped) — is usually all you need. Most screen recorders include this.
For export format:
- MP4 for YouTube, Notion, documentation sites, and Loom
- GIF for GitHub READMEs, Jira tickets, Slack messages, and embedding in docs
GIF file sizes grow fast. For tutorials longer than 30 seconds, MP4 is the better choice. If you need a GIF from a longer recording, capture just the key section as a separate short recording and export that.
Common mistakes#
Too much talking before the first action. Get to the first click within 10-15 seconds. Viewers came for the tutorial, not an introduction to it.
Recording the full screen when only part of it matters. Select a specific area around the relevant UI. Viewers don't need your dock, status bar, or unrelated windows.
Skipping the mic check. Record 10 seconds of yourself talking and play it back. Crackling, echo, or low volume are easy to catch before you record the whole tutorial.
Long pauses between steps. If you pause to read your notes, trim the pause. Silence with nothing happening on screen signals to viewers that something went wrong.
Audio tips worth knowing#
External mic vs built-in laptop mic: the difference is audible. A USB condenser mic in the EUR 40-80 range — Blue Snowball, Samson Q2U, or similar — sounds noticeably cleaner.
If you don't want to buy a mic, use a wired headset with an inline mic. The mic placement near your mouth reduces room noise significantly.
Record in the smallest room available. Open rooms echo. A room with furniture and soft surfaces (books, clothes, carpet) absorbs sound.
Where to share your tutorial#
Where you host the video changes how people find and watch it:
- Notion or Confluence: Embed as MP4 or upload a GIF directly. GIFs autoplay without a click, which works well for short walkthroughs.
- GitHub README: GIF under 10MB. Keep the recording under 20 seconds to stay within that limit. See our GIF for GitHub READMEs guide for specifics.
- YouTube: MP4. YouTube handles hosting, playback controls, and auto-generated captions. Good for public tutorials that need to be discoverable.
- Documentation sites: Most support embedded video or GIF. Check the media size limit before exporting — some platforms cap at 5MB.
- Loom: Upload your MP4 for a hosted link with a built-in player. Useful for sharing in email or embedding in an internal tool.
Making a good tutorial video is mostly about preparation. Plan the steps, record a clean screen with visible click targets, trim the start and end, and share. If you're doing this regularly, auto-zoom on click removes the biggest time cost — you get a polished output without an editing session after every take.
For more on recording demos for customers and product announcements, see our product demo video guide.
Ready to record?
Rekort auto-zooms every click so your screen recordings look professional. No video editing required.
Download for MacmacOS 14+ · From $9/month or $79 lifetime
Related Articles
How to Make a Product Demo Video (Without a Video Editor)
16 min read
SaaS Demo Video: How to Make One That Actually Converts
7 min read
How to Record Training Videos (Without a Video Editor)
7 min read
Best Video Messaging Tools (Beyond Loom) in 2026
8 min read
How to Record Software Demos That Convert
7 min read