SaaS Demo Video: How to Make One That Actually Converts
A practical guide to recording SaaS demo videos that move prospects forward — what to show, how long to keep it, and which tools to use on Mac.
Most SaaS demo videos show too much. The recording starts at the login screen, spends two minutes on the dashboard, and ends somewhere in the settings panel. By then, the viewer has lost track of what problem was being solved.
A demo video that converts does one thing: shows the viewer exactly how your product solves their specific problem, in the shortest possible time.
Here's how to record one that works.
What a converting SaaS demo video looks like#
Before you touch a screen recorder, answer one question: what is the single workflow you want the viewer to understand?
Not your entire product. One workflow.
A demo for an invoicing tool might be: add line items → preview → send. That's it. The viewer doesn't need to see your report exports, your settings panel, or your pricing tiers. Not in this video.
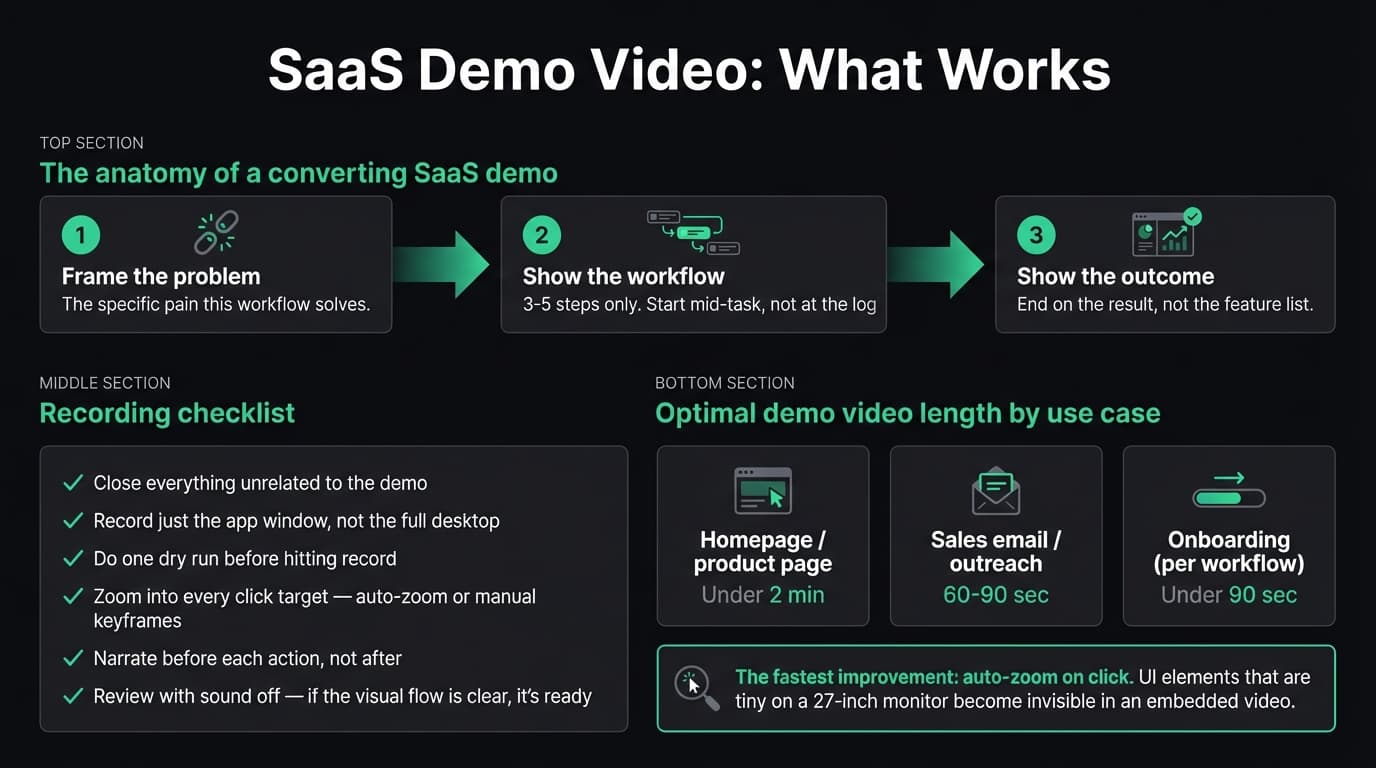
The structure that works: problem → steps → outcome.
- Frame the problem in one sentence ("Clients keep asking where their invoice is")
- Show the workflow that solves it — 3-5 steps, nothing more
- Show the outcome ("Invoice sent, payment tracked")
If you can't define that arc before you start recording, the demo will ramble. Write it down first.
How long to make it#
For async demos — posted on your site, shared via email, embedded in a product page — keep it under 3 minutes. Ideally 90-120 seconds.
A viewer will start a 90-second video without deciding whether to watch it. They'll think about skipping a 4-minute video before they hit play.
For live demos with a prospect on a call, longer is fine because you're responding to questions. But your screen recording component — the "let me show you how this works" part — should still be tight.
Continue reading
Product Demos Without the Editing
Record a walkthrough and Rekort handles the zoom. Export a polished demo in minutes.
What to skip#
The login screen. Start with the workflow already open. Nobody cares how fast your login page loads.
Dashboard overviews. Generic dashboards look like every other SaaS product. Start where the specific workflow happens.
Unrelated features. If you're demoing for a marketing team, skip the developer API section. Show what's relevant to this viewer's use case.
Long loading states. If your app takes 3 seconds to load a report, edit around it. You can trim during export or just re-record once the screen is ready.
Setting up to record#
Once you know what you're recording, set up your environment:
Close everything else. Open only the windows and tabs relevant to the demo. A notification mid-recording is unprofessional and annoying to work around.
Use a cropped recording area. Record just the relevant window, not your full desktop. This keeps the viewer's attention where it belongs and makes the recording look deliberate.
Record at your display's native resolution. Mac screens are high-DPI. If you record at native resolution and export at 1080p, the output is crisp. Recording at 720p often looks soft on modern displays.
Do a dry run first. Walk through the workflow once without recording. You'll catch the moments where you go back and redo something — which shows up on screen as hesitation. One practice run usually eliminates most of them.
Zoom into your clicks#
The biggest readability problem with screen recording demos is that UI elements are too small to see clearly in the final video. A button that looks obvious on a 27-inch display is a tiny target when embedded in a 600-pixel-wide webpage or a sales email.
The manual fix is to add zoom keyframes in a video editor after recording. For a 90-second demo, that takes 20-30 minutes.
The faster fix is to use a recorder with auto-zoom on click. You click normally, and the recording zooms into each click target automatically. No timeline, no keyframing.
Tools like Rekort and Screen Studio do this on Mac. You select your recording area, hit record, click through your workflow, and export. The video zooms in on every click, even on high-DPI displays, without any post-production. For a full comparison of Mac recording tools for demos, see best product demo software.
If your SaaS demo involves clicking through small UI elements — which most do — auto-zoom is the single biggest improvement you can make to output clarity.
Comparing recording options for SaaS demos#
| Tool | Auto-zoom | System audio | GIF export | Price |
|---|---|---|---|---|
| Rekort | Yes | Yes | Yes | EUR 40 lifetime |
| Screen Studio | Yes | Yes | Yes | $229 one-time |
| Loom | No | Yes | No | From $15/mo |
| QuickTime | No | No | No | Free (built-in) |
Loom is a reasonable choice if you're sharing async demos to individuals via a link — its built-in sharing workflow is fast. But it doesn't zoom into clicks, so viewers on small screens may miss what you're clicking.
QuickTime works for quick internal recordings where quality doesn't matter. For a demo you're putting on your homepage or sending to leads, use a tool with zoom.
Recording with audio#
Voiceover helps when the context isn't obvious from the UI. Narrate before each action, not after:
- Good: "I'll click Add Invoice to start a new one" → [click]
- Less good: [click] → "So I've just clicked Add Invoice"
Narrating before keeps the audio synchronized with what's on screen. Narrating after makes the video feel slow and hard to follow.
If you're recording in a noisy environment, most Mac screen recorders will pick up background noise. Screen Studio and Rekort both capture microphone audio directly. If system noise is a problem, record with your mic close and use a tool like Krisp to filter background noise in your system audio settings before recording.
The recording checklist#
- Write the problem → steps → outcome arc before opening a recorder
- Close everything unrelated to the demo
- Set your recording area to just the app window
- Do one dry run without recording
- Record — don't stop for minor mistakes unless they're on screen for more than a few seconds
- Review with the sound off: if you can follow the visual flow without audio, it's good; if you can't, re-record or improve your zoom
- Export as MP4 at 1080p for site and email; GIF if you need it for documentation or Slack
For a deeper look at the full demo video production process, the product demo video guide covers structure, scripting, and distribution in more detail. And if you're choosing between video and screenshots for async communication, video messaging tools covers the tradeoffs.
What to do with the video once recorded#
Website: Embed it on your homepage or feature pages, above or near your main CTA. Keep it short enough that visitors don't have to decide whether to commit before they hit play.
Sales emails: A GIF thumbnail that links to the full video outperforms plain text links. Record a 60-90 second walkthrough personalized to the prospect's use case — it outperforms sending a generic product link.
Onboarding: Demo videos showing new users their first 1-2 core workflows reduce support tickets for those workflows. Keep onboarding demos even shorter than sales demos: 60-90 seconds per workflow, one workflow per video.
Documentation: For step-by-step feature docs, a GIF export of the workflow is often cleaner than a video — no play button required, plays inline automatically in Notion, GitHub, or Confluence. See screen recording with auto-zoom for the workflow.
The setup overhead for a SaaS demo video is low if you know what you're recording before you start. Define the workflow, close your distractions, record with zoom, and export. The whole process takes under 15 minutes for most demos.
Ready to record?
Rekort auto-zooms every click so your screen recordings look professional. No video editing required.
Download for MacmacOS 14+ · From $9/month or $79 lifetime
Related Articles
How to Make a Product Demo Video (Without a Video Editor)
16 min read
How to Record Training Videos (Without a Video Editor)
7 min read
Best Video Messaging Tools (Beyond Loom) in 2026
8 min read
How to Record Software Demos That Convert
7 min read
Screen Recording with Zoom Effect: Why Clicks Should Pop
8 min read