Screen Recording with Zoom Effect: Why Clicks Should Pop
Auto-zoom screen recording zooms into every click automatically so viewers see exactly what you're doing. Here's how it works and which Mac apps offer it.
A screen recording with zoom effect is a capture where the video automatically zooms into click targets — buttons, form fields, menu items — so viewers can see exactly what's being interacted with. Without zoom, a product demo recorded on a Retina Mac shows a full-screen capture where every UI element is tiny.
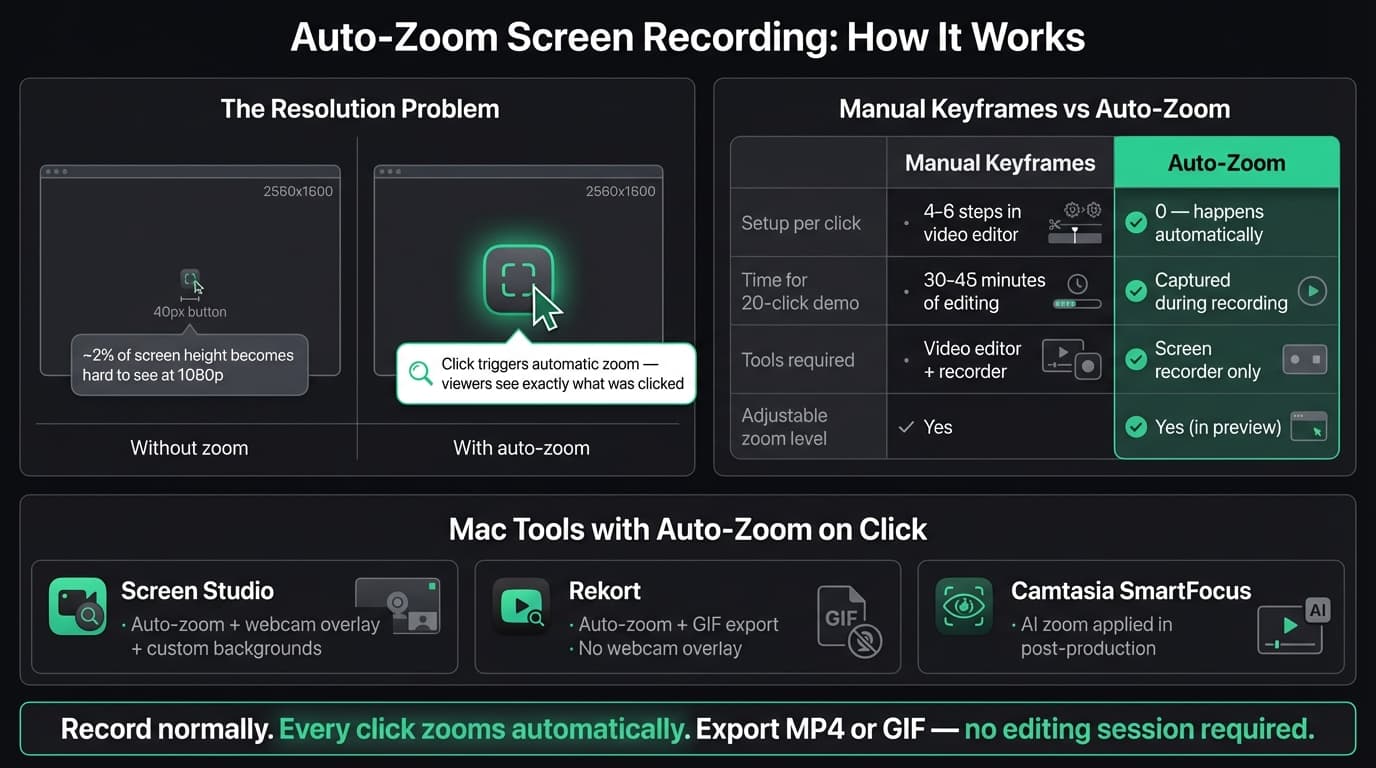
The math is the problem. A 2560×1600 display packed into a 1080p video means a standard 40-pixel button occupies under 2% of the screen height. Viewers watching that recording on a laptop miss the click, miss what changed, and rewind to watch again. Or they don't rewind, and they leave.
Auto-zoom solves this by detecting each click during recording and zooming the video frame into that area. You record normally. The zoom happens automatically during export.
Why flat recordings fail for demos#
Most screen recorders — QuickTime, OBS, Kap — record exactly what's on your screen. That's fine for informal clips or streaming where viewers are watching in real time. It's not fine for product demos and tutorials, where someone is following a series of steps on a different device, often pausing and rewinding.
The gap between what you see while recording and what a viewer sees when watching is mostly a resolution problem. You're looking at your native display where the UI is sharp and full-size. The viewer is watching a compressed video where every element is scaled down. A click that's obvious to you is a small motion in a sea of pixels to them.
Three things make this worse:
Dense app UIs. Modern web apps and desktop software pack more controls into less space. A toolbar with 12 icons that's easy to navigate when you're using the app becomes unreadable in a screenshot or video.
Retina displays. MacBooks run at 2560×1600 or higher. When you export at 1920×1080 (which is standard), everything shrinks. The scaling factor cuts your apparent UI size roughly in half.
No click indicators by default. Most recorders don't highlight the cursor or mark where a click happened. Viewers have to track the cursor movement themselves.
Auto-zoom addresses all three. Each click zooms the camera into the relevant region, making the target fill more of the frame. Viewers see the button, the field, the selection — not a guess.
Continue reading
Product Demos Without the Editing
Record a walkthrough and Rekort handles the zoom. Export a polished demo in minutes.
Manual zoom vs auto-zoom#
Before auto-zoom tools existed, the workflow was manual keyframing in a video editor. Add a keyframe at the start of a click sequence, scale up the video layer, add another keyframe at the end, scale back out. Then tune the easing curve so the zoom doesn't feel jarring.
That's 4-6 steps per click. For a 3-minute product demo with 20 clicks, it's 80-120 operations in a video editor before you have a watchable recording. Add in the re-do's when you get the timing wrong, and a 3-minute demo can take 30-45 minutes to produce.
Auto-zoom tools track the clicks during recording and handle all of that automatically. What changes is where you spend the time: not on keyframe mechanics, but on whether the recording shows what you need to show.
Some tools give you control over the zoom level and how long the camera holds at the zoomed position before pulling back out. That's worth adjusting — a fast demo where you're clicking quickly needs shorter hold times than a tutorial where viewers are following along step by step.
Mac apps with auto-zoom on click#
Most screen recorders don't have this feature. These are the ones that do.
Screen Studio (Mac only, $229 one-time or $29/month as of March 2026) was the first tool to make auto-zoom on click mainstream for Mac screen recording. The feature works well: every click triggers a zoom with a smooth camera movement, and you can adjust zoom level, easing, and timing in post. Screen Studio also has webcam overlay, custom backgrounds, cursor effects, and GIF export. It's the most feature-complete option. Screen Studio's auto-zoom documentation explains the settings in detail.
Rekort (Mac only, $9/month or $79 lifetime) is our app. It records your screen, zooms into every click automatically, and exports as MP4 or GIF. There's no webcam overlay, no custom backgrounds, no cursor spotlight effects — the focus is on the record-zoom-export workflow without the extras. The trade-off is intentional: if you need camera overlays and background effects, Screen Studio is the better choice. If you need auto-zoom without the full production suite, Rekort is simpler and costs less.
Camtasia (Mac and Windows, $299 one-time as of March 2026) has a feature called SmartFocus that automatically identifies important clicks and actions and adds zoom animations. Unlike Screen Studio and Rekort, SmartFocus is applied in post-production inside Camtasia's video editor — it's not a live recording feature. You record, then apply SmartFocus, then export. That works fine if you're already using Camtasia for editing, but it's a heavier workflow than auto-zoom during capture.
FocuSee (Mac and Windows) is an auto-editing screen recorder that adds zoom and other effects automatically after recording. It's newer and less established than the tools above. Worth evaluating if you also need Windows support.
Cursorful is a browser-based screen recorder that adds auto-zoom and pan during recording for browser content specifically. Free to use. The limitation is that it only records browser tabs — if you need to record desktop software or cross-app workflows, you need a native app.
No auto-zoom: QuickTime, OBS, Kap, ScreenFlow. You'd need to add zoom manually in a video editor after recording with any of these.
When you actually need auto-zoom#
Auto-zoom is most useful when:
The viewer is following along. Tutorials, product demos, onboarding docs, changelog recordings — any format where someone is watching to learn or do something specific. If they can't see what you're clicking, the recording fails at its job.
You're recording a complex UI. Data-dense apps, developer tools, admin dashboards, and anything with small controls all benefit from zoom. Simple workflows with large obvious targets need it less.
You record frequently. If you record demos or tutorials regularly, the time saved by not doing manual zoom keyframes adds up. A few recordings a week, multiplied over months, is a meaningful difference.
The recording is shared outside your team. Internal quick clips can be informal. Customer-facing demos, public tutorials, and documentation videos need to be watchable by someone who doesn't know the product.
Auto-zoom matters less when:
You're capturing a quick bug report or something informal for Slack. The viewer knows the context and can follow along even without zoom. QuickTime or Kap is fine for that.
You're streaming. Auto-zoom in a live stream creates jarring camera jumps that viewers didn't expect. That's a different problem from recorded demos.
You're recording long-form content with cuts. If you're building a 10-minute tutorial with ScreenFlow and editing it down, you already have a video editor open — adding zoom keyframes to specific moments is part of the production workflow anyway.
How to record with auto-zoom#
The workflow with any auto-zoom recorder (Screen Studio, Rekort) follows the same pattern:
- Select the recording area. Crop to the relevant app or section of your screen. Don't record your full display — a tighter crop gives zoom more to work with.
- Record normally. Click through your workflow as you would if you were demonstrating it in person. Don't slow down or pause before clicks for the zoom to work — it triggers on the click event itself.
- Preview with zoom applied. Review the recording with all zooms visible. Check that nothing important is cut off during a zoom.
- Adjust if needed. Most auto-zoom tools let you tune the zoom level (how far in) and hold time (how long before pulling back out). Increase hold time for slower, instructional content; decrease it for fast demos.
- Export. MP4 for video sharing, GIF for documentation and GitHub.
For a deeper look at the broader workflow for demos, see our guide to making product demo videos.
The gap it fills#
The default screen recording experience on Mac — QuickTime, the Screenshot toolbar — is designed for quick captures, not polished demos. It records what's on your screen exactly as-is, which is all you need for a bug report or a quick note.
For anything that needs to be clear to someone who wasn't there when you recorded it, zoom is the difference between "they can follow along" and "they have to guess."
That's the case auto-zoom makes. Not that manual keyframes are impossible — they work — but that the per-click cost of adding them manually adds up faster than most people expect. If you record demos or tutorials with any regularity, the math on auto-zoom usually works out.
For a broader comparison of Mac screen recorders including which ones offer zoom, system audio, and GIF export, see our Mac screen recorder comparison. For tips on structuring the recording itself, see screen recording for tutorials and how to make tutorial videos.
Ready to record?
Rekort auto-zooms every click so your screen recordings look professional. No video editing required.
Download for MacmacOS 14+ · From $9/month or $79 lifetime
Related Articles
How to Make a Product Demo Video (Without a Video Editor)
16 min read
SaaS Demo Video: How to Make One That Actually Converts
7 min read
How to Record Training Videos (Without a Video Editor)
7 min read
Best Video Messaging Tools (Beyond Loom) in 2026
8 min read
How to Record Software Demos That Convert
7 min read