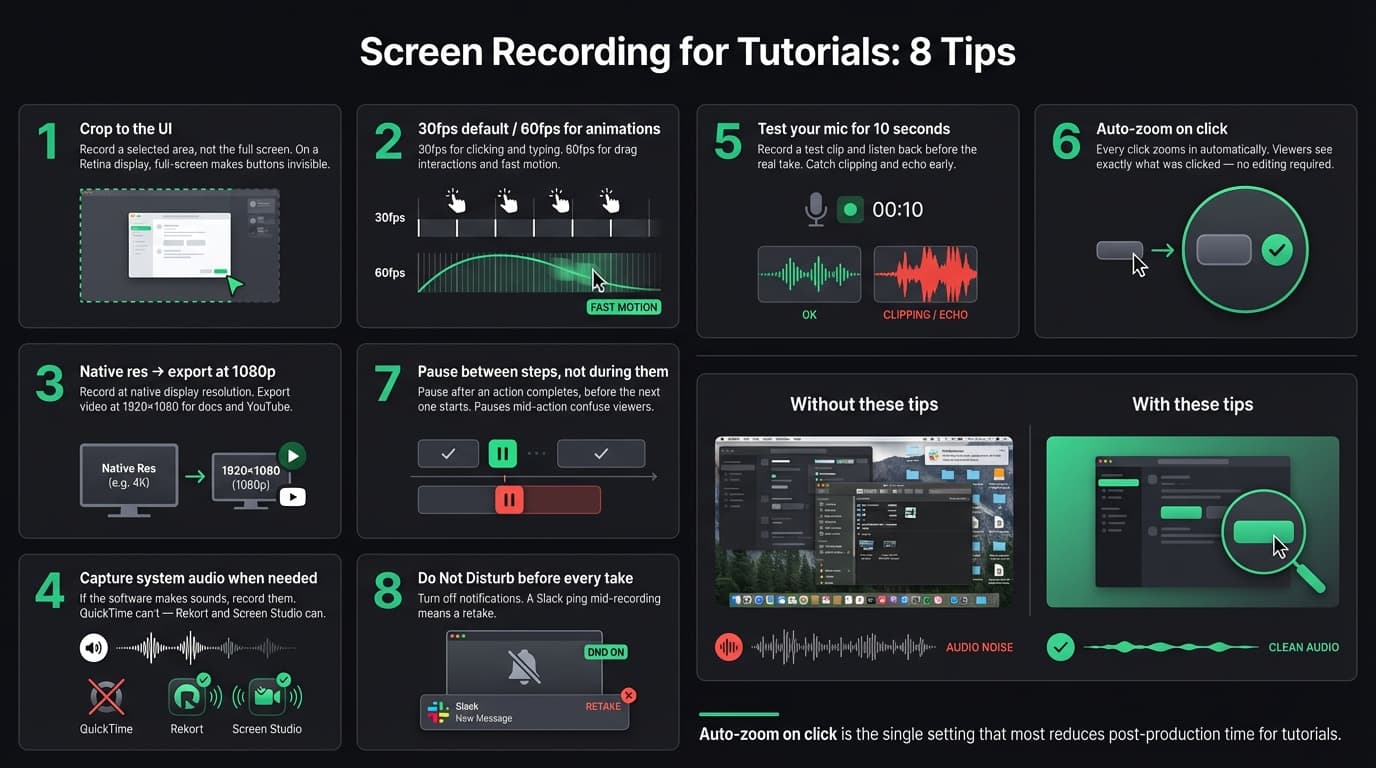
Screen Recording for Tutorials: Tips That Actually Work
Practical screen recording tips for software tutorials on Mac. Covers recording area, resolution, audio, auto-zoom, and the settings that make tutorials easy to follow.
Most screen recording tutorials fail for the same reason: the viewer can see the screen, but they can't see what's happening on it. Buttons are too small. The cursor disappears mid-click. Audio cuts in and out.
Good tutorial recordings aren't about production value — they're about giving the viewer enough visual and audio clarity to follow every step. These tips cover the recording setup choices that make the biggest difference.
If you want a full workflow from planning to publishing, see our guide to making tutorial videos. For more on recording product demos specifically, see the product demo video guide.
1. Record a cropped area, not the full screen#
This is the single most impactful change you can make. On a 2560×1600 MacBook display, a button might be 24 pixels wide. In a full-screen recording exported at 1080p, that same button renders at about 10 pixels — invisible.
Select a recording area that's tightly cropped around the relevant interface. If you're demoing a side panel, record just the panel. If you're showing a form, record the form and a bit of context around it. Cut everything else.
The right recording area also helps viewers focus. A full-screen recording includes your dock, status bar, other open windows, and browser tabs. None of that helps the viewer follow the tutorial.
2. Match your recording area to your content, not your screen#
A common mistake is setting a fixed recording resolution (say, 1920×1080) and centering it on screen, regardless of what you're demoing. That works until you're showing a narrow panel that only uses 400 pixels of horizontal space — now you have 760 pixels of empty space on each side.
Let the content determine the frame. For a sidebar-heavy app, use a taller and narrower crop. For dashboard workflows, use a wide landscape crop. The recording area doesn't need to match any standard video format during recording — you can set the export aspect ratio separately.
Most screen recorders let you drag a selection area before recording. Use it every time.
Continue reading
Product Demos Without the Editing
Record a walkthrough and Rekort handles the zoom. Export a polished demo in minutes.
3. Use 30fps by default, 60fps for fast interactions#
30 frames per second is the right default for most software tutorials. It's smooth enough for clicking, typing, and scrolling, keeps file sizes manageable, and matches the frame rate of most documentation embeds.
Use 60fps when your tutorial involves:
- Drag-and-drop interactions that need to look smooth
- Animations that play as part of the feature you're showing
- Fast navigation between screens
- Gaming or drawing apps where fluid motion matters
60fps at 1080p roughly doubles the file size and encoding time of 30fps. For a 3-minute tutorial that doesn't have fast animations, the tradeoff isn't worth it.
4. Record at native resolution, export at 1080p#
Record at your display's native resolution. On a Retina MacBook, that means recording the actual pixel density the OS uses — this gives you more headroom to crop without losing sharpness in the export.
Export at 1080p (1920×1080) for video. This is the standard for YouTube, Loom, Notion, and most documentation platforms. Going higher (1440p, 4K) increases file size without improving readability on most screens.
For GIF export, match the export resolution to the actual display area you recorded. If you recorded a 640×480 area, exporting that GIF at 640×480 is sharper than upscaling it to 1080p. See our GIF screen recorder guide for more on GIF-specific settings.
5. Capture system audio if the software makes sounds#
If you're showing a tool that plays audio — a notification, a playback control, a sound effect — capture system audio alongside your microphone. Without system audio, viewers hear you narrating something they can't hear on their own screen.
QuickTime can't capture system audio without third-party routing software like BlackHole. Most dedicated screen recorders — including Rekort, Screen Studio, and OBS Studio (macOS 13+) — handle system audio natively without extra configuration.
For narration-only tutorials where the software is silent, microphone audio is all you need.
6. Set up your microphone before you record#
Audio problems are harder to fix after recording than visual ones. A few minutes of setup avoids a full retake.
Position the mic correctly. Built-in laptop mics pick up keyboard sounds, fan noise, and room echo. A USB condenser mic (Blue Snowball, Samson Q2U, or similar, in the EUR 40–80 range) placed 15–20cm from your mouth makes an audible difference. If you don't want an external mic, a wired headset with an inline mic is a clear improvement over the built-in.
Test before you record. Open QuickTime or your recorder of choice, record 10 seconds of narration at normal speaking volume, and play it back. Listen for: clipping (distortion when you speak too loud), echo, background hum, or keyboard noise. Fix what you hear before the full take.
Eliminate background noise at the source. Turn off fans, close windows, put your phone on silent. Record in a smaller room — open spaces echo. Rooms with bookshelves, carpet, and furniture absorb sound better than empty rooms.
7. Use auto-zoom on click to replace editing#
The biggest time cost in tutorial production isn't recording — it's what happens after. If your screen recorder captures the screen flat with no zoom, every click on a small element requires a zoom keyframe in a video editor. For a 3-minute tutorial with 20 clicks, that's 30–60 minutes of post-production work per recording.
Auto-zoom on click handles this automatically. The recording zooms into each click as it happens, showing the click target clearly, then zooms back out. You review the zoom in the preview, adjust the zoom level and timing if needed, and export. No video editor required.
For tutorials specifically, this is the feature that most reduces total production time. It also improves viewer clarity — instead of showing a full-screen recording where a button click is barely visible, every action becomes legible.
Rekort and Screen Studio both offer auto-zoom on click for Mac. For a full comparison, see our screen recorder guide.
8. Pause between steps, not during them#
Experienced tutorial recorders pause deliberately between steps — after completing an action, before starting the next one. This gives viewers a moment to see the result before the next action begins.
What they don't do is pause mid-action: stopping halfway through a drag, freezing while filling out a form, or trailing off mid-sentence. Pauses mid-action are confusing. Pauses between actions are helpful.
The pause also makes editing easier. A clean pause between steps is easy to trim if needed. A pause in the middle of an interaction is hard to cut around.
If you make a mistake partway through a recording, pause, say "starting over from [step name]," then redo that section. You can trim the mistake and redo in post, or just retake the section. You don't need to restart the entire recording.
What to check before every recording#
Run through this before hitting record:
- Recording area set to the relevant UI, not the full screen
- Unrelated apps and browser tabs closed
- Desktop icons hidden or in a folder
- Notification center set to Do Not Disturb (Control Center → Focus → Do Not Disturb)
- Microphone test done — no clipping, no echo
- Steps planned and walked through once
The cleanup takes two minutes. It prevents retakes that take ten.
Screen recording quality for tutorials comes down to three things: the viewer can see what you're clicking, the viewer can hear what you're saying, and the viewer can follow the pace. Cropping the recording area, capturing system audio when needed, and using auto-zoom on click covers all three without a video editing session after every take.
For the full tutorial production workflow, see how to make tutorial videos. For more on auto-zoom specifically, see screen recording with zoom effect.
Ready to record?
Rekort auto-zooms every click so your screen recordings look professional. No video editing required.
Download for MacmacOS 14+ · From $9/month or $79 lifetime
Related Articles
How to Make a Product Demo Video (Without a Video Editor)
16 min read
SaaS Demo Video: How to Make One That Actually Converts
7 min read
How to Record Training Videos (Without a Video Editor)
7 min read
Best Video Messaging Tools (Beyond Loom) in 2026
8 min read
How to Record Software Demos That Convert
7 min read