Screen Recording for Instagram: Reels & Stories from Your Mac
How to record your Mac screen for Instagram Reels and Stories. Covers aspect ratio, selection tricks, export settings, and auto-zoom for product demos.
Mac screens are horizontal. Instagram wants vertical. That mismatch is the root of every screen recording headache when you're trying to create Reels or Stories from your Mac.
The good news: you don't need a phone or a video editor to fix it. You just need to know which approach fits what you're trying to show.
This guide covers the practical methods — from the simplest (just let Instagram letterbox it) to the cleanest (record a vertical selection from the start).
What Instagram actually requires#
Before picking a method, know what you're targeting:
| Format | Dimensions | Aspect ratio | Max length | Frame rate |
|---|---|---|---|---|
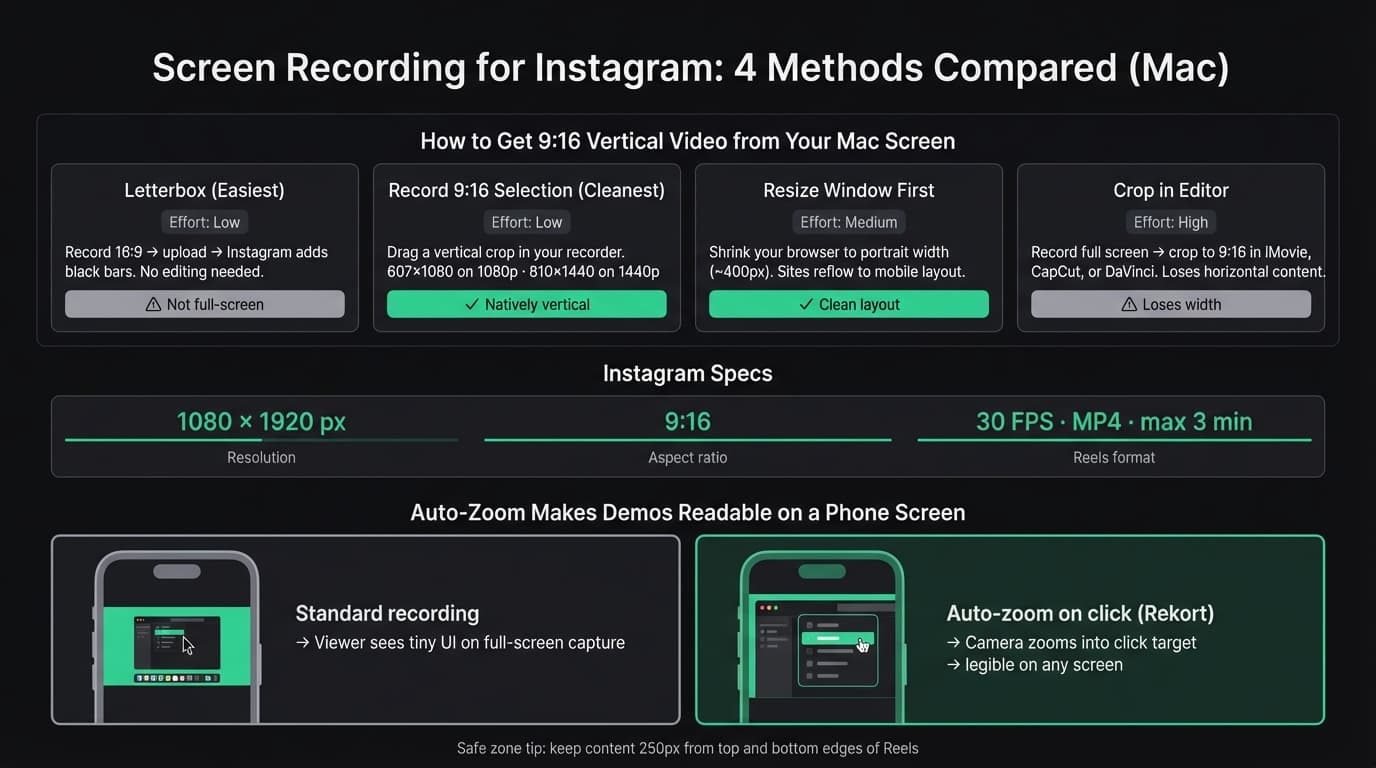
| Reels | 1080×1920px | 9:16 | 3 minutes | 30 FPS |
| Stories | 1080×1920px | 9:16 | 60 seconds | 30 FPS |
| Feed video | 1080×1350px | 4:5 (portrait) or 1:1 | 60 minutes | 30 FPS |
Both Reels and Stories use the same 9:16 vertical format. Keep important content away from the top and bottom 250px — that's where Instagram overlays your username, audio label, and action buttons.
Instagram accepts MP4 and MOV. Upload at the highest quality you can — it recompresses everything, so starting with 1080p gives you better results after compression than starting with 720p.
Method 1: Record full screen, let Instagram letterbox#
The simplest option. Record your screen normally using QuickTime or the macOS Screenshot toolbar, then upload the 16:9 file directly to Instagram.
Instagram automatically adds black bars on the left and right side (pillarboxing). Your content plays fine. It just doesn't fill the full screen.
When to use this: Quick captures — a bug report, a software notification, a screen moment you want to share without overthinking the format. The black bars are a non-issue for content where the subject is the point, not the aesthetic.
When to avoid it: Product demos or tutorials where you want full-screen impact. Black bars shrink your content and reduce legibility on a phone screen.
Continue reading
Screen Recording Made Simple
Rekort captures your screen with system audio and auto-zooms every click automatically.
Method 2: Record a 9:16 selection (cleanest approach)#
Every Mac screen recorder lets you drag a selection area. If you drag a region with a 9:16 aspect ratio, the resulting recording is natively vertical — no cropping or letterboxing needed.
The math:
| Display | Selection to drag |
|---|---|
| 1080p (1920×1080) | 607×1080px |
| 1440p (2560×1440) | 810×1440px |
| MacBook 14" (3024×1964) | 1104×1964px |
In practice, you don't need exact pixel counts. Most recorders let you resize the selection handles. Drag out a tall, narrow column — roughly three times taller than it is wide — and you're close enough. Instagram will crop to 9:16 on upload if you're slightly off.
What fits in a 9:16 column:
- A browser window at portrait width (~400px)
- A mobile simulator (Xcode Simulator, iOS browser preview)
- A single app pane or sidebar
- A terminal window showing output
- A narrow chat or feed interface
If your content is naturally narrow — a Slack thread, a code snippet, a mobile preview — this works perfectly. If your content spans the full width of your screen, you'll need to rethink the layout before recording.
To record a selection with the built-in Mac tools: press Cmd+Shift+5, choose "Record Selected Portion," drag your 9:16 region, and press Record. See the full Mac screen capture guide for keyboard shortcuts and settings.
Method 3: Resize your window before recording#
Instead of cropping after the fact, resize the app window you're recording into a portrait-friendly layout before you start.
For browsers: Drag Safari or Chrome to roughly 400-600px wide. Most websites reflow into a responsive mobile layout at that width, which looks natural in a 9:16 frame. This is useful for recording web app walkthroughs.
For Xcode Simulator: Set the simulator to an iPhone target (any iPhone model). The simulator renders a full portrait phone UI. Record the simulator window with a tightly fitted selection.
For terminal: A narrow terminal window with large text reads well in vertical format. Increase font size to 16-18pt before recording — small text on a phone screen is unreadable.
Method 4: Record normally, crop afterward#
If you record a full 16:9 screen, you can crop to 9:16 in a video editor. This lets you choose which part of the screen to keep.
Most editing apps handle this: iMovie, CapCut (free, mobile or desktop), Final Cut Pro, DaVinci Resolve. In each, set the project aspect ratio to 9:16 and position your clip so the important content is centered in the frame.
The trade-off: You lose more than half the horizontal information (a 9:16 crop of a 16:9 video keeps about 56% of the width). Content that spans the full screen width gets cut off. Works best when your subject — a cursor, a button, a specific panel — sits in the center of the frame.
Recording product demos for Instagram with auto-zoom#
If you're recording a software product demo or tutorial for Instagram, the biggest problem isn't aspect ratio — it's legibility. Viewers watch Reels on a phone screen. Small UI elements, cursor clicks, and text that look fine on a 27-inch display become unreadable at 390px wide.
Auto-zoom on click fixes this directly. Instead of viewers trying to find where you clicked, the recording zooms into the click target automatically. On a phone-sized screen, the difference between a recording with auto-zoom and one without is the difference between a watchable tutorial and a confusing one.
Rekort records your screen and zooms into every click automatically. You select an area, record, and export — the zoom happens in the preview without any editing. For a portrait crop, record a narrow 9:16 selection as described in Method 2.
Screen Studio also offers auto-zoom at $229 one-time. If you're producing polished Instagram content daily, it's worth considering. For occasional recordings, Rekort starts at EUR 5/month or EUR 40 lifetime.
Neither tool exports at 1080×1920 automatically — you get a 16:9 file by default, so use Method 2 (record a vertical selection) to avoid a crop step.
Export settings for Instagram#
Whatever tool you use, these export settings give Instagram the best source file to work with:
- Format: MP4 (H.264)
- Resolution: 1080×1920px if you recorded 9:16; otherwise export at your native recording resolution and let Instagram handle the fit
- Frame rate: 30 FPS
- Bitrate: 8-10 Mbps for 1080p content — Instagram recompresses anyway, but higher source quality means better output
- Audio: AAC, 44.1 kHz, stereo
For recording with audio on Mac — including system audio, not just mic — see the full guide. QuickTime doesn't capture system audio; Rekort and Screen Studio both do natively.
Common problems#
My recording looks blurry on Instagram. Instagram recompresses uploads. Start from the highest resolution you can — 1080p minimum. If you're recording a MacBook with a Retina display, your screen might be 2x or 3x density; record at native resolution and let the export downsample cleanly.
Black bars on my Reel. You uploaded a 16:9 video. Either crop it to 9:16 in a video editor, or re-record using Method 2 (select a 9:16 region).
My recording is too long for a Story. Instagram Stories max out at 60 seconds per segment; longer videos auto-split. For Reels, the limit is 3 minutes. If your screen recording is longer, trim it before uploading or let Instagram split it.
The UI text is unreadable. Record at a higher zoom level (increase the app's UI scale), use a larger font size, or use auto-zoom so the recording zooms into the area you're clicking. For Mac display scaling, see how to get high-quality screen recordings on Mac.
The format problem is real but solvable. For quick shares, the letterbox approach is fine. For tutorials and demos, recording a 9:16 selection from the start is the cleanest path — no cropping, no quality loss, and the output works in Reels and Stories without any post-processing.
If click legibility matters, add auto-zoom on top of that and your screen recording will be readable at any screen size.
Ready to record?
Rekort auto-zooms every click so your screen recordings look professional. No video editing required.
Download for MacmacOS 14+ · From $9/month or $79 lifetime