How to Convert Video to GIF on Mac (4 Methods Compared)
Four ways to turn a video into a GIF on Mac: FFmpeg, online tools, Kap, and Rekort. Covers quality settings, file size targets, and when to use each method.
Converting a video to GIF on Mac means taking an existing MP4 or MOV file and exporting it as an animated GIF that plays inline in GitHub READMEs, Notion pages, Slack messages, and anywhere else that embeds images.
There are four practical ways to do this on Mac. Each involves different trade-offs on file size, quality, automation, and the time it takes to set up.
Methods at a glance#
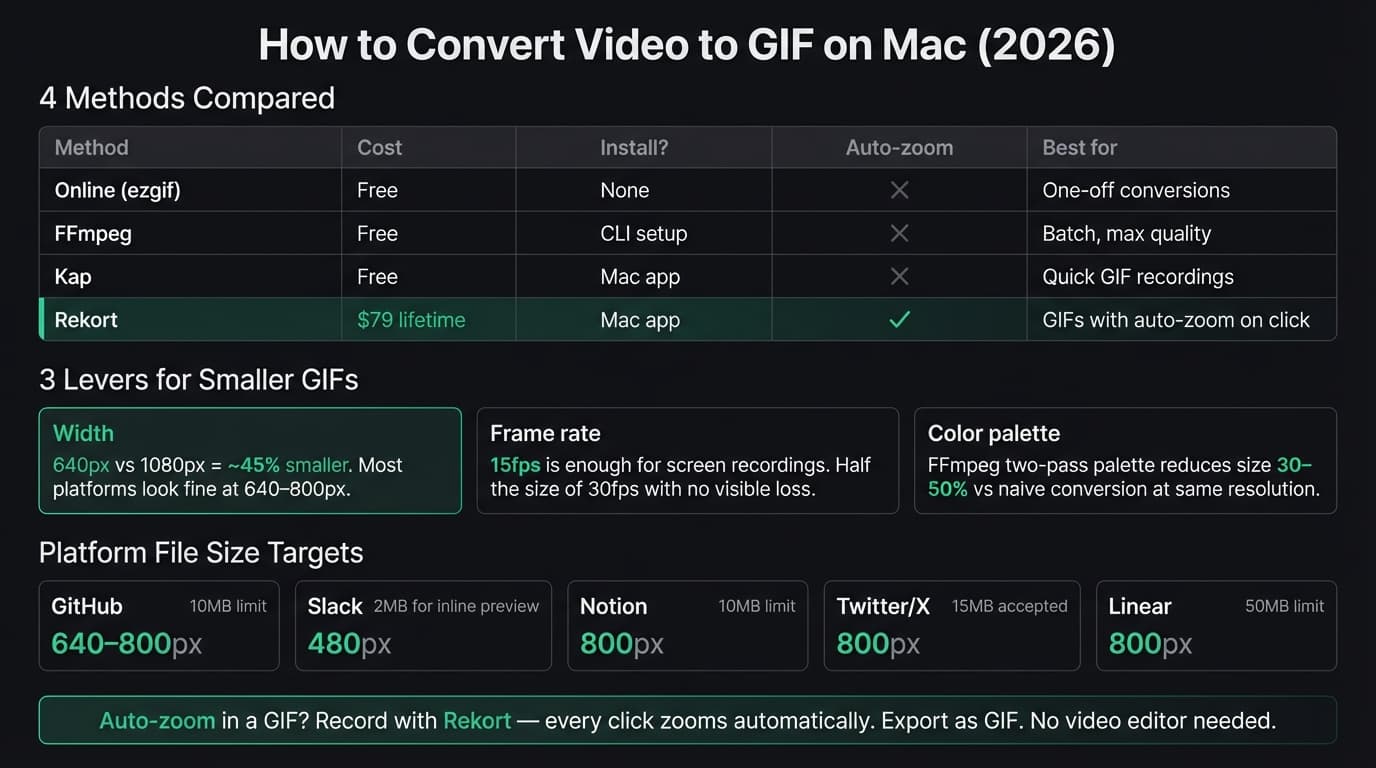
| Method | Cost | Install | Best for |
|---|---|---|---|
| Online converter (ezgif) | Free | None | One-off conversions |
| FFmpeg | Free | CLI setup | Batch processing, max control |
| Kap | Free | Mac app | Recording short GIFs directly |
| Rekort | $79 lifetime or $9/mo | Mac app | GIFs with auto-zoom on click |
The right choice depends on whether you're converting an existing video file or making a new screen recording intended for GIF output from the start.
Method 1: Online converter (ezgif)#
Best for: One-off conversions. No software to install, works in any browser.
ezgif.com is the most widely used online GIF converter. Upload an MP4 or MOV (up to 100MB), set start and end times, adjust frame rate and width, and download the GIF.
Steps:
- Go to ezgif.com/video-to-gif
- Upload your video file or paste a URL
- Set the time range (start/end seconds)
- Set frame rate — 10–15fps is enough for most recordings
- Set width — 640–800px covers most use cases
- Click Convert, then download the GIF
What works well:
- No signup, no install, completely free
- Handles most common formats: MP4, MOV, WebM, AVI
- Frame rate and size controls are straightforward
- Trim to any time range without editing software
Where it falls short:
- 100MB file size limit — long or high-resolution screen recordings hit this quickly
- Uploads take time, especially on slower connections
- Privacy: your video is sent to their servers
- No automation — you can't batch-convert multiple files
For occasional conversions of short clips, ezgif is the fastest path. For anything larger or more frequent, use one of the options below.
Continue reading
GIFs That Actually Look Good
Record with auto-zoom, export as GIF. Perfect for docs, READMEs, and pull requests.
Method 2: FFmpeg#
Best for: Batch conversion, scripting, maximum quality and size control.
FFmpeg is a command-line tool that handles virtually any video conversion task. Installing it takes a few minutes; after that, you can convert video to GIF with a single command.
Install FFmpeg:
brew install ffmpeg
If you don't have Homebrew, install it first at brew.sh.
Basic conversion:
ffmpeg -i input.mp4 -vf "fps=15,scale=640:-1" output.gif
This converts input.mp4 to a GIF at 15fps, scaled to 640px wide (height auto-calculated).
Higher quality with palette optimization:
# Step 1: Generate palette
ffmpeg -i input.mp4 -vf "fps=15,scale=640:-1,palettegen" palette.png

# Step 2: Apply palette
ffmpeg -i input.mp4 -i palette.png -filter_complex "fps=15,scale=640:-1[x];[x][1:v]paletteuse" output.gif
The two-pass palette method produces noticeably better colors and smaller file sizes than the single-pass approach. For any GIF that will be shared publicly, the extra step is worth it.
Convert a specific time range:
ffmpeg -ss 00:00:05 -t 10 -i input.mp4 -vf "fps=15,scale=640:-1,palettegen" palette.png
ffmpeg -ss 00:00:05 -t 10 -i input.mp4 -i palette.png -filter_complex "fps=15,scale=640:-1[x];[x][1:v]paletteuse" output.gif
-ss 00:00:05 starts at 5 seconds, -t 10 captures 10 seconds.
What works well:
- No file size limits
- Full control over frame rate, resolution, quality, color depth
- Scriptable — convert dozens of files in a loop
- Free, runs entirely locally, no privacy concerns
- Integrates into any automation workflow
Where it falls short:
- Requires Terminal — not suitable if you're uncomfortable with the command line
- Output quality depends on getting the flags right; there's a learning curve
- No visual preview while converting
FFmpeg is the right choice when you're doing this regularly, need large files, or want to automate GIF generation as part of a pipeline. For one-off conversions, the online tool is faster to reach.
Method 3: Kap#
Best for: Quick screen recordings exported directly as GIF. Best when you're starting from a new recording rather than converting an existing file.
Kap is a free, open-source screen recorder for Mac that records directly to GIF, MP4, WebM, or APNG. It lives in the menu bar and starts recording in one click.
Kap doesn't convert existing video files — it records your screen and exports the recording as GIF. If you have an MP4 already, use an online converter or FFmpeg instead.
Workflow:
- Click the Kap icon in the menu bar
- Select a recording area
- Click record
- When done, click stop
- In the export sheet, choose GIF and set quality/size
- Export
What works well:
- Free and open-source
- Dead simple — record and export in two clicks
- Solid GIF quality with frame rate and loop controls
- Records a selected area, window, or full screen
Where it falls short:
- No auto-zoom on click. Viewers see your recording exactly as it happened, at whatever resolution you recorded.
- No system audio recording — Kap captures video only
- For product demos and tutorials, the lack of click zoom makes small UI elements hard to see
- Less actively maintained than a few years ago (check the GitHub repo for current status)
Kap is the fastest tool if you need a simple GIF recording with no extras. See our GIF screen recorder for Mac guide for a full comparison of GIF recording tools.
Method 4: Rekort#
Best for: GIFs where clicks automatically zoom in — demos, tutorials, product walkthroughs.
Rekort takes a different approach. Instead of converting an existing video file, you record your screen with Rekort, every click in the recording automatically zooms in, and then you export the result as a GIF. The exported GIF includes the zoom animation on each click.
This is distinct from every other method on this page. With FFmpeg or ezgif, you convert whatever is in the video. With Rekort, the zoom is built into the recording before conversion ever happens.
Workflow:
- Open Rekort and select a recording area
- Record your screen normally — click what you'd normally click
- Preview the recording with zoom applied. Adjust zoom level and duration if needed.
- Export as GIF
The result is a GIF that zooms in on every click, with no post-processing, no video editor, no manual keyframing.
What works well:
- Auto-zoom on click — the GIF shows exactly what's being clicked, even on Retina displays
- Exports as GIF or MP4 from the same recording
- System audio and microphone capture included
- Native Mac app (Swift, no Electron)
- Adjustable zoom level, timing, and easing in the preview before export
Where it falls short:
- Requires macOS 14 or later
- $79 one-time or $9/month — not free
- Doesn't convert existing video files. If you have footage from another recorder, use FFmpeg or an online tool.
- Webcam overlay is available with position and size controls; unlike Screen Studio, Rekort does not remove the camera background.
Rekort makes sense when the GIF you're creating is a product demo or tutorial where viewers need to see what you're clicking. For converting an existing file, use one of the other methods.
File size targets by platform#
GIF file size matters because many platforms have limits or degrade performance above certain sizes.
| Platform | File size limit | Recommended width |
|---|---|---|
| GitHub (README) | 10MB | 640–800px |
| GitHub (issue/PR comment) | 10MB | 640px |
| Slack | 2MB for auto-preview | 480px |
| Notion | 10MB | 800px |
| Twitter/X | 15MB | 800px |
| Linear (issue) | 50MB | 800px |
Slack is the most restrictive: files above 2MB don't play inline, they show as a download link. For Slack GIFs, keep width at 480px and frame rate at 10–12fps.
Three levers for smaller GIFs#
Width. This has the biggest impact. A GIF at 640px wide is roughly 40–50% smaller than the same GIF at 1080px. For most platforms and use cases, 640–800px is plenty.
Frame rate. 15fps looks fine for screen recordings. 24fps is slightly smoother but not noticeably so for typical UI interactions. 10fps works for slow-moving demos. Halving the frame rate roughly halves the file size.
Color palette. GIF format supports a maximum of 256 colors per frame. FFmpeg's two-pass palette optimization picks the best 256 colors for your specific video rather than using a generic palette, which reduces size 30–50% at the same visual quality. If you're using FFmpeg, always use the two-pass method.
GIF vs MP4: when to use each#
GIF is convenient because it plays automatically everywhere images are accepted. But it's an old format with a 256-color limit and poor compression. For the same content:
- A 10-second GIF at 640px might be 3–8MB
- The same clip as MP4 at the same resolution might be 300–800KB
GitHub renders MP4 files inline in Markdown with <video> tags or standard image syntax in newer rendering. If you're posting to GitHub and file size matters, MP4 is often the better choice.
For Slack, Notion, and most documentation tools, GIF remains the universal format because it works without the viewer needing to click play. For longer or higher-resolution recordings, MP4 is worth considering.
See our screen recording to GIF guide for a deeper look at the format trade-offs, and GIF vs video for product demos if you're deciding which format to use for customer-facing content.
Which method to use#
You have an existing video file and just need a GIF. Use ezgif for one-off conversions. Use FFmpeg if you're doing this regularly or the file is over 100MB.
You're recording something new and want a GIF. Use Kap (free, simple) or Rekort (if you need click zoom).
The GIF is for a product demo, tutorial, or anything where small UI elements need to be visible. Use Rekort. Auto-zoom on click solves the problem of unreadable text and tiny click targets at full-screen resolution.
You need to automate GIF generation as part of a build or deployment process. FFmpeg with a palette-optimized command in a shell script. Batch-convert recordings, resize to target dimensions, and output to a known directory.
For more on recording GIFs on Mac, see our GIF screen recorder for Mac comparison page.
Ready to record?
Rekort auto-zooms every click so your screen recordings look professional. No video editing required.
Download for MacmacOS 14+ · $9/month, $49/year, or $79 lifetime