How to Make High Quality GIFs (No Artifacts)
GIF artifacts come from the format's 256-color limit and poor settings. Here's how to fix banding, blur, and dithering noise with FFmpeg, Gifski, and Mac-native tools.
A high quality GIF is one where you can actually read the text, the colors look correct, and there's no visible banding or dithering noise. Most GIFs don't meet that bar — not because GIF is inherently bad, but because the default export settings in most tools are optimized for speed, not quality.
The root cause of GIF artifacts is the format's color limit: GIF can store at most 256 colors per frame. Your source video has millions. The conversion process has to pick the best 256, and how it does that determines whether the result looks sharp or looks like a degraded screenshot from 2003.
This guide covers what causes each type of artifact and which settings and tools fix them.
What causes GIF quality problems#
Understanding the cause makes the fix obvious.
Color banding. GIF's 256-color limit means smooth gradients (like a light blue sky or a gray UI background transitioning in shadow) get reduced to visible steps. Instead of a smooth fade, you see distinct color bands.
Dithering noise. Dithering is the technique used to simulate colors not in the palette by mixing neighboring pixels. Floyd-Steinberg dithering — the most common algorithm — diffuses the quantization error across adjacent pixels. Done well, it hides banding. Done poorly, it introduces a visible grain or static-like pattern.
Color washout. If the tool builds a single global palette for the entire GIF rather than per-frame palettes, the palette has to cover all colors across all frames. Frames with unique colors (e.g., a bright red button that only appears once) get poorly represented in a global palette, washing out to the nearest color.
Blur or softness. Lowering resolution (width) to hit a file size target introduces blur. This is usually the right trade-off — a 640px GIF at high quality beats a 1080px GIF with visible banding — but aggressive downscaling on dense UI makes text unreadable.
Settings that control quality#
Before choosing a tool, know which settings to tune:
| Setting | Recommended | Why |
|---|---|---|
| Width | 640–800px | Biggest impact on file size; sufficient for most uses |
| Frame rate | 15fps | Sweet spot between smoothness and size |
| Palette | Per-frame, optimized | Prevents global palette color washout |
| Dithering | Floyd-Steinberg or better | Masks banding at 256-color limit |
| Color count | 256 (max) | No reason to use less unless targeting tiny file size |
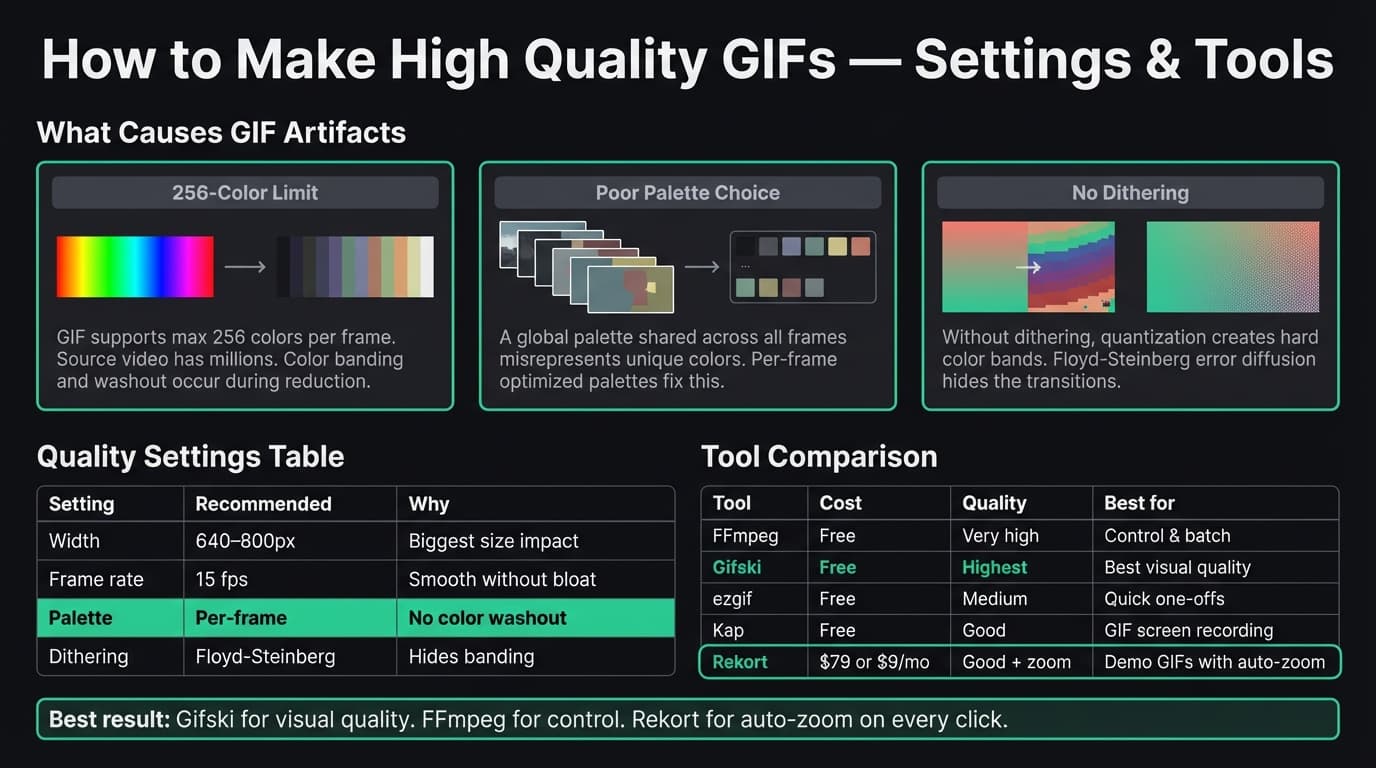
The palette setting matters most. A per-frame optimized palette means each frame picks the best 256 colors for its specific content, rather than sharing a single palette across the whole animation. This is the single biggest quality improvement you can make.
Continue reading
GIFs That Actually Look Good
Record with auto-zoom, export as GIF. Perfect for docs, READMEs, and pull requests.
Method 1: FFmpeg with two-pass palette optimization#
Best for: Maximum control, scripting, batch conversion. Produces very high quality with small file sizes.
FFmpeg's default GIF output is mediocre — it uses a generic color palette that doesn't match your video. The two-pass approach builds a custom palette first, then uses it to encode the GIF. The result is noticeably better colors and typically 30–50% smaller files at the same visual quality.
Install FFmpeg:
brew install ffmpeg
Two-pass conversion:
# Step 1: Generate a custom palette from your video
ffmpeg -i input.mp4 -vf "fps=15,scale=640:-1,palettegen=stats_mode=full" palette.png

# Step 2: Use the palette to create the GIF
ffmpeg -i input.mp4 -i palette.png -filter_complex "fps=15,scale=640:-1[x];[x][1:v]paletteuse=dither=floyd_steinberg" output.gif
Key flags:
stats_mode=full— analyzes all frames to build a better global palette (slower but higher quality)dither=floyd_steinberg— uses error diffusion dithering for smoother color transitionsscale=640:-1— scales to 640px wide, auto-calculated height
For a specific time range:
ffmpeg -ss 00:00:05 -t 10 -i input.mp4 -vf "fps=15,scale=640:-1,palettegen=stats_mode=full" palette.png
ffmpeg -ss 00:00:05 -t 10 -i input.mp4 -i palette.png -filter_complex "fps=15,scale=640:-1[x];[x][1:v]paletteuse=dither=floyd_steinberg" output.gif
-ss 00:00:05 starts at 5 seconds; -t 10 captures 10 seconds.
What works well:
- Produces some of the best GIF quality available from a command-line tool
- Per-frame palette mode available (use
stats_mode=difffor animations with distinct scenes) - Full control over every quality parameter
- Free, runs locally, no file size limits
Where it falls short:
- Requires Terminal and familiarity with FFmpeg flags
- No visual preview — you run it, check the output, adjust
- Two-pass adds extra steps vs single-command tools
FFmpeg is the right tool if you're converting videos you already have, want to batch-process multiple files, or need to automate GIF generation as part of a pipeline.
Method 2: Gifski#
Best for: Highest visual quality. The best GIF encoder available for Mac.
Gifski is a Mac app (and command-line tool) built on libimagequant, the same library used by pngquant. It achieves notably better visual quality than most GIF converters by using temporal dithering — different palette choices per frame that work together across the animation, rather than treating each frame in isolation.
The result looks closer to the source video than any other tool at the same file size. The trade-off: Gifski prioritizes quality, so files can be larger than FFmpeg output at comparable settings. You can dial down quality/fps to reduce size.
Install via Homebrew:
brew install gifski
Or download the Mac App Store version (drag-and-drop interface, no Terminal).
CLI usage:
gifski --fps 15 --width 640 -o output.gif input.mp4
Adjust quality vs size:
gifski --fps 15 --width 640 --quality 85 -o output.gif input.mp4
--quality goes from 1 (smallest) to 100 (best). 80–90 is a good starting point.
What works well:
- Best visual quality of any tool covered here — noticeably better on gradients and smooth color transitions
- Temporal dithering reduces frame-to-frame noise
- Handles transparency correctly
- Drag-and-drop Mac app version requires no Terminal
- Free
Where it falls short:
- Slower than FFmpeg for long videos
- Doesn't convert directly from screen recording — input must be a video file
- Mac App Store version has fewer quality controls than the CLI
Use Gifski when quality is the priority and you're willing to accept somewhat larger files. If you need smaller files with fine-grained control, FFmpeg with palette optimization is better.
Method 3: Online converter (ezgif)#
Best for: One-off conversions without installing anything.
ezgif.com is the most widely used web-based GIF converter. Upload an MP4 or MOV (up to 100MB), set frame rate and width, and download the GIF. For occasional use with small files, it's the fastest path to a result.
For quality: ezgif uses basic GIF encoding, not palette optimization. Results are acceptable at 640px/15fps but noticeably worse than FFmpeg or Gifski at the same settings. Banding is visible on gradients.
To get better quality from ezgif:
- Set width to 640px (not full resolution)
- Set frame rate to 15fps
- Use the "Optimize" feature after generating the GIF — it applies lossy compression that often reduces file size without visible quality loss
For anything where quality matters or files are over 100MB, use FFmpeg or Gifski instead.
Method 4: Kap#
Best for: Simple GIF screen recordings. Record directly to GIF format.
Kap is a free, open-source Mac screen recorder that exports directly to GIF, MP4, WebM, or APNG. It's the simplest tool for making a screen recording GIF — record, stop, export, done.
Quality is good for a screen recorder. Kap uses solid color quantization internally, and for typical screen content (UI, text, web pages), the results are clean. Banding shows on photos or videos with smooth gradients, but for app demos and documentation, it's fine.
What works well:
- Free and open-source
- Record directly to GIF — no separate conversion step
- Solid quality for screen content
- Frame rate and loop controls in the export sheet
Where it falls short:
- No auto-zoom on click. Text and UI elements at full screen resolution can be small and hard to read
- No system audio capture
- Not suitable for converting existing video files — records new sessions only
See our GIF screen recorder for Mac comparison for a full breakdown of GIF recording tools.
Method 5: Rekort#
Best for: GIFs where clicks automatically zoom in — demos, tutorials, product walkthroughs.
Rekort is a Mac screen recorder where every click in the recording automatically zooms in. When you export as GIF, the zoom is already baked in — the exported file shows each click with a smooth zoom animation.
This is a different problem than GIF quality settings. It doesn't improve the 256-color limit or dithering. But for product demos and UI walkthroughs, the biggest readability problem isn't color banding — it's that everything looks tiny at full-screen resolution. Auto-zoom solves that, no video editor required.
Workflow:
- Open Rekort and select a recording area
- Record normally — click through the UI as you normally would
- Preview with zoom applied, adjust zoom level and timing
- Export as GIF
What works well:
- Every click zooms in automatically — no manual keyframing
- Export as GIF or MP4 from the same recording
- Native Mac app (Swift, no Electron)
- Adjustable zoom level, timing, and easing curves before export
Where it falls short:
- Requires macOS 14 or later
- $79 one-time, $49/year, or $9/month — not free
- Doesn't convert existing video files
- No webcam background removal or text annotation
Rekort makes sense when the GIF you're creating is a demo or tutorial. For converting existing footage to high-quality GIFs, use FFmpeg or Gifski.
Tool comparison#
| Tool | Cost | Quality | Source | Best for |
|---|---|---|---|---|
| FFmpeg | Free | Very high | Existing video | Control, batch, automation |
| Gifski | Free | Highest | Existing video | Best visual quality |
| ezgif | Free | Medium | Existing video | Quick one-offs |
| Kap | Free | Good | Screen recording | Simple GIF recordings |
| Rekort | $79 or $9/mo | Good + zoom | Screen recording | Demo GIFs with auto-zoom |
Troubleshooting common artifacts#
Banding on gradients or backgrounds. Switch to FFmpeg with dither=floyd_steinberg, or use Gifski. Both apply error diffusion dithering that visually smooths out the color step transitions caused by 256-color quantization.
Grainy or noisy appearance. This is usually over-aggressive dithering. Try reducing dithering strength. In FFmpeg, try dither=bayer (ordered dithering) instead of Floyd-Steinberg — it produces a more regular pattern that reads as texture rather than noise.
Washed-out colors. You're likely using a global palette. Use FFmpeg's stats_mode=full or stats_mode=diff to build per-frame-aware palettes. Gifski handles this automatically.
Text is unreadable. The width is too low for the content density, or the source recording was at full screen on a large display and was downscaled too aggressively. Record at a smaller region, or export at 800px instead of 640px.
File is too large. Reduce width first (biggest impact), then frame rate. If using FFmpeg, check that you're using the palette optimization step — basic conversion produces larger files.
File size targets#
| Platform | Recommended limit | Recommended width |
|---|---|---|
| GitHub (README) | Under 5MB | 640–800px |
| Slack (auto-preview) | Under 2MB | 480px |
| Notion | Under 10MB | 800px |
| Twitter/X | Under 15MB | 800px |
| Linear (issue) | Under 50MB | 800px |
Slack is the strictest: GIFs above 2MB don't play inline — they show as a download link. If your GIF is for Slack, target 480px width and 10–12fps.
GIF quality vs file size: the real trade-off#
The formula is: better quality = larger files. The tools above don't break that rule — they give you better quality at the same file size, or the same quality at smaller file size. But you can't get the visual richness of a 10MB GIF in a 1MB file.
MP4 is worth considering when file size matters more than format compatibility. A 10-second GIF at 640px might be 3–8MB. The same clip as MP4 might be 300–800KB — 10-30x smaller with better visual quality. GitHub renders MP4 files inline in Markdown. If you're posting to GitHub and the recording is longer than a few seconds, MP4 often produces a better result.
For Slack, Notion, and most documentation tools where you can't use <video> tags, GIF remains the practical choice.
See our screen recording to GIF guide for more on the conversion workflow, and video to GIF on Mac for detailed FFmpeg commands.
Ready to record?
Rekort auto-zooms every click so your screen recordings look professional. No video editing required.
Download for MacmacOS 14+ · $9/month, $49/year, or $79 lifetime