How to Record a GIF on Mac (2026)
Four ways to record a GIF on Mac: Kap, GIPHY Capture, Rekort, and macOS screen recording + convert. Honest comparison with file size and workflow notes.
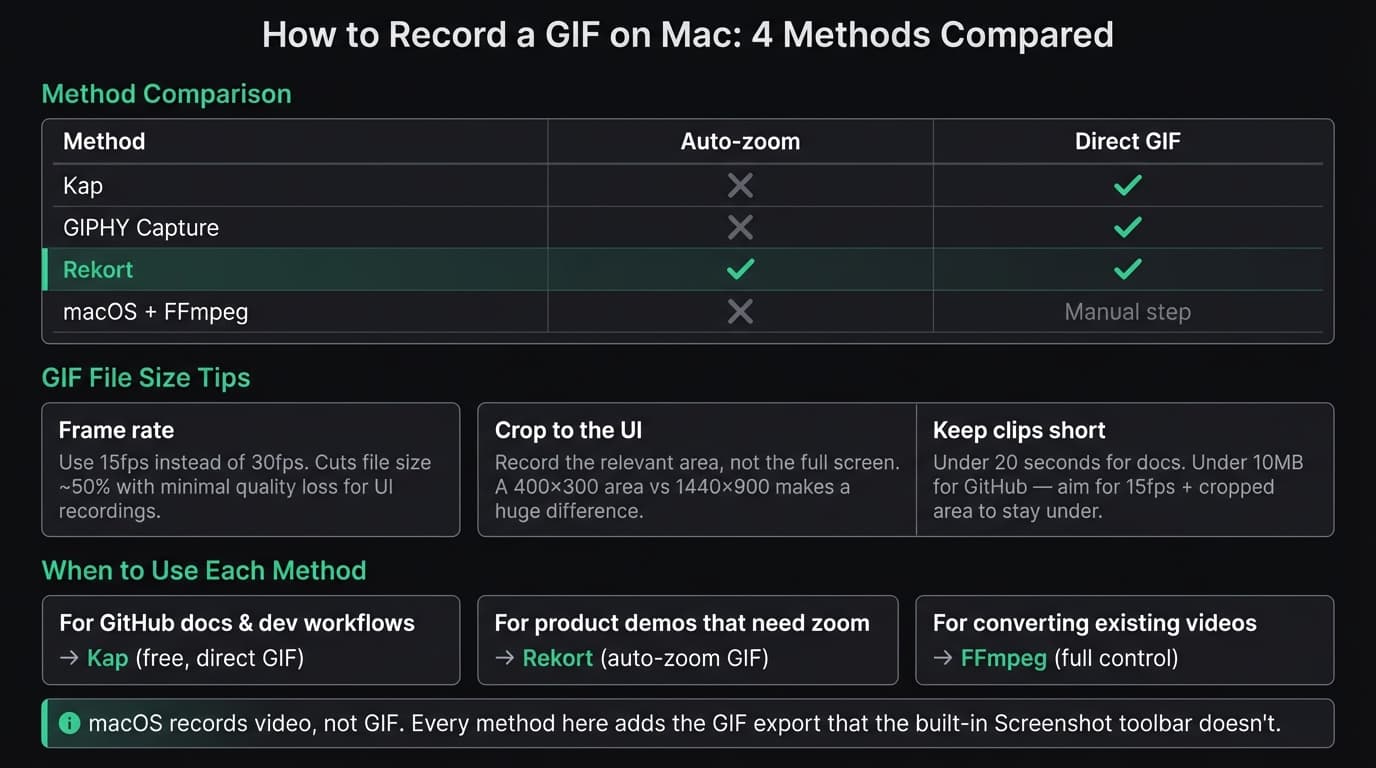
macOS doesn't include a GIF recorder. The Screenshot toolbar (Cmd+Shift+5) captures your screen as a .mov file, not a GIF. To get a GIF, you either use a dedicated GIF recorder or record video and convert it.
This guide covers four methods: Kap (free, open-source), GIPHY Capture (free, simple), Rekort (auto-zoom + GIF export), and the macOS video capture + conversion route. Each one makes sense for different situations.
At a glance#
| Method | Cost | Auto-zoom | Direct GIF export | Best for |
|---|---|---|---|---|
| Kap | Free | No | Yes | Quick GIFs, dev docs |
| GIPHY Capture | Free | No | Yes | Simple casual GIFs |
| Rekort | $79 lifetime | Yes | Yes | Demo GIFs with zoom |
| macOS + convert | Free | No | With extra step | One-off conversions |
Method 1: Kap (free, open-source)#
Kap is a menu bar screen recorder that exports directly to GIF, MP4, WebM, and APNG. It's the most popular free GIF recorder for Mac, and the one most developers reach for first.
How to record a GIF with Kap:
- Click the Kap icon in your menu bar (or launch it from Applications)
- Draw a selection rectangle over the area you want to record
- Click the record button
- Click the stop button when you're done
- In the preview window, set the export format to GIF
- Adjust fps (15 is a good default for GIFs), then click Export
Kap lets you trim the start and end of a clip before exporting. You can also enable "Highlight cursor clicks" to show a subtle ring around each click — useful for documentation.
What Kap doesn't do:
- No auto-zoom on click. Kap records whatever is on screen. If you're clicking small buttons on a high-resolution display, viewers will need to squint.
- No system audio capture.
- No zoom or editing beyond basic trim.
File sizes: A 10-second Kap recording at 15fps and a 400×300px area will typically produce a GIF under 3MB. Full-screen at 30fps for the same duration can hit 25MB+. Keep recordings short and cropped.
Who should use it: Developers making GIFs for GitHub issues, READMEs, and pull requests. Anyone who needs a free, low-friction GIF recorder without additional setup. For a full comparison of Kap against other GIF tools, see our GIF screen recorder for Mac guide.
Continue reading
GIFs That Actually Look Good
Record with auto-zoom, export as GIF. Perfect for docs, READMEs, and pull requests.
Method 2: GIPHY Capture (free, simple)#
GIPHY Capture is GIPHY's own free Mac recorder. It's a minimal window-based recorder: drag the capture frame over what you want to record, adjust the size, and hit the red button.
How to record a GIF with GIPHY Capture:
- Open GIPHY Capture from Applications
- Position and resize the capture window over the area you want to record
- Click the record button at the bottom
- Click stop when you're done
- Trim the clip and set a loop count (infinite, or a fixed number of times)
- Click Save to export the GIF
GIPHY Capture saves directly to a local GIF. The interface is minimal and there aren't many settings to configure.
What GIPHY Capture doesn't do:
- Limited file size control. For large areas or longer recordings, GIF output can be large.
- No frame rate selection (it records at a fixed rate).
- No auto-zoom.
- No system audio.
Who should use it: Anyone who wants the simplest possible route to a GIF and doesn't need fine-grained control over the output.
Method 3: Rekort (auto-zoom GIF export)#
Rekort records your screen with automatic zoom on click, then lets you export the recording — with zoom applied — as a GIF. The resulting GIF shows each click zoomed in, exactly as it appears in the preview.
How to record a GIF with auto-zoom in Rekort:
- Open Rekort and click the record button
- Draw a selection area over the UI you want to capture
- Record normally — click through your workflow
- Click stop to enter the preview
- Adjust zoom level and timing in the preview if needed
- Click Export and choose GIF
The GIF includes the zoom animation on every click. No video editor, no manual keyframes.
What this is useful for:
Kap and GIPHY Capture capture exactly what's on screen. On a Retina display, a full app window at 2560×1600 means individual buttons are small — viewers can't tell what you're clicking without zooming in manually in post-production.
Rekort removes that step. If your GIFs are for product demos, onboarding docs, or changelogs where viewers need to follow along clearly, auto-zoom changes what's possible without a video editor.
What Rekort doesn't do:
- No webcam overlay.
- No custom backgrounds or padding around the recording.
- Requires macOS 14+.
Pricing: $9/month or $79 lifetime (one-time). No tiers — all features are included.
Who should use it: Product teams and developers who make demo GIFs regularly and want viewers to clearly see each click without manually editing zoom into every recording. See also: screen recording with zoom effect.
Method 4: macOS screen recording + conversion#
If you already have a screen recording as a .mov or .mp4 file, you can convert it to GIF without a dedicated recorder. Two options:
Using the Shortcuts app (macOS 13+):
- Open the Shortcuts app
- Create a new shortcut with the "Convert Image" action (works for video-to-GIF on newer macOS)
- Pass your .mov file to it
This works for one-off conversions but isn't a repeatable workflow.
Using FFmpeg (command line):
ffmpeg -i input.mov -vf "fps=15,scale=640:-1" output.gif
This gives you full control over frame rate and output size. The fps=15 flag sets the frame rate and scale=640:-1 resizes to 640px wide while preserving aspect ratio.
For even smaller files, add a palette optimization pass:
ffmpeg -i input.mov -vf "fps=15,scale=640:-1,palettegen" palette.png
ffmpeg -i input.mov -i palette.png -vf "fps=15,scale=640:-1,paletteuse" output.gif
Who should use it: Developers comfortable with the command line who want maximum control over the output, or anyone who has an existing video file they want to convert.
GIF optimization: keeping file sizes manageable#
GIFs are inefficient by design. A 15-second full-screen capture at 30fps can easily hit 50MB. Nobody will embed that. Here's how to keep GIFs usable:
Frame rate: 15fps is the sweet spot for UI recordings. Motion stays readable and file size drops roughly in half compared to 30fps.
Crop aggressively: Record the relevant section of the UI, not the full screen. A 400×300 area produces a much smaller file than a 1440×900 area of the same content.
Keep clips short: Under 20 seconds for documentation GIFs. For GitHub, under 10MB is a practical target — some older GitHub clients have size limits that affect rendering.
Limit the palette: GIF supports a maximum of 256 colors. Most UI recording tools optimize for this automatically. If you're converting manually with FFmpeg, the palette optimization pass above significantly reduces file size.
Which method to use#
For GitHub READMEs, issues, and pull requests: Kap. It's free, exports directly to GIF, and the click highlight option helps viewers track what's happening.
For quick, one-off documentation GIFs: GIPHY Capture. It's the smallest mental overhead — open, drag frame, record, export.
For product demos and walkthroughs where viewers need to see each click clearly: Rekort. The auto-zoom means every click is visible without manual editing, and the GIF export includes the zoom animation.
For converting existing videos: FFmpeg gives the most control over quality and file size.
For a broader comparison of GIF recording tools on Mac, including paid options and workflow comparisons, see the GIF screen recorder for Mac guide.
Ready to record?
Rekort auto-zooms every click so your screen recordings look professional. No video editing required.
Download for MacmacOS 14+ · From $9/month or $79 lifetime