Screen to GIF on Mac: 5 Methods Compared
Five ways to convert screen recordings to GIF on Mac — Kap, GIPHY Capture, Rekort, FFmpeg, and online converters. Honest comparison with file size tips.
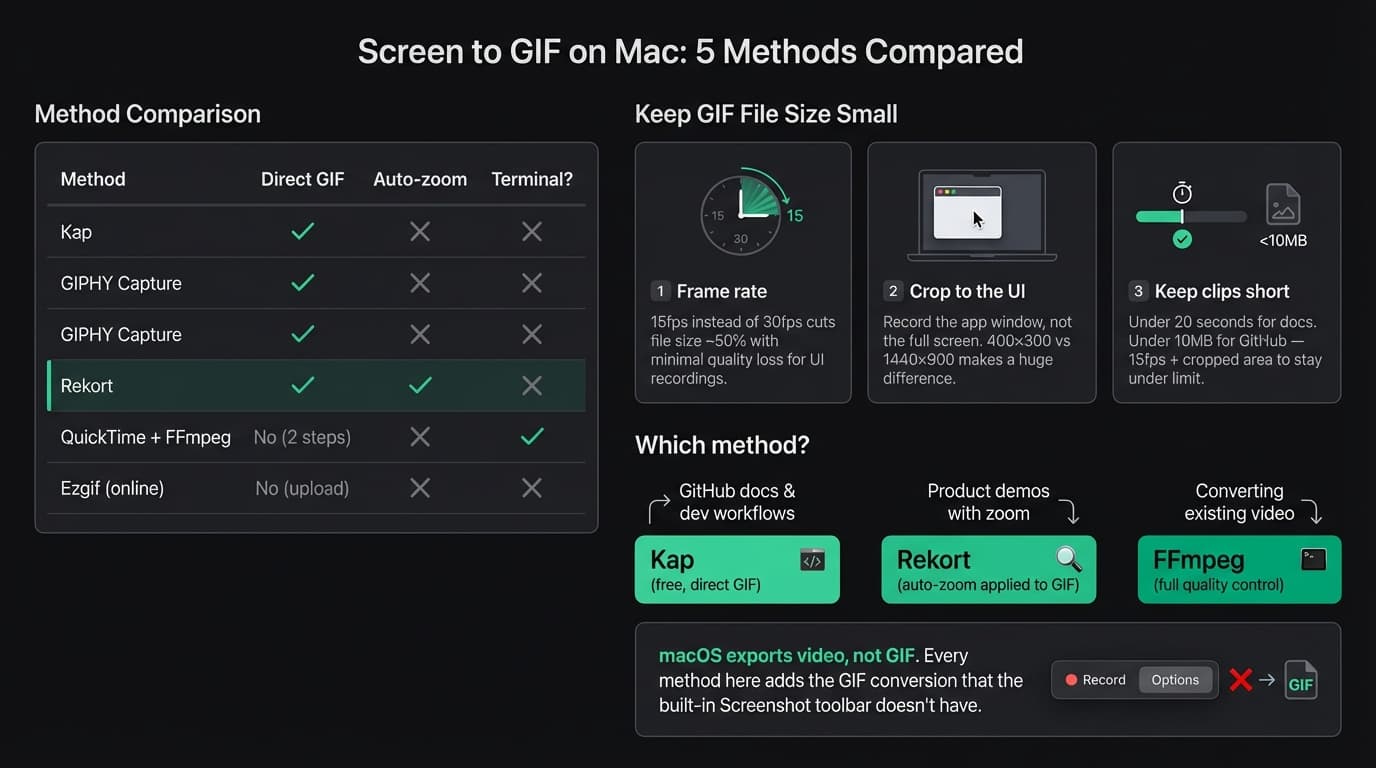
macOS records your screen as video — not as a GIF. Every method below bridges that gap, either by recording directly to GIF or by converting an existing screen recording. There's no built-in screen-to-GIF option in macOS, so you need a third-party app or command-line tool.
All 5 methods at a glance#
| Method | Cost | Direct GIF | Auto-zoom | Setup required |
|---|---|---|---|---|
| Kap | Free | Yes | No | Low |
| GIPHY Capture | Free | Yes | No | Low |
| Rekort | $79 lifetime | Yes | Yes | Low |
| QuickTime + FFmpeg | Free | No (two steps) | No | Terminal |
| Ezgif (online) | Free | No (upload) | No | None |
Kap#
Kap is an open-source screen recorder for Mac that exports directly to GIF, MP4, WebM, or APNG. It lives in your menu bar, handles the full record-trim-export workflow without leaving the app, and runs natively on Apple Silicon.
What it does well:
- Records any area of your screen and exports as GIF in one step
- No watermarks, no time limits, completely free
- Plugin support lets you upload directly to Giphy, Imgur, or Streamable after recording
- Runs on Apple Silicon and requires macOS 10.15+
- Active community with regular plugin contributions even as core updates have slowed
Where it falls short:
- No auto-zoom on click. If your UI elements are small on a Retina display, they'll be small in the GIF.
- No system audio capture.
- Editing is limited to trim and crop — no annotation, no color adjustment.
- Core app updates have slowed. The Kap GitHub repository shows less frequent commits compared to earlier years, though it remains functional.
Best for: Developers recording short clips for GitHub issues, pull requests, and README files. If your workflow is "record 10 seconds, export GIF, paste into a PR," Kap is the fastest path.
Install via getkap.co or brew install --cask kap.
Continue reading
GIFs That Actually Look Good
Record with auto-zoom, export as GIF. Perfect for docs, READMEs, and pull requests.
GIPHY Capture#
GIPHY Capture is a free Mac app from GIPHY that records a portion of your screen and exports it as a GIF. It's simpler than Kap — fewer settings, one export path.
What it does well:
- Free on the Mac App Store
- Simple drag-to-resize capture window
- Lets you set frame rate and playback speed before export
- GIF preview before saving
Where it falls short:
- Shares GIFs via GIPHY's platform by default. Saving locally requires an extra step depending on the version.
- No auto-zoom on click.
- No system audio.
- Interface hasn't changed much in several years.
Best for: Quick social GIFs or one-off recordings where you want something more approachable than Kap. Less suitable for developer documentation workflows where local file output matters.
Rekort#
Rekort is a Mac screen recorder with automatic zoom on click. You record normally — Rekort tracks every click and zooms in automatically so the viewer can see what's being interacted with. The GIF export applies that zoom compositing to the output, which means your GIFs show zoomed interactions without any video editing.
This is a different category from Kap and GIPHY Capture. Those record what your screen shows. Rekort records what your screen shows and adds automatic zoom around every click.
What it does well:
- Auto-zoom on click is baked into the GIF — no video editor required
- System audio and microphone captured natively, no extra tools needed
- Adjustable zoom level, duration, and easing curve in the preview before export
- MP4 and GIF export from the same recording
- Native Swift/SwiftUI app on macOS 14+
Where it falls short:
- Paid app — $79 one-time or $9/month. Not a free option.
- macOS 14+ only.
- No webcam overlay or custom backgrounds.
- No plugin ecosystem.
Best for: Product demos and tutorials where UI legibility matters. If you're recording a SaaS dashboard, developer tool, or settings workflow for documentation or marketing, auto-zoom makes the output significantly more readable without any post-processing. See the GIF screen recorder for Mac guide for a broader comparison of GIF tools.
Not for: Short social GIFs where zoom would feel excessive. Kap is faster for those.
Rekort starts at $79 lifetime or $9/month.
QuickTime + FFmpeg#
If you already have a screen recording — or prefer recording with QuickTime — you can convert it to GIF using FFmpeg from the command line. This is free, gives you precise control over quality and file size, and produces better GIFs than most GUI apps when configured with palette optimization.
Install FFmpeg via Homebrew:
brew install ffmpeg
Basic conversion:
ffmpeg -i input.mov output.gif
This works but produces large files at 25fps. For smaller, cleaner GIFs:
Optimized conversion with palette generation:
ffmpeg -i input.mov -vf "fps=15,scale=800:-1:flags=lanczos,split[s0][s1];[s0]palettegen[p];[s1][p]paletteuse" output.gif
What this does:
fps=15— 15 frames per second. Half the frames of 30fps, which cuts file size significantly without visible smoothness loss for most UI recordings.scale=800:-1— scales width to 800px with height auto-calculated.palettegen+paletteuse— generates an optimized color palette per GIF. GIF is limited to 256 colors per frame; without palette optimization, gradients and screenshots look blotchy. With it, the output is noticeably cleaner.
Where it falls short:
- Requires Terminal comfort.
- Two-step process: record with QuickTime, then convert.
- No auto-zoom — QuickTime captures the screen as-is.
Best for: Developers comfortable with the command line who want maximum quality control, or who need to batch-convert a folder of existing recordings. If you record regularly for docs and want the smallest possible file sizes with the best color output, FFmpeg gives you more control than any GUI tool.
Online converter (Ezgif)#
If you have an existing video file and don't want to install anything, Ezgif converts MP4, MOV, and WebM files to GIF in a browser. Upload the file, set the start/end time, frame rate, and output width, and download the GIF. No account required.
Where it falls short:
- File size limits — large recordings may not upload or process.
- Privacy consideration: you're uploading your screen recording to a third-party server. Not suitable for confidential product recordings.
- No auto-zoom.
- Quality is acceptable but not as clean as FFmpeg with palette optimization.
Best for: One-off conversions when you don't want to install anything and the recording isn't sensitive.
File size: what actually matters#
GIF files grow fast. A 30-second full-screen recording at 30fps can exceed 100MB — unusable for GitHub or Slack. Three settings control this:
Frame rate. Drop from 30fps to 15fps and you halve the frame count. For UI walkthroughs and click-through demos, 15fps is indistinguishable from 30fps in practice. Use 10fps for static screenshots between interactions, 24fps for fast animations where motion clarity matters.
Crop area. Record the relevant UI, not the full desktop. A 400×300 crop produces a much smaller file than a 1440×900 full-screen recording at the same frame rate. On a Retina display, recording the full screen at native resolution is rarely necessary — record the app window or the relevant panel.
Duration. Keep clips under 20 seconds for documentation, under 30 seconds for demos. Longer than that, use MP4 — it compresses far better than GIF for anything over a few seconds.
As a rule of thumb: 15fps + cropped area + under 20 seconds keeps most UI recording GIFs under 5MB, which works everywhere. GitHub limits uploads to 10MB per file; Slack supports inline GIFs up to 25MB.
Which method to use#
| Your situation | Use this |
|---|---|
| Developer making GIFs for GitHub/docs | Kap |
| Quick one-off, no installs | GIPHY Capture or Ezgif |
| Product demo where UI legibility matters | Rekort |
| Have existing recordings, comfortable with Terminal | FFmpeg |
| Need maximum file size and quality control | FFmpeg |
The core decision is whether you need auto-zoom. If your UI has small elements — button-dense dashboards, developer tools, settings panels on a Retina display — auto-zoom makes the GIF significantly more useful. Viewers can see what was clicked without squinting. If you're recording a simple click-through on large UI, Kap or GIPHY Capture handles it fine.
For a broader look at GIF tools on Mac, see the GIF screen recorder for Mac guide. And if you're deciding between GIF and video for a specific use case, GIF vs video for product demos covers when each format wins.
Ready to record?
Rekort auto-zooms every click so your screen recordings look professional. No video editing required.
Download for MacmacOS 14+ · From $9/month or $79 lifetime