How to Record Screen with Audio on Mac (2026 Guide)
Step-by-step guide to recording your Mac screen with audio. Covers QuickTime, BlackHole, the Screenshot toolbar, and modern tools like Rekort and Screen Studio that capture system audio without extra setup.
Recording your Mac screen with audio is simple — unless you want to capture what your computer is actually playing. macOS doesn't expose system audio to screen recorders by default, which means QuickTime gives you microphone audio but silently drops everything else.
This guide covers every method that works: the built-in options, the BlackHole workaround, and modern screen recorders that handle system audio without extra setup.
The short answer#
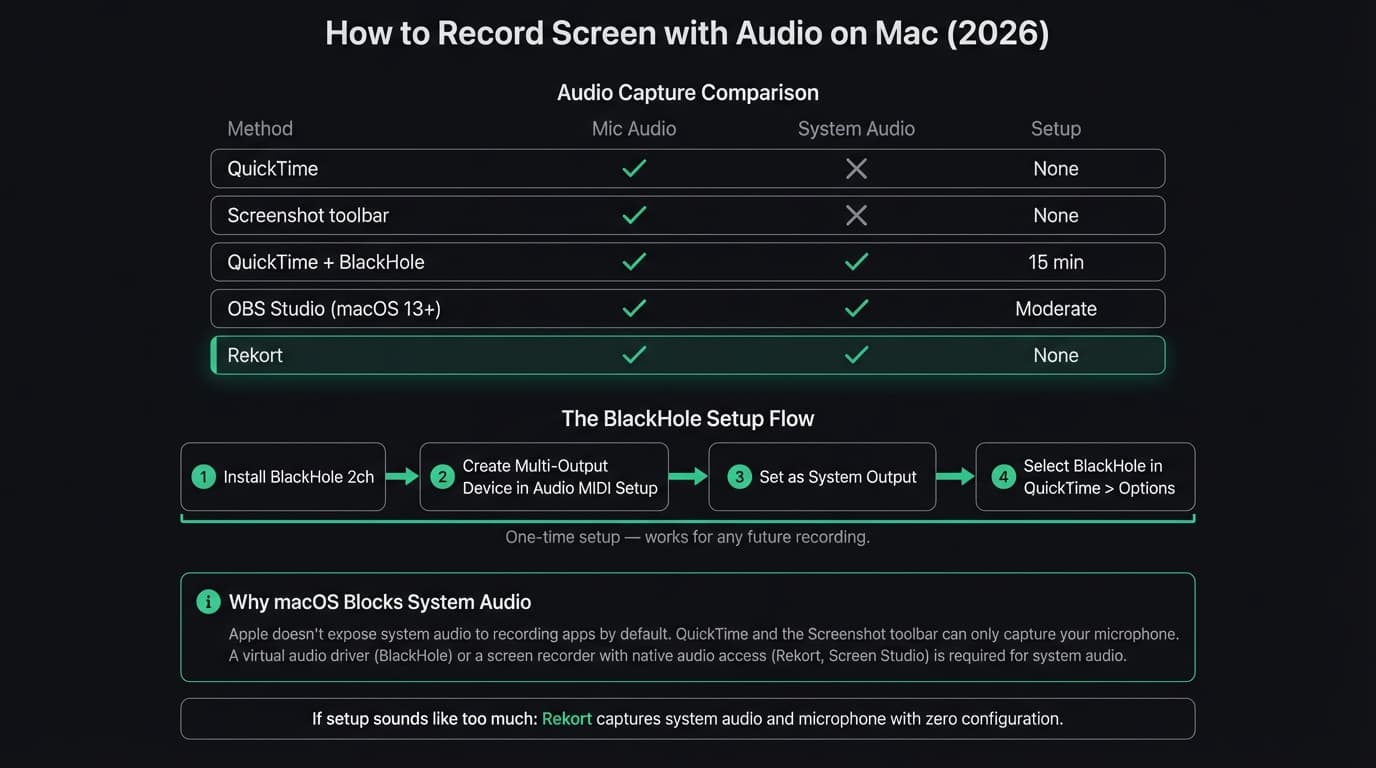
| Method | Mic audio | System audio | Setup required |
|---|---|---|---|
| QuickTime Player | Yes | No | None |
| Screenshot toolbar (Cmd+Shift+5) | Yes | No | None |
| QuickTime + BlackHole | Yes | Yes | 10-15 min |
| OBS Studio | Yes | Yes (macOS 13+) | Moderate |
| Rekort | Yes | Yes | None |
| Screen Studio | Yes | Yes | None |
| ScreenFlow | Yes | Yes | None |
If you need system audio and want zero setup, skip to the modern tools section. If you want to understand the full picture or stay free, read on.
Why macOS doesn't capture system audio by default#
Apple restricts direct access to system audio at the OS level. Unlike Windows, macOS doesn't expose a "what you hear" audio source to recording apps. This is a privacy and security decision — it prevents apps from silently recording audio without user consent.
The practical result: apps like QuickTime and the Screenshot toolbar can only record from physical audio inputs (your microphone). They have no path to what the system is outputting, even if you wanted to allow it.
The workaround is a virtual audio driver that creates a loopback: system audio plays into a virtual device, which recording apps can then treat as an input. BlackHole is the most popular free tool for this.
Method 1: QuickTime Player (microphone only)#
QuickTime is already on your Mac and works for any recording where system audio isn't needed.
Open: File > New Screen Recording, or press Cmd+Shift+5
Steps:
- Click the Options dropdown in the toolbar
- Under Microphone, select your microphone input
- Click Record (full screen or selected area)
- Click Stop in the menu bar when done
What you get: A .mov file with your screen video and microphone audio. If someone is speaking on screen, talking through a mic, or narrating, this works perfectly. If you need to capture music, app sounds, browser video, or notification sounds, QuickTime won't capture any of that.
When to use it: Bug reports, quick Loom-style walkthroughs, personal notes, any recording where you're narrating and nothing important is playing through the speakers.
Continue reading
Screen Recording Made Simple
Rekort captures your screen with system audio and auto-zooms every click automatically.
Method 2: Screenshot toolbar (Cmd+Shift+5)#
The Screenshot toolbar is built into macOS 10.15+ and works the same way as QuickTime for audio purposes.
Steps:
- Press Cmd+Shift+5
- Choose "Record Entire Screen" or "Record Selected Portion"
- Click Options and select your microphone
- Click Record
- Click the Stop button in the menu bar, or press Cmd+Shift+5 again
The recording saves to your Desktop (or wherever you configured in Options > Save to). Output is .mov.
Same limitation as QuickTime: microphone only, no system audio.
Method 3: QuickTime + BlackHole (system audio included)#
This is the free route to capturing system audio. It takes about 10-15 minutes to set up once, and then it works reliably.
Step 1: Install BlackHole
Download BlackHole 2ch from existential.audio/blackhole. The 2-channel version is sufficient for stereo system audio. Installation requires your Mac password and a restart of any audio apps.
Step 2: Create a Multi-Output Device
You need a Multi-Output Device so your Mac routes audio to both BlackHole (for recording) and your actual speakers or headphones (so you can still hear what's playing).
- Open Audio MIDI Setup (search for it in Spotlight)
- Click the + button at the bottom left and choose "Create Multi-Output Device"
- Check both BlackHole 2ch and your speakers/headphones
- Check "Drift Correction" on BlackHole 2ch
- Right-click the Multi-Output Device and select "Use This Device for Sound Output"
Your Mac's audio is now routing to both your speakers and BlackHole simultaneously.
Step 3: Configure QuickTime
- Open QuickTime Player
- Go to File > New Screen Recording
- Click the Options dropdown
- Under Microphone, select BlackHole 2ch
- Record as normal
QuickTime will now capture system audio through BlackHole. Note: in this setup, QuickTime captures system audio OR your microphone through BlackHole — not both simultaneously unless you configure an Aggregate Device that combines both inputs, which is a further step in Audio MIDI Setup.
Limitations of this approach:
- Requires Audio MIDI Setup knowledge
- Setting the Multi-Output Device as your system output means you can't easily adjust volume from the menu bar
- The configuration can break after macOS updates
- You won't capture microphone and system audio together without an additional Aggregate Device
For most people, this is more friction than it's worth if they record regularly. The BlackHole route makes sense if you're already comfortable with audio routing, you record occasionally, or you're on a strict no-cost budget.
Method 4: OBS Studio (free, system audio on macOS 13+)#
OBS Studio added native macOS audio capture in OBS 30, which requires macOS 13 Ventura or later. No BlackHole or audio routing needed.
Setup for screen recording with audio:
- Download OBS Studio
- Create a new Scene
- Add a "Display Capture" source
- Add a "macOS Screen Capture" source (this enables audio capture on Ventura+)
- Check that Desktop Audio is not muted in the audio mixer
- Click Start Recording
OBS records to .mkv by default. You can configure it to record .mp4 in Settings > Output.
The catch: OBS is designed for live streaming. The interface is built around scenes, sources, and transitions — concepts from broadcasting, not quick screen captures. If you're recording a 30-second product demo and want to share it in two minutes, OBS will slow you down. See our OBS alternative for Mac comparison for context on when OBS is and isn't the right tool.
Modern screen recorders that capture system audio#
These tools handle system audio and microphone simultaneously with no setup. You install the app, click Record, and audio just works.
Rekort#
Rekort is a native Mac screen recorder with automatic zoom on click. System audio and microphone are captured together by default — no BlackHole, no Audio MIDI Setup, no virtual devices.
Record your screen, and every click automatically zooms in so viewers can see exactly what you're clicking on a Retina display. Preview the recording, adjust zoom timing and level, then export as MP4 or GIF.
Audio: Both system audio and microphone, captured simultaneously with no extra configuration.
Price: $9/month or $79 lifetime.
Limitation: No webcam overlay, no custom backgrounds. The focus is on the recording and auto-zoom workflow, not production effects.
The right fit for: developers, DevRel, and product teams who record demos and tutorials regularly and want polished output without editing. For more context on how Rekort compares, see our best screen recorder for Mac comparison.
Screen Studio#
Screen Studio has the most complete feature set for screen recording on Mac. System audio and microphone work natively, alongside webcam overlay, background removal, custom backgrounds, and auto-zoom with configurable camera movements.
Price: $229 one-time or $29/month.
The tradeoff: At $229, it's the most expensive option on this list by a significant margin. If you produce polished product videos daily and need webcam overlays or custom backgrounds, the feature set justifies the cost. For occasional recordings or microphone-only needs, it doesn't.
ScreenFlow#
ScreenFlow is a screen recorder and full video editor combined. It captures system audio and microphone natively and gives you a real multi-track timeline for editing.
Price: $169 one-time.
When it makes sense: Longer tutorial videos that need cuts, annotations, and transitions. When you want a single app that handles recording and editing without switching to Final Cut or Premiere. See our ScreenFlow alternative comparison for full context.
Comparing all methods#
| Method | System audio | Mic audio | Cost | Setup time | Auto-zoom |
|---|---|---|---|---|---|
| QuickTime | No | Yes | Free | None | No |
| Screenshot toolbar | No | Yes | Free | None | No |
| QuickTime + BlackHole | Yes | Separate | Free | 10-15 min | No |
| OBS Studio | Yes (macOS 13+) | Yes | Free | Moderate | No |
| Rekort | Yes | Yes | $79 one-time | None | Yes |
| Screen Studio | Yes | Yes | $229 one-time | None | Yes |
| ScreenFlow | Yes | Yes | $169 one-time | None | No |
Which method should you use?#
"I just need to record my screen — I'm narrating, no system sounds matter." Use Cmd+Shift+5 or QuickTime. It's already on your Mac, takes 10 seconds to start, and microphone audio works fine.
"I need system audio and I'm comfortable with technical setup." BlackHole + QuickTime is free and reliable once configured. Plan 15 minutes for the initial setup and document the Audio MIDI Setup configuration so you can rebuild it after a macOS update.
"I need system audio and I want zero setup." Rekort, Screen Studio, or ScreenFlow all handle system audio natively. Rekort is the most affordable at $79 lifetime. Screen Studio adds webcam overlays and camera effects if you need them.
"I need auto-zoom so my clicks are visible on a Retina display." QuickTime and BlackHole won't help here — neither supports zoom. Rekort and Screen Studio both add automatic zoom on click. See our screen recording with zoom effect guide for detail on why auto-zoom matters for demos and tutorials.
"I record long tutorials and need to cut and edit." ScreenFlow is the right tool. It's a full video editor combined with a screen recorder, and it captures system audio natively.
"My budget is zero." QuickTime for microphone-only. BlackHole + QuickTime if you need system audio. OBS Studio if you're on macOS 13+ and willing to learn its interface.
A note on audio quality#
Once you have the right setup, a few things make a difference in how your audio sounds:
Use a dedicated microphone. The built-in MacBook mic picks up keyboard noise, fan noise, and room echo. A USB condenser mic or a headset with a boom mic makes a significant difference for any viewer-facing recording.
Record in a quiet space. Reverb from hard walls, HVAC noise, and background sounds are picked up by microphones more than you'd expect.
Set your recording level correctly. Audio that peaks above 0 dBFS will distort and is difficult or impossible to fix in post. Aim for peaks around -12 to -6 dBFS with headroom for louder moments.
Check levels before recording. Do a short test recording and play it back before starting a longer session. Fixing audio issues in the test is much easier than redoing a 10-minute recording.
For a broader look at how to record your screen on MacBook including keyboard shortcuts and workflow tips, see our MacBook-specific guide.
Ready to record?
Rekort auto-zooms every click so your screen recordings look professional. No video editing required.
Download for MacmacOS 14+ · From $9/month or $79 lifetime
Related Articles
Screen Recording for Instagram: Reels & Stories from Your Mac
7 min read
How to Screen Record a Zoom Meeting on Mac (2026)
7 min read
Where Do Screen Recordings Go on Mac?
7 min read
Screen Record on Mac with Sound: System Audio + Mic (2026)
7 min read
Cursor Highlight & Click Effects in Screen Recordings
8 min read