How to Record Your Screen on MacBook (2026 Guide)
Two built-in ways to record your screen on MacBook, the system audio limitation, and when to use a third-party app. Step-by-step instructions.
Every MacBook ships with a screen recorder built in. No download needed. Press one shortcut, select your area, and hit record.
macOS gives you two paths: the Screenshot toolbar (faster) and QuickTime Player (more familiar for most people). Both record video, both are free, and both hit the same ceiling: no system audio, no zoom, no GIF export.
Here's how each method works, what the limits are, and when you need something beyond the built-in options.
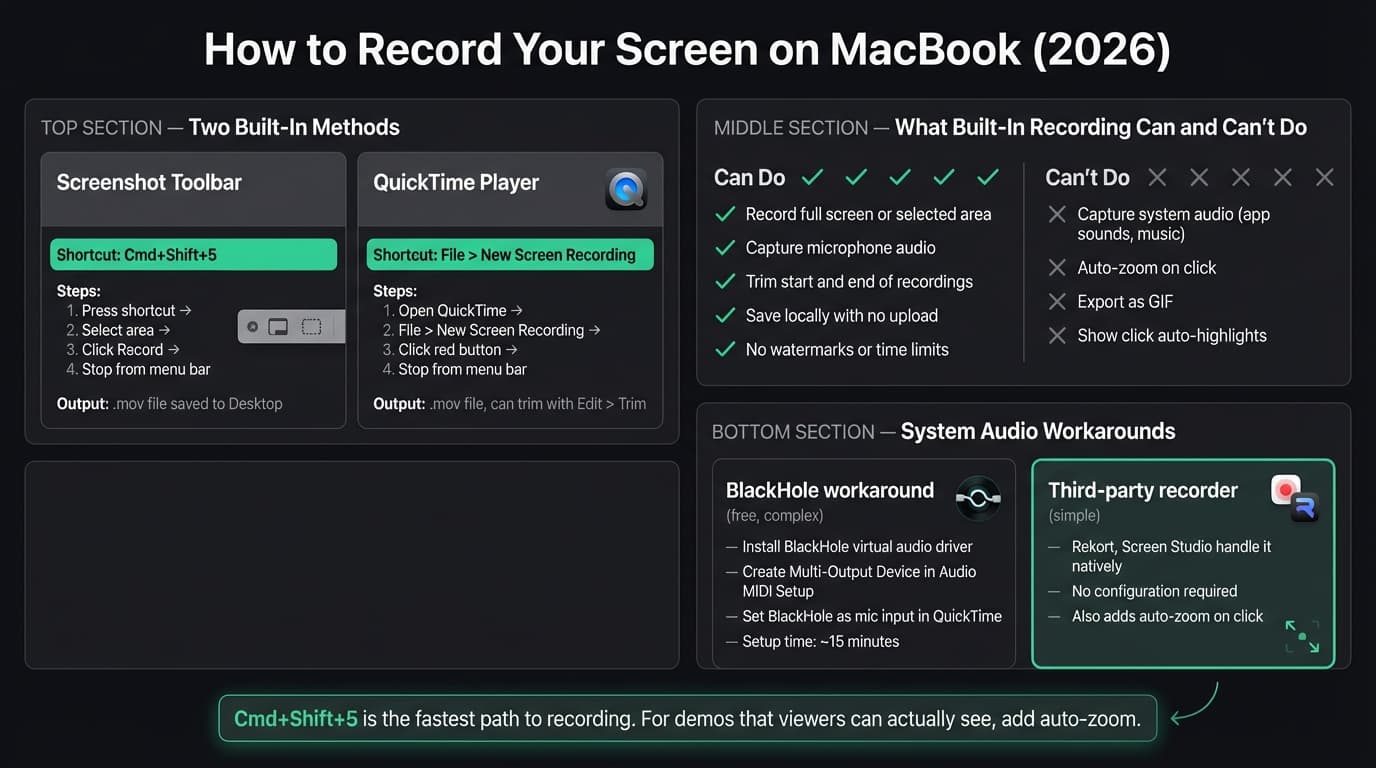
Method 1: Screenshot toolbar (Cmd+Shift+5)#
This is the fastest way. Press Cmd+Shift+5 anywhere on your Mac. A small toolbar appears at the bottom of your screen with five buttons:
- Capture entire screen (still image)
- Capture selected window (still image)
- Capture selected portion (still image)
- Record entire screen
- Record selected portion
The last two are the recording options.
To record:
- Press Cmd+Shift+5
- Click "Record Entire Screen" or "Record Selected Portion"
- For selected portion: drag to define the area, then click Record inside the selection
- A countdown starts (if configured), then recording begins
- A recording indicator appears in the menu bar
- To stop: click the stop button (square icon) in the menu bar, or press Cmd+Ctrl+Esc
The recording saves as a .mov file. On macOS, you'll see a thumbnail in the corner of the screen. Click it to trim, or wait for it to save automatically to your Desktop (or wherever you've set it in Options).
Options menu (click before recording):
- Microphone: Choose your input or turn audio off entirely
- Show Mouse Clicks: Adds a black circle around your cursor when you click — useful for demonstrations
- Timer: 5 or 10 seconds before recording starts
- Save to: Desktop, Documents, or a custom folder
On Macs running macOS Tahoe (macOS 26) or later, you can also choose between SDR (H.264, most compatible) and HDR (HEVC, higher quality) capture formats from the Options menu.
Continue reading
Screen Recording Made Simple
Rekort captures your screen with system audio and auto-zooms every click automatically.
Method 2: QuickTime Player#
QuickTime is the longer route to the same destination. Open QuickTime from your Applications folder or Spotlight (Cmd+Space → "QuickTime"), then:
- Go to File > New Screen Recording (or press Cmd+Ctrl+N)
- A recording window appears with options: click the arrow next to the record button to choose your microphone
- Click the red record button
- Click anywhere to record the full screen, or drag to record a selection
- Click the stop button in the menu bar when you're done
QuickTime saves recordings as .mov files. You can trim the start and end with Edit > Trim (Cmd+T) before exporting.
Both methods produce the same output. The Screenshot toolbar is faster to launch; QuickTime is more familiar if you've been on Mac for a while.
The system audio limitation#
This is the main catch with both built-in methods: neither can record system audio.
macOS records your microphone fine. But sounds from apps — music, video playback, notification chimes, UI sound effects — aren't captured. You hear them through your speakers, but they don't appear in the recording.
This is a macOS privacy design decision, not a bug. Apple restricts screen recorders from tapping into the audio subsystem without explicit setup.
The BlackHole workaround: BlackHole is a free virtual audio driver. Once installed, you create a Multi-Output Device in Audio MIDI Setup that routes audio to both your speakers and BlackHole simultaneously, then set BlackHole as your recording input in QuickTime. It works, but setup takes 10-15 minutes and you have to re-route audio back to your speakers when you're done recording.
The simpler path: Third-party screen recorders like Rekort and Screen Studio handle system audio natively. You don't configure anything — they capture both microphone and system audio by default.
Tips for better built-in recordings#
Record a selection, not the full screen. On a 14" or 16" MacBook Pro with a Retina display, full-screen recordings make buttons and text tiny on a 1080p playback device. Drag to record just the app window you're demoing. Viewers will be able to read the UI without squinting.
Close what you don't need. Notifications appear in recordings. Put macOS in Do Not Disturb mode before you start (Focus > Do Not Disturb, or Option-click the menu bar clock).
Use 30fps for most recordings. The built-in recorder captures at your display's native frame rate. If you're recording for documentation, 30fps is plenty. For fast UI animations, the default is still fine — macOS handles the frame rate automatically.
Check your mic before the real take. Record 10 seconds, play it back in QuickTime. Catch echo, clipping, or background noise before you record a 5-minute walkthrough.
Trim before sharing. Every recording starts with you fumbling around before you hit record and ends with you reaching for the stop button. QuickTime's Edit > Trim removes both. It takes 30 seconds and makes the recording look intentional.
When the built-in recorder isn't enough#
The built-in options cover quick captures and informal recordings. They don't cover:
- Auto-zoom on click. On a Retina MacBook display, your recording area might be 2560 pixels wide. Viewers watching at 1080p see tiny buttons. Auto-zoom on click zooms into exactly what you clicked, automatically, so viewers see what's happening. Neither QuickTime nor the Screenshot toolbar does this.
- GIF export. macOS exports .mov only. For documentation, GitHub READMEs, or embedding in tools like Notion and Linear, GIF is more practical. You need a third-party converter or a recorder that exports GIF directly.
- System audio without a workaround. As covered above.
- GIF with auto-zoom. If you need a looping GIF where viewers can actually see what you're clicking, you need an app that combines both.
Rekort is a Mac-native screen recorder with auto-zoom on click. It captures system and microphone audio natively, exports as MP4 or GIF, and runs on macOS 14+. Screen Studio is the alternative with more production features (webcam overlay, custom backgrounds). See our best screen recorder for Mac comparison for a full breakdown.
For the comprehensive guide to recording with audio — including the BlackHole setup and all audio options — see how to record screen with audio on Mac.
Quick reference#
| Task | Method |
|---|---|
| Record a quick clip | Cmd+Shift+5 → Record Entire Screen |
| Record a specific area | Cmd+Shift+5 → Record Selected Portion → drag |
| Stop recording | Click stop button in menu bar (or Cmd+Ctrl+Esc) |
| Trim the recording | QuickTime → Edit > Trim |
| Record system audio | BlackHole workaround, or Rekort/Screen Studio |
| Export as GIF | Third-party app (Kap, Rekort) |
| Auto-zoom on click | Third-party app (Rekort, Screen Studio) |
The built-in recorder is right for quick, informal captures. For product demos, tutorials, or anything customer-facing, the lack of auto-zoom is the real limiting factor — viewers can't see what you're clicking on a high-resolution display.
Ready to record?
Rekort auto-zooms every click so your screen recordings look professional. No video editing required.
Download for MacmacOS 14+ · From $9/month or $79 lifetime
Related Articles
How to Record Screen with Audio on Mac (2026 Guide)
10 min read
Screen Recording for Instagram: Reels & Stories from Your Mac
7 min read
How to Screen Record a Zoom Meeting on Mac (2026)
7 min read
Where Do Screen Recordings Go on Mac?
7 min read
Screen Record on Mac with Sound: System Audio + Mic (2026)
7 min read