Cursor Highlight & Click Effects in Screen Recordings
How to make your cursor and clicks visible in screen recordings. Covers cursor highlight rings, click animations, spotlight effects, and auto-zoom on click — and which tools support each approach.
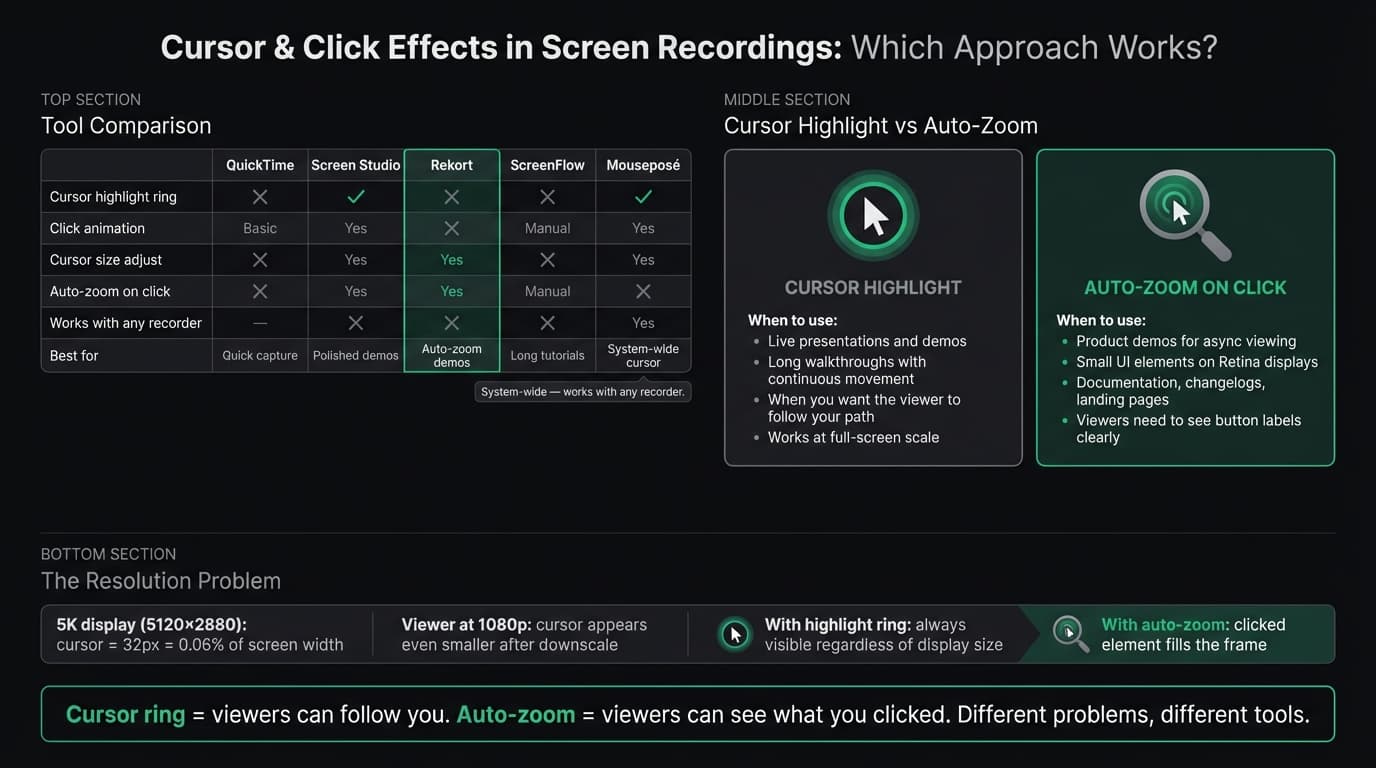
Cursor visibility is one of those things you don't think about until you watch your own screen recording and realize you have no idea where you were clicking. On a 27-inch display at 5K resolution, a standard cursor is roughly 32×32 pixels — about 0.04% of the visible area. Viewers on a smaller screen can barely see it.
This guide covers what cursor and click effects actually do, which tools support them, and when auto-zoom is more useful than a highlight ring.
Why cursor visibility matters#
When you record your screen, you can see your own cursor in real time and you know where you're going next. Your viewers don't have that context. They're watching a replay with no preview of what's coming, and if they lose the cursor, they lose the thread of the demo.
This is worse on Retina displays. macOS captures at the physical pixel resolution — a 1920×1200 logical display captures at 3840×2400 pixels. Viewers watching at 1080p or on a smaller screen see your cursor at a fraction of its recorded size. The cursor practically disappears.
Cursor effects solve this by making the cursor more visible. Click effects solve a related problem: even when viewers can see the cursor, they can't always tell when you clicked versus when you were just moving the mouse.
Types of cursor and click effects#
Cursor highlighting (spotlight/halo)#
A ring or spotlight appears around the cursor at all times. The ring moves with the cursor, making it easy to track across the screen. This is the most common cursor effect.
Implementations vary:
- Ring: A colored circle around the cursor tip. Subtle, always visible.
- Spotlight: The area around the cursor is brightened or enlarged. More dramatic.
- Dimming: Everything outside the cursor area darkens, focusing attention on where the cursor is.
Tools like Mouseposé and Presentify add spotlight effects system-wide and work with any screen recorder. Screen Studio includes a built-in cursor highlight ring with adjustable radius and color.
Click animations (ripple/ring flash)#
When you click, a brief animation appears at the click location — typically a ripple expanding outward, or a ring that appears and fades. This tells viewers "something just happened here."
Click animations are separate from cursor highlighting. You can have one without the other, or both together.
macOS has a basic built-in version: in the Screenshot toolbar (Cmd+Shift+5), enable Show Mouse Clicks in Options. A gray circle briefly appears at each click location. It's subtle but costs nothing.
Cursor size adjustment#
The simplest effect: make the cursor bigger so it's easier to see. Some tools let you scale the cursor 1.5× or 2× during recording. No animation, just a larger target.
Rekort supports cursor size adjustment. Screen Studio also lets you adjust cursor size alongside other cursor effects.
Auto-zoom on click#
A different approach entirely: instead of making the cursor more visible, zoom the entire recording into the clicked area so viewers can see what was clicked. The camera moves to the click target and zooms in, shows the interaction at full size, then zooms back out.
This is more effective for product demos than cursor highlighting because:
- The viewer doesn't just see where you clicked — they see the result at readable size
- UI elements that are tiny at full-screen resolution are now clearly visible
- No need to track the cursor; the camera brings the action to the viewer
Rekort and Screen Studio both offer auto-zoom on click. For a deeper look at how it works and when to use it, see our screen recording with zoom effect guide.
Continue reading
Screen Recording Made Simple
Rekort captures your screen with system audio and auto-zooms every click automatically.
What each tool supports#
| Tool | Cursor highlight | Click animation | Cursor size | Auto-zoom |
|---|---|---|---|---|
| QuickTime | No | Basic (Show Mouse Clicks) | No | No |
| Screen Studio | Yes (ring) | Yes | Yes | Yes |
| Rekort | No | No | Yes | Yes |
| ScreenFlow | No | Callout effects | No | Manual |
| OBS Studio | No | No (plugins available) | No | No |
| Mouseposé (system-wide) | Yes | Yes | Yes | No |
| Presentify (system-wide) | Yes | Yes | Yes | No |
QuickTime is the baseline. The macOS Screenshot toolbar's "Show Mouse Clicks" option adds a basic gray ripple on clicks — no ring, no spotlight, no zoom. It's better than nothing for casual recordings.
Screen Studio has the most complete cursor feature set: highlight ring, click animation, cursor size, and auto-zoom. If you need all of these, Screen Studio covers them in one app at $229 one-time.
Rekort focuses on auto-zoom rather than cursor decorations. The trade-off: you get auto-zoom (which does more for demo clarity than a highlight ring) but no spotlight or click ripple. If you need both cursor highlight AND auto-zoom, Screen Studio is the better fit. If auto-zoom is enough, Rekort does it starting at $9/month or $79 lifetime. See our Screen Studio alternative comparison for more detail.
ScreenFlow has callout effects — annotations that appear on screen to label or highlight a region — but not a cursor spotlight in the traditional sense. You add callouts manually in the timeline editor. This is more work but more precise.
OBS Studio shows the cursor without effects by default. There are community plugins that add click highlighting, but they require manual setup and aren't recommended if you just need a quick solution.
Mouseposé and Presentify are system-wide cursor tools — they work with any recorder. Open the app, enable your preferred effect, then record with QuickTime, OBS, or any other tool. This is the best approach if your recorder of choice doesn't support cursor effects natively.
When to use each approach#
Use cursor highlighting when:
- Recording live presentations or walkthroughs where you're explaining as you go
- The content stays at full-screen size (no zoom)
- You're recording a long demo where constant zoom would be disorienting
- You're presenting on a projected screen and the audience needs to track your cursor
Use auto-zoom when:
- Recording product demos for async viewing (documentation, changelogs, landing pages)
- Clicking through UI that's small relative to the recording area
- Viewers need to see button labels, form fields, or menus clearly
- The recording is under 3 minutes and the structure is clear
Use both when:
- Your demo involves a mix of navigation (cursor tracking) and precise clicks (auto-zoom)
- You're making content for an audience that spans different screen sizes and distances
Use neither when:
- The recording is informal (bug report, quick Slack message)
- The UI elements are large enough to read at full-screen resolution
- You're recording terminal output or text editors where cursor tracking isn't important
How to enable cursor effects in common tools#
QuickTime / Screenshot toolbar#
- Press Cmd+Shift+5 to open the Screenshot toolbar
- Click Options
- Enable Show Mouse Clicks
- Record normally
The effect is a small gray circle that appears briefly at each click. No customization.
Screen Studio#
Cursor effects are in the recording settings panel:
- Cursor: Highlight ring — toggle on, adjust radius and color
- Cursor: Size — scale from 1× to 2.5×
- Click animation — ripple, ring flash, or none
These apply to the exported video, not to the live recording preview.
Rekort#
Cursor size is adjustable in the zoom settings panel. Auto-zoom on click is enabled by default — every click during recording generates a zoom event in the preview, which you can adjust or remove before export. For more on how to configure zoom settings, see our tips & workflows pillar guide.
Mouseposé (system-wide)#
- Download Mouseposé ($10/year)
- Enable the highlight effect from the menu bar
- Record with any screen recorder
Works alongside any recorder and persists across apps. Turn it off when not recording — it affects your live cursor too.
Presentify (system-wide)#
Similar to Mouseposé: a menu bar app that adds cursor spotlight, annotation tools, and zoom-to-cursor. Available on the Mac App Store. Works with any recorder.
The cursor vs. zoom trade-off#
Cursor highlighting and auto-zoom solve the same underlying problem (viewers can't see what's happening in your recording) in different ways.
Cursor highlighting is subtle and continuous. The ring is always there, doesn't change the recording's composition, and lets the viewer choose where to look. It's the right tool when you want the viewer to follow you through a workflow without being led frame-by-frame.
Auto-zoom is active and decisive. The recording physically zooms in when something important happens. The viewer doesn't have to track the cursor because the camera does it for them. This works better for product demos where clarity of a specific interaction matters more than overall context.
Neither is strictly better. Most screen recording tools force you to choose, and the choice should be based on what you're recording and who's watching.
For quick demos, documentation GIFs, and product walkthroughs, auto-zoom on click tends to produce better results with less viewer effort. For longer tutorials or live presentations, cursor highlighting gives you visibility without disrupting the flow.
If you're not sure which to use, start with auto-zoom. It's harder to miss a click when the recording zooms into it.
Ready to record?
Rekort auto-zooms every click so your screen recordings look professional. No video editing required.
Download for MacmacOS 14+ · From $9/month or $79 lifetime
Related Articles
How to Record Screen with Audio on Mac (2026 Guide)
10 min read
Screen Recording for Instagram: Reels & Stories from Your Mac
7 min read
How to Screen Record a Zoom Meeting on Mac (2026)
7 min read
Where Do Screen Recordings Go on Mac?
7 min read
Screen Record on Mac with Sound: System Audio + Mic (2026)
7 min read