Screen Capture on Mac: Screenshots, Video & GIF
Screen capture on Mac explained: every screenshot shortcut, how to record video, GIF export options, and where the built-in tools fall short.
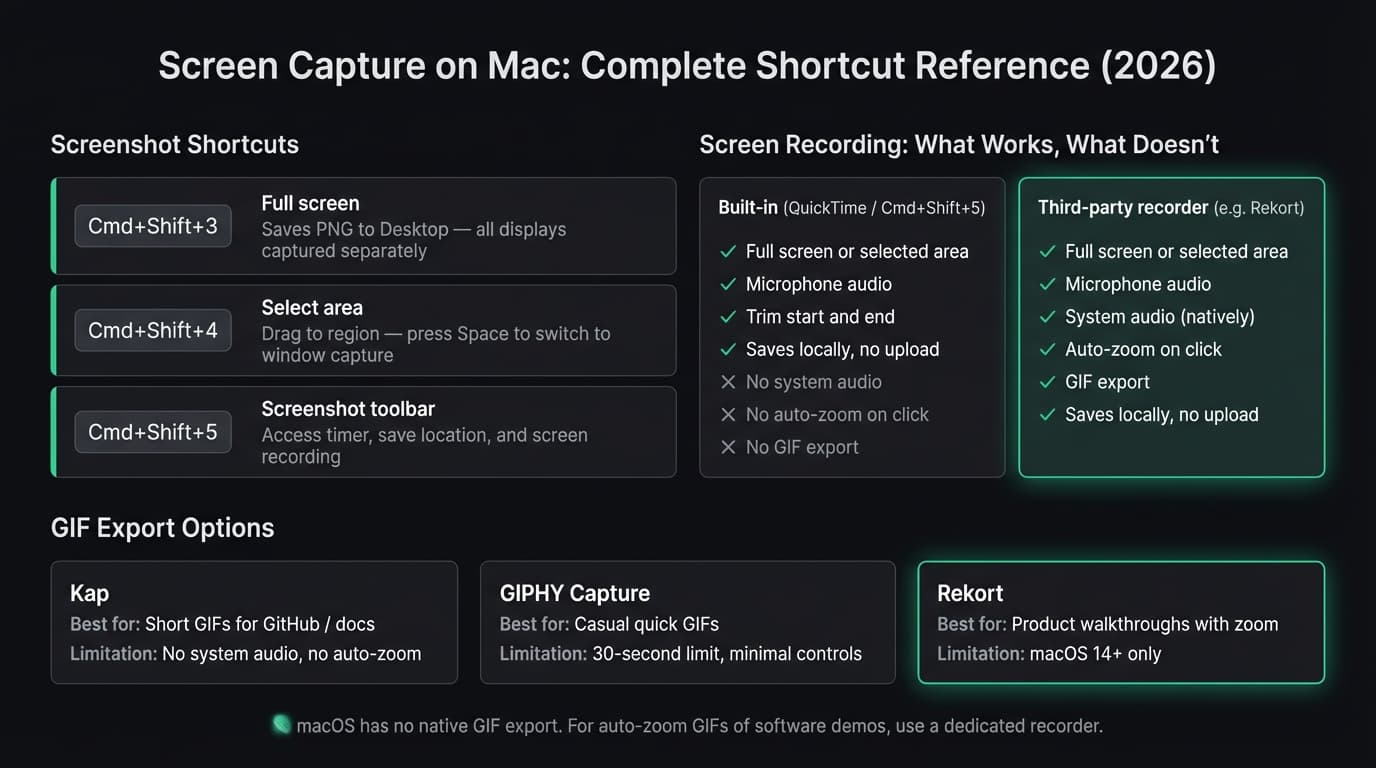
Screen capture on Mac covers three things: screenshots (still images), screen recordings (video), and GIF export. macOS has solid built-in tools for the first two. For GIFs, you need a third-party app.
This guide covers every built-in method, what each one does, and where the built-in tools stop.
Screenshot shortcuts#
macOS has six screenshot shortcuts. Three are for daily use; three are situational.
The three you'll use#
Cmd+Shift+3 captures the entire screen instantly. The file saves to your Desktop as a PNG. On a multi-display setup, macOS creates separate files for each display.
Cmd+Shift+4 turns your cursor into a crosshair. Drag to select an area, release to capture. Press Space while in selection mode to switch to window capture — hover over any window, it highlights blue, click to capture it with a transparent drop shadow.
Cmd+Shift+5 opens the Screenshot toolbar at the bottom of the screen. Use it when you want to set a timer delay, change the save location, or start a screen recording. For quick screenshots, the shortcuts above are faster.
Situational shortcuts#
Cmd+Shift+4, then Space captures a single window with a clean background. Move your cursor over a window, click when it highlights. Good for app screenshots without the clutter of your Desktop behind them.
Cmd+Shift+6 captures the Touch Bar on older MacBook Pros.
Cmd+Ctrl+Shift+3 or Cmd+Ctrl+Shift+4 work the same as their counterparts above, but copy to clipboard instead of saving a file. Useful when you want to paste directly into Slack or Notion without a file appearing on your Desktop.
Where screenshots save#
By default, screenshots save to your Desktop as PNGs. Filenames follow the format Screenshot [date] at [time].png.
To change the save location: press Cmd+Shift+5, click Options, then pick a folder or choose Clipboard to skip file creation entirely.
Continue reading
Screen Recording Made Simple
Rekort captures your screen with system audio and auto-zooms every click automatically.
Screen recording#
macOS has two built-in paths to video recording: the Screenshot toolbar and QuickTime Player. Both use the same underlying engine.
Screenshot toolbar#
Press Cmd+Shift+5. Two recording buttons appear on the right side of the toolbar:
- Record Entire Screen — captures everything on your display
- Record Selected Portion — lets you drag a region before recording starts
Click the record button to start. A stop icon appears in the menu bar. Click it or press Cmd+Ctrl+Esc to stop. Recordings save as .mov files to your Desktop.
QuickTime Player#
Open QuickTime and go to File > New Screen Recording (shortcut: Cmd+Ctrl+N). This opens the same Screenshot toolbar. After you stop recording, QuickTime opens the file so you can trim it with Edit > Trim — which the Screenshot toolbar alone doesn't do.
Microphone audio#
Both methods capture microphone audio. In the Screenshot toolbar, click Options and select a microphone. The built-in mic works without any configuration.
System audio#
macOS doesn't give screen recorders access to system audio — the sounds your computer is actually playing — without extra setup. This is a macOS-level restriction, not a bug in any specific app.
Two ways around it:
BlackHole is a free, open-source virtual audio driver. Install it, create a Multi-Output Device in Audio MIDI Setup that routes both your speakers and BlackHole, then set BlackHole as the microphone input in QuickTime. It works, but the setup takes 15-20 minutes and the configuration breaks if you reinstall audio software or update macOS.
A screen recorder with built-in system audio — apps like Rekort, Screen Studio, and ScreenFlow capture system audio without BlackHole using a system audio extension. If you record audio regularly, this is the simpler path.
For a full walkthrough of both approaches, see our guide on screen recording with audio on Mac.
GIF export#
There's no native GIF export in macOS. QuickTime saves .mov, the Screenshot toolbar saves .mov, and there's no conversion step built in.
For GIFs, the main options:
Kap — Free, open-source, lives in your menu bar. Record a capture and export as GIF, MP4, WebM, or APNG. Has a size optimizer. No system audio, no auto-zoom. Best for short GIFs under 15-20 seconds, like UI walkthrough clips for GitHub issues or README files.
GIPHY Capture — Free from the Mac App Store. Simple capture and GIF export with a 30-second limit. Fine for casual use; the quality controls are minimal.
Rekort — Records with automatic zoom on click, then exports as MP4 or GIF. If you're making GIFs of software walkthroughs, the auto-zoom means viewers can see what you're clicking without squinting at a full-screen capture. $79 lifetime or $9/month.
For a broader comparison of GIF tools on Mac, see our GIF screen recorder for Mac guide.
Where the built-in tools fall short#
For quick personal captures, QuickTime and Cmd+Shift+5 are fine. The shortcomings matter when you're recording for other people.
No auto-zoom on click. macOS screen capture records your screen as-is. On a Retina display, that means small buttons and text that look clear at your resolution look tiny at standard viewing sizes. Adding zoom in post-production means manual keyframes in a video editor — 20-30 minutes of work for a 60-second recording. Apps like Rekort and Screen Studio apply zoom automatically on every click.
No system audio without a workaround. If you need to record app sounds, music, or notification audio alongside your narration, you're either setting up BlackHole or switching to a different app.
No GIF export. Built-in tools produce .mov files. For GitHub, Slack, docs, or any context that renders GIFs inline, you need Kap, Rekort, or a separate converter.
Quick reference#
| Method | Shortcut | Output | Audio |
|---|---|---|---|
| Full screenshot | Cmd+Shift+3 | PNG | — |
| Area screenshot | Cmd+Shift+4 | PNG | — |
| Window screenshot | Cmd+Shift+4, Space | PNG | — |
| Screenshot toolbar | Cmd+Shift+5 | .mov | Mic only |
| QuickTime recording | File > New Screen Recording | .mov | Mic only |
| GIF export | No built-in option | — | — |
For a deeper look at third-party options — auto-zoom, system audio, GIF with zoom, webcam overlay — see our best screen recorder for Mac comparison. If you're specifically on a MacBook and want to know every recording method available, see how to record your screen on MacBook.
Ready to record?
Rekort auto-zooms every click so your screen recordings look professional. No video editing required.
Download for MacmacOS 14+ · From $9/month or $79 lifetime
Related Articles
How to Record Screen with Audio on Mac (2026 Guide)
10 min read
Screen Recording for Instagram: Reels & Stories from Your Mac
7 min read
How to Screen Record a Zoom Meeting on Mac (2026)
7 min read
Where Do Screen Recordings Go on Mac?
7 min read
Screen Record on Mac with Sound: System Audio + Mic (2026)
7 min read