Snipping Tool Screen Recording (and Better Mac Alternatives)
Snipping Tool is Windows-only. Here's how Mac screen recording works natively, and the best alternatives when you need auto-zoom, GIF export, or better output quality.
Snipping Tool screen recording is a Windows 11 feature — it doesn't exist on Mac. macOS has its own built-in screen recording tools (the Screenshot toolbar and QuickTime Player), and a separate ecosystem of third-party apps with features that go well beyond what Snipping Tool offers on Windows.
This guide explains how Snipping Tool screen recording works on Windows, what the Mac equivalents are, and which Mac screen recording tools are worth using if you need more than basic capture.
What is Snipping Tool screen recording?#
Snipping Tool started as a screenshot utility in Windows, then Microsoft added video recording capability to Windows 11 in early 2023 (after a preview rollout to Windows Insiders in December 2022). The shortcut is Win + Shift + R.
What Snipping Tool records:
- Full screen
- Selected area (draw a rectangle)
- A specific app window (added in 2025, version 11.2507.14.0)
Output: MP4 only. Recordings save automatically to your Videos\Screen Recordings folder.
Audio: Can capture microphone and speaker audio simultaneously.
What Snipping Tool screen recording cannot do:
- Auto-zoom into clicks
- Export as GIF
- Add annotations or callouts in real time
- Record on macOS
If you're on a Mac looking for Snipping Tool, you need a different tool entirely. macOS has built-in equivalents, and third-party tools that do more.
Mac built-in screen recording: Screenshot toolbar#
The closest Mac equivalent to Snipping Tool is the Screenshot toolbar, opened with Cmd+Shift+5.
The Screenshot toolbar shows five buttons along the bottom of your screen:
- Capture entire screen
- Capture selected window
- Capture selected portion
- Record entire screen
- Record selected portion
Click a recording button, set your options in the toolbar (microphone, timer, pointer visibility), then click Record. Press Cmd+Ctrl+Esc or click the Stop button in the menu bar to stop.
Recordings save as .mov files to your Desktop by default. You can change the save location in the toolbar's Options menu.
Limitations of the built-in tool:
- No system audio. The Screenshot toolbar records microphone audio, but not what your computer is playing. To capture system audio, you need a third-party audio routing tool like BlackHole plus some manual setup in Audio MIDI Setup.
- No auto-zoom. The recording captures your screen as-is. On a Retina display, small UI elements are hard to see.
- No GIF export. Output is .mov only.
- Basic trim only. You can trim the start and end using QuickTime Player, nothing else.
For informal captures — a quick Slack message, a bug report, a personal reference — the built-in tool works fine. For anything customer-facing or tutorial-style, the limitations add up fast.
Continue reading
A Simpler Alternative
Auto-zoom on click, focused timeline editing, MP4 & GIF export. $9/month, $49/year, or $79 lifetime.
QuickTime Player screen recording#
QuickTime Player is another built-in option. Go to File > New Screen Recording (or press Cmd+Shift+5 to use the Screenshot toolbar, which is the same underlying system).
QuickTime is slightly more straightforward for one-click full-screen recordings: click the red record button, choose your area, record, stop, save. But it has the same fundamental limitations as the Screenshot toolbar: no system audio natively, no zoom, no GIF, no editing beyond trim.
How Mac built-in tools compare to Snipping Tool#
| Feature | Windows Snipping Tool | Mac Screenshot Toolbar | Mac QuickTime |
|---|---|---|---|
| Area selection | Yes | Yes | Yes |
| Full screen | Yes | Yes | Yes |
| Window recording | Yes (2025+) | Yes | Yes |
| System audio | Yes | No (needs workaround) | No (needs workaround) |
| Microphone | Yes | Yes | Yes |
| Auto-zoom on click | No | No | No |
| GIF export | No | No | No |
| Output format | MP4 | MOV | MOV |
| Platform | Windows 11 only | macOS | macOS |
On audio capture, Snipping Tool is actually more capable out of the box — Windows exposes system audio to screen recorders by default. macOS requires a workaround.
On everything else — zoom, GIF export, editing — both platforms' built-in tools are similarly limited.
When the built-in tools aren't enough#
The built-in tools work for basic captures. They stop being enough when:
You're making product demos or tutorials. On a 2560x1600 Retina display, UI text and buttons are tiny in a full-screen recording. Without zoom, viewers can't follow what you're clicking. Manual zoom in a video editor takes 20-30 minutes per recording. Auto-zoom on click does it automatically.
You need system audio. If you're demoing an app with sound, or recording a video with audio, you need system audio capture. The built-in Mac tools require BlackHole or a similar workaround. Third-party apps handle it natively.
You want GIFs. For GitHub READMEs, Jira tickets, documentation, or Slack, GIFs are often more useful than MP4 videos. Neither built-in tool exports GIFs.
You need the recording to look polished. Raw screen captures show your actual desktop — resolution, exact window size, everything. Tools like Rekort and Screen Studio let you adjust framing, add padding, and apply consistent zoom effects.
The best Mac screen recording alternatives#
Rekort — best for auto-zoom demos#
Price: $9/month, $49/year, or $79 lifetime
Rekort is a native Mac screen recorder built around auto-zoom on click. Select an area, record your screen, and every click automatically zooms in so viewers can see exactly what you're interacting with. Preview the zoom, adjust the level and timing, then export as MP4 or GIF.
Full disclosure: we built Rekort. Here's where it's the right choice and where it isn't.
What it does well:
- Auto-zoom on click — no manual keyframing
- System audio and microphone natively
- MP4 and GIF export
- Adjustable zoom level, duration, and easing curves
- Native Swift/SwiftUI app, no Electron
- Simple pricing, no tiers
What it doesn't do:
- Webcam overlay
- Custom backgrounds or rounded corners
- Advanced cursor effects (spotlight, highlight ring)
- Requires macOS 14+
Who it's for: Developers, product marketers, and DevRel who record demos and tutorials regularly and want auto-zoom without Screen Studio's price. If you came from Snipping Tool and want something significantly more capable for polished screen recordings, Rekort covers the core workflow — record, zoom, export — at a fraction of Screen Studio's cost.
Screen Studio — best for production-quality video#
Price: $29/month or $108/year
Screen Studio set the standard for auto-zoom screen recording on Mac. It records your screen and automatically adds smooth, cinematic zoom movements on every click. It also adds custom backgrounds, rounded corners, camera overlays with background removal, and cursor effects.
For daily use producing customer-facing video, Screen Studio is the most complete tool available. For occasional use, the $108/year price is hard to justify. See our Screen Studio alternative guide for a direct comparison.
Kap — best free GIF recorder#
Price: Free and open-source
Kap records your screen and exports as GIF, MP4, WebM, or APNG. It lives in the menu bar, starts and stops instantly, and makes great GIFs. No auto-zoom, no system audio, no editing — but for short captures destined for docs or GitHub, it's the fastest free option. See our GIF screen recorder for Mac guide for more detail.
QuickTime Player — best for no-frills quick captures#
Price: Free (built-in)
If you just need to capture something and share it, QuickTime is already there. File > New Screen Recording, select your area, record, stop. No auto-zoom, no system audio without workarounds, but zero setup and zero cost.
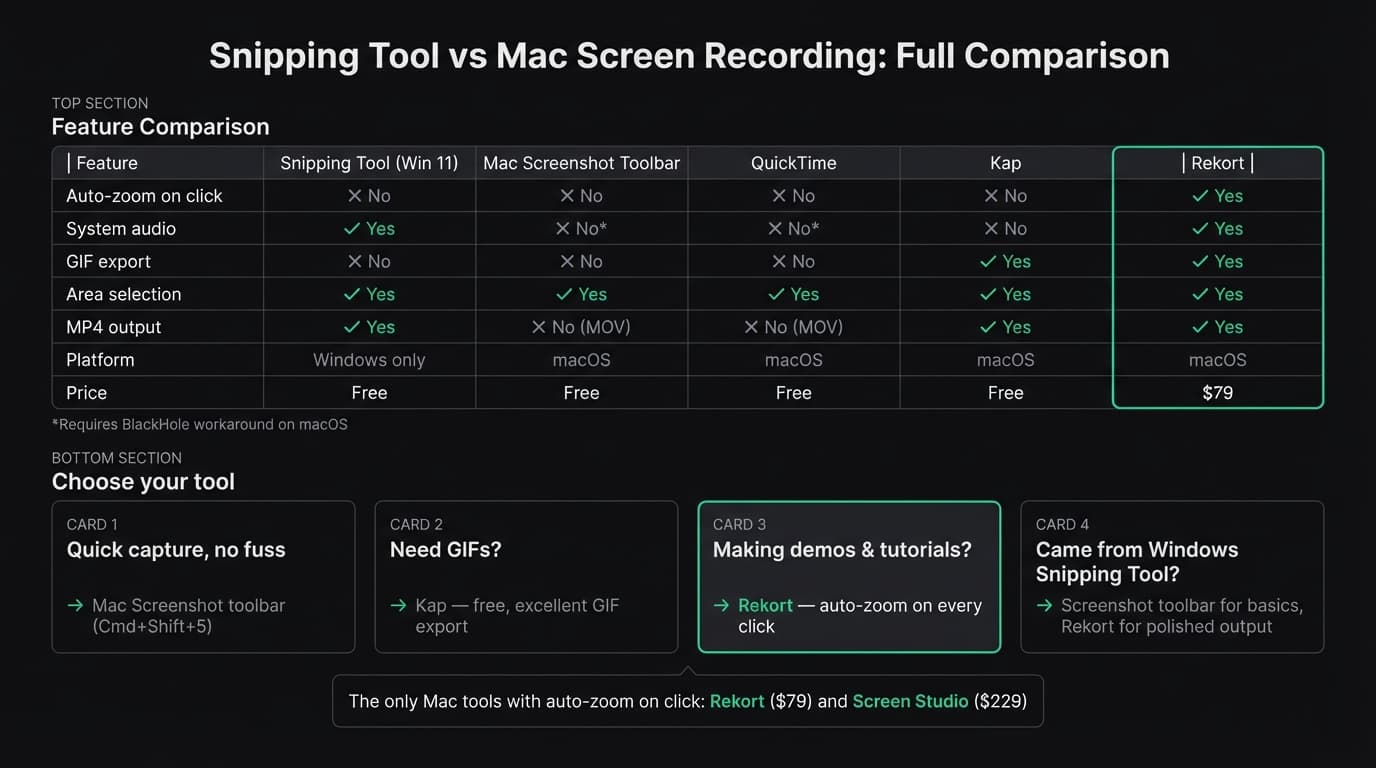
Comparison: Snipping Tool vs Mac alternatives#
| Tool | Platform | Auto-zoom | System audio | GIF export | Price |
|---|---|---|---|---|---|
| Snipping Tool | Windows 11 only | No | Yes | No | Free |
| Mac Screenshot toolbar | macOS | No | No (workaround needed) | No | Free |
| QuickTime Player | macOS | No | No (workaround needed) | No | Free |
| Kap | macOS | No | No | Yes | Free |
| Rekort | macOS 14+ | Yes | Yes | Yes | $79 lifetime |
| Screen Studio | macOS | Yes | Yes | Yes | $108/year |
Which Mac tool to use#
If you just want basic recording, for free: Use the Screenshot toolbar (Cmd+Shift+5) or QuickTime. They work, they're already installed, and they're free.
If you need GIFs: Use Kap. Free, fast, excellent GIF quality. No auto-zoom, but for short captures, that's often fine.
If you make product demos or tutorials regularly: Use Rekort or Screen Studio. The auto-zoom feature is what separates these from everything else. Your viewers can actually see what you're clicking without you spending time editing zoom keyframes.
If you came from Windows and want something like Snipping Tool but better: The Screenshot toolbar is the direct equivalent for basic captures. For anything more polished, Rekort's auto-zoom workflow is closer to what most people actually want out of a screen recorder.
For a broader comparison of all major Mac screen recorders, see our best screen recorder for Mac guide.
Ready to record?
Rekort auto-zooms every click so your screen recordings look professional. No video editing required.
Download for MacmacOS 14+ · $9/month, $49/year, or $79 lifetime
Related Articles
Best Screen Studio Alternatives for Mac: Pick by Workflow (2026)
15 min read
OBS Alternative for Mac: Screen Recording Without the Complexity
10 min read
Cap Alternative for Mac: Auto-Zoom Without the Cloud
8 min read
Cursorful Alternative: Native Mac Auto-Zoom Screen Recording
7 min read
Descript Alternative for Mac: Screen Recording Without the Learning Curve
8 min read