QuickTime Screen Recording: Complete Guide (2026)
Complete guide to QuickTime screen recording on Mac: how to record full screen or a selected area, fix the system audio problem, and when to use a different tool.
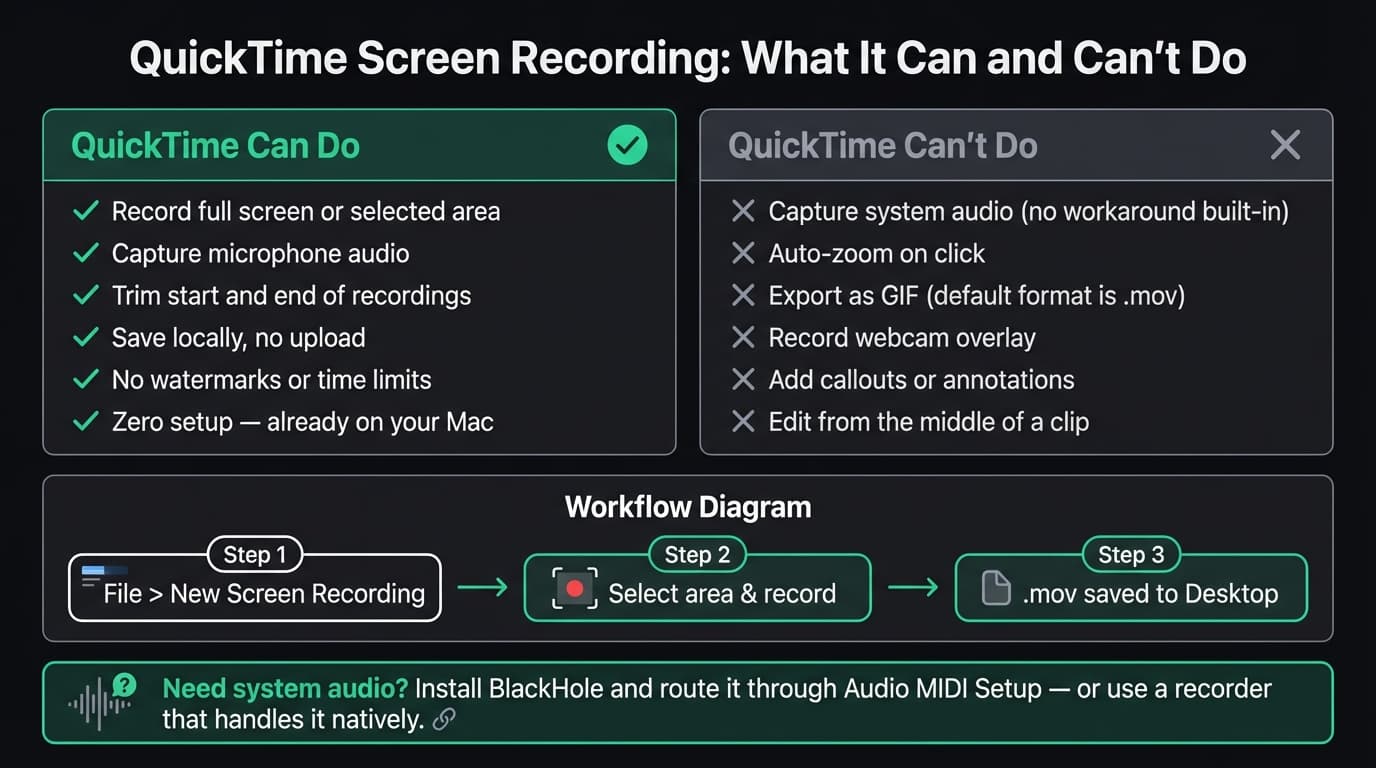
QuickTime screen recording is a built-in feature of macOS that lets you capture your screen as video without installing anything. Open QuickTime Player, choose File > New Screen Recording, select your area, and hit record. The result is a .mov file saved to your chosen location.
This guide covers everything QuickTime can and can't do for screen recording, including the system audio workaround, all the recording options, and when a different tool makes more sense.
How to start a screen recording in QuickTime#
There are two ways to open screen recording on a Mac:
Option 1: QuickTime Player
- Open QuickTime Player (it's in your Applications folder, or use Spotlight with Cmd+Space)
- Choose File > New Screen Recording
- The Screenshot toolbar appears
Option 2: Screenshot toolbar (faster)
- Press Cmd+Shift+5
- The Screenshot toolbar appears immediately, no need to open QuickTime
Both methods open the same toolbar. From there:
- Click Record Entire Screen (the solid rectangle) to record your full display
- Click Record Selected Portion (the dashed rectangle) to draw a region
Click the Record button to start. A countdown timer option is available under Options if you need a few seconds to set up before capture begins.
To stop recording: Click the stop icon in the menu bar (top right), or press Cmd+Control+Escape.
The recording saves automatically to the location set in Options (Desktop by default).
QuickTime recording options#
Click Options in the toolbar before you start to configure:
| Option | What it does |
|---|---|
| Save to | Choose where the recording file is saved |
| Timer | 5 or 10 second delay before recording starts |
| Microphone | Select which microphone to use (or None) |
| Show Mouse Clicks | Highlights the cursor with a circle when you click |
The microphone selector is where you'd also select a virtual audio device like BlackHole if you're working around the system audio limitation (more on that below).
The Screen Recorder That Zooms for You
Record your screen on Mac — every click auto-zooms to what matters. No manual keyframing.
The system audio problem#
QuickTime's most significant limitation for screen recording is that it cannot capture system audio — the sound your Mac is playing from apps, videos, or notifications. It records only your microphone.
This isn't a bug or an oversight you can work around in Settings. macOS doesn't provide apps with direct access to system audio output. QuickTime gets around this for microphone input but not for playback audio.
What this means in practice: If you're recording a product demo where you play a video, demo an app with sound effects, or show anything that makes noise, that audio will be missing from your QuickTime recording. Viewers will hear your microphone (if enabled) but nothing from the screen.
Workaround: BlackHole virtual audio driver#
BlackHole is a free, open-source virtual audio driver that creates a digital "cable" between your Mac's audio output and QuickTime's input. Here's how to set it up:
- Download and install BlackHole (the 2-channel version works for most use cases)
- Open Audio MIDI Setup (search for it in Spotlight)
- Click the + button, choose Create Multi-Output Device
- Check both BlackHole 2ch and Built-in Output (so you still hear audio while recording)
- In QuickTime's Options menu, select BlackHole 2ch as your microphone input
- Start your recording — QuickTime will now capture system audio routed through BlackHole
This works, but it's a multi-step setup that breaks if you switch audio devices or update macOS. If you record often and need system audio reliably, a screen recorder that handles this natively is a simpler choice (see below).
Recording full screen vs. selected area#
Full screen recording captures your entire display at its native resolution. On a Retina Mac, this means the raw file is very large — a MacBook Pro with a 2560x1600 display produces files roughly twice the size of a 1080p recording.
Selected area recording lets you draw a specific region. Drag the handles to resize the selection after drawing it. The selected area remains locked for the recording session and releases when you stop.
Selected area recording is better for most product demos and tutorials because:
- It focuses viewers on the relevant part of your screen
- Smaller file size
- Avoids capturing sensitive notifications or windows outside your capture zone
To record a selected area in QuickTime specifically (not the Screenshot toolbar):
- Choose File > New Screen Recording
- Click the record button (red circle) — a crosshair cursor appears
- Drag to select your region, then click Record inside the selection
Basic editing in QuickTime#
After recording, QuickTime provides minimal editing under the Edit menu:
Trim: Drag the yellow handles at either end of the yellow scrubber bar (Edit > Trim, or Cmd+T). Removes footage from the beginning and end only. You cannot cut from the middle.
Split clip: Edit > Split Clip (Cmd+Y) splits at the playhead position. You can split a clip into sections and rearrange or delete individual sections — useful for removing a section from the middle without a proper video editor.
Rotate and flip: Edit menu has rotation options, rarely needed for screen recordings.
That's the extent of editing QuickTime offers. There's no timeline, no text overlays, no zoom effects, no transitions. For anything beyond basic trimming, you need a video editor or a screen recorder with built-in editing.
Exporting and sharing#
QuickTime saves recordings as .mov files by default. From File > Export As, you can choose:
- 1080p — Compresses to 1080p H.264 regardless of source resolution
- 720p — Further compressed
- 480p — Lower quality, smaller file
- Audio only — Extracts audio track only
The export options are limited. There's no MP4 (H.264 in .mp4 container), no GIF, no WebM. If you need those formats, convert using HandBrake (free, MP4/H.265) or use a screen recorder that exports them natively.
What QuickTime does well#
- Already installed. Zero download, zero setup for basic captures. It's on every Mac.
- Reliable for microphone capture. Straightforward audio quality from any connected microphone.
- Fast for quick, informal recordings. Bug reports, Slack videos, quick reference — QuickTime is hard to beat for speed.
- No watermarks or limits. Unlike many free screen recorders, QuickTime imposes no time limits and adds no watermarks.
- Files stay local. Nothing uploads anywhere. The recording goes where you tell it.
Where QuickTime falls short#
| Limitation | Impact |
|---|---|
| No system audio | Can't capture in-app sounds, music, or video audio without BlackHole setup |
| No auto-zoom | Clicks aren't highlighted or magnified — viewers squint at small UI elements |
| No GIF export | .mov only (or compressed .mov via Export As) |
| No MP4 export | Requires a converter for web-compatible files |
| No zoom, effects, or annotations | No cursor highlights, callouts, or overlays |
| No webcam overlay | Can't show your face alongside the screen |
| Minimal editing | Trim and split only — no timeline cuts from the middle |
When QuickTime is the right choice#
QuickTime works well for:
- Quick, informal captures. Showing a bug to a teammate, recording a clip for reference, or anything you won't share publicly.
- Microphone-only recordings. Voiceover demos where system audio doesn't matter.
- macOS environments where installing apps isn't allowed. QuickTime needs no additional permissions beyond screen recording.
When to use a different tool#
QuickTime becomes a bottleneck when you need polished output. Common triggers:
You need system audio. The BlackHole workaround works, but it's tedious to set up and maintain. Apps like Rekort, Screen Studio, and ScreenFlow capture system audio natively with no extra configuration.
Your viewers can't see what you're clicking. On a Retina display, a cursor click on a tiny button is nearly invisible in a full-screen recording. Auto-zoom on click — a feature in Rekort and Screen Studio — automatically zooms into each click so viewers can see exactly what's happening. Without auto-zoom, you're manually adding zoom keyframes in a video editor, which takes 20-30 minutes per recording. See our screen recording with zoom effect guide for a full explanation.
You need GIFs. QuickTime can't export GIFs. Kap is the fastest free option for GIF output. Rekort exports GIFs with zoom effects applied.
You're making product demos or tutorials. These are customer-facing recordings. Viewers expect to clearly see what you're clicking, hear the right audio, and watch something that looks intentional. QuickTime produces recordings that look like screen captures; tools with auto-zoom produce recordings that look edited.
For a full comparison of available tools, see our best screen recorder for Mac guide.
QuickTime screen recording: quick reference#
| Task | How |
|---|---|
| Open screen recording | File > New Screen Recording, or Cmd+Shift+5 |
| Record full screen | Click "Record Entire Screen" in toolbar |
| Record selected area | Click "Record Selected Portion", drag to select |
| Record with microphone | Choose microphone in Options before starting |
| Capture system audio | Install BlackHole, select it as microphone input |
| Stop recording | Click stop in menu bar, or Cmd+Control+Escape |
| Trim recording | Edit > Trim (Cmd+T) |
| Export compressed video | File > Export As > 1080p / 720p / 480p |
| Convert to MP4 | Use HandBrake after exporting from QuickTime |
QuickTime screen recording is a solid starting point for anyone who needs a quick, no-setup capture on Mac. Its limitations — no system audio, no zoom, no GIF export — push most people toward a dedicated screen recorder once they're recording regularly. For casual use, it's hard to beat something that's already installed and requires zero configuration.
Ready to record?
Rekort auto-zooms every click so your screen recordings look professional. No video editing required.
Download for MacmacOS 14+ · From $9/month or $79 lifetime
Related Articles
Best Screen Recorder for Mac (2026) — Honest Comparison
13 min read
AI Screen Recorder: Which Features Actually Matter (2026)
5 min read
Best Screen Recording Software in 2026
11 min read
How to Make YouTube Videos with Screen Recording (Mac, 2026)
8 min read
Screen Recording for Presentations: A Practical Guide (2026)
7 min read