How to Make YouTube Videos with Screen Recording (Mac, 2026)
The complete guide to recording your screen for YouTube on Mac. Covers resolution, audio, tool choices, and how to get polished-looking tutorials without a video editor.
Screen recording for YouTube means capturing your Mac screen as video, with the audio and zoom quality needed for viewers watching at 1080p or higher. The built-in tools on macOS get you started, but they skip two things that matter for YouTube content: system audio and visual clarity at scale.
This guide covers the right settings, which tools fit which workflows, and how to produce recordings that look clean on YouTube without spending hours in a video editor.
What YouTube needs from your recording#
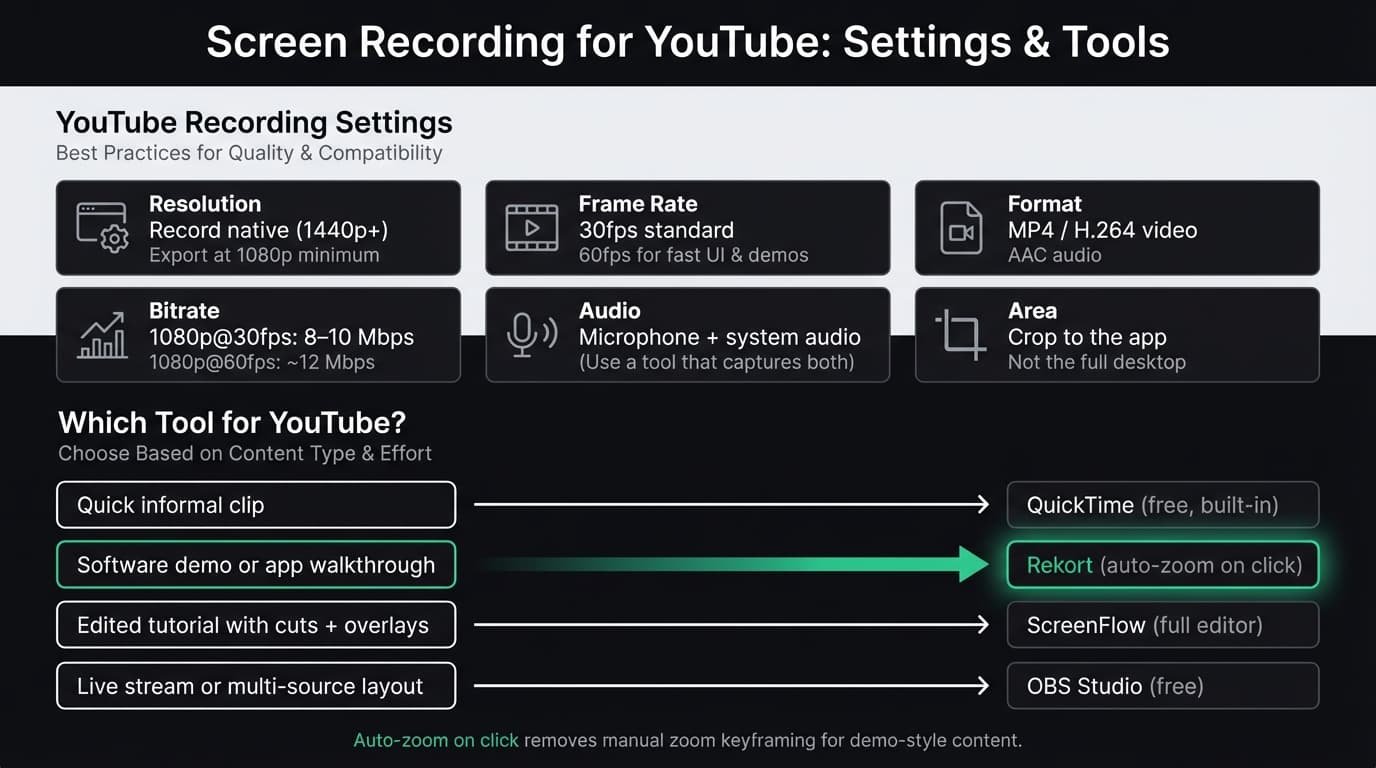
Before you choose a tool, understand what YouTube expects:
Resolution. YouTube accepts anything from 360p to 8K. For screen recordings, 1080p (1920×1080) is the minimum worth publishing. Most Mac displays are 2560×1600 or higher — record at your display's native resolution and export to 1080p, or export at 2x (2880×1800) for sharper text in 4K uploads.
Frame rate. 30fps is standard for most tutorials. 60fps makes fast-moving UI — scrolling, animations, dropdown menus — look smoother and is worth the larger file size for software demos.
Format. YouTube's recommended upload format is MP4 with H.264 video and AAC audio. Nearly every screen recorder on Mac exports this format by default.
Audio. YouTube's compression is aggressive on low-quality audio. Use a decent microphone (even a USB headset is better than a laptop mic), and if your tutorial includes app sounds or music, capture system audio rather than re-recording it externally.
Bitrate for upload. According to YouTube's encoding guidelines, 1080p at 30fps needs approximately 8–10 Mbps. At 60fps, target 12 Mbps. Your recording tool handles this automatically if you export at standard settings — only matters if you're manually adjusting export options.
The Screen Recorder That Zooms for You
Record your screen on Mac — every click auto-zooms to what matters. No manual keyframing.
Tools and who they're for#
The right recorder depends on what kind of YouTube content you're making. Here's a quick decision tree:
| Content type | Best tool | Why |
|---|---|---|
| Software demos, app walkthroughs | Rekort or Screen Studio | Auto-zoom on click; no editing needed |
| Long tutorials with cuts and text overlays | ScreenFlow | Built-in editor, timeline, annotations |
| Live coding or gaming | OBS Studio | Multi-source, streaming-ready, free |
| Quick informal clips | QuickTime | Already on your Mac, zero setup |
For a full comparison of every Mac screen recorder, see our best screen recorder for Mac guide.
QuickTime: fast but limited#
QuickTime is already on your Mac. Open it, press Cmd+Shift+5, select your recording area, and hit record. No download, no configuration.
The problem: QuickTime records microphone audio only. If your tutorial includes in-app sounds, music, or system alerts, none of that gets captured. Viewers hear silence where they expect feedback.
The workaround — installing BlackHole, configuring a multi-output device in Audio MIDI Setup, setting it as your system output — works but requires 15 minutes of setup and remembering to undo it when you're done recording.
QuickTime also has no zoom. At 2560×1600, a button click on your screen is 4 pixels wide in a 1080p export. Viewers can't see what you're clicking without leaning into their monitor.
Use QuickTime for informal clips where audio quality and visual clarity don't matter. For YouTube tutorials, it's the starting point, not the destination.
For a detailed QuickTime walkthrough, see our QuickTime screen recording guide.
OBS Studio: powerful, steep learning curve#
OBS is free, open-source, and handles everything QuickTime can't: system audio (on macOS 13 Ventura and later), webcam overlay, multi-scene layouts, and direct streaming to YouTube.
For YouTube screen recording specifically, OBS is excellent when:
- You want a webcam in the corner while recording your screen
- You're recording a live stream that also serves as a YouTube video
- You need to switch between scenes (screen, slides, facecam) during the recording
The cost is complexity. OBS's interface is built around streaming concepts — scenes, sources, transitions — that don't map naturally to "record my app and share it." If you've never used OBS, budget 30–60 minutes to get a working recording setup.
OBS doesn't add auto-zoom on click and has no built-in timeline editor. You record, then edit in a separate tool. If you're considering OBS for simpler workflows, our OBS alternative for Mac comparison covers lighter options.
Rekort: for software demos without editing#
Rekort is a native Mac screen recorder built around one thing: automatic zoom on click. Record your screen normally, and every click automatically zooms in to show what you're interacting with — no keyframes, no post-production.
For YouTube tutorials that demonstrate software, this matters. When you click a dropdown, zoom shows viewers what option you selected. When you type in a field, zoom keeps the text legible. The recording looks professionally edited because the zoom is applied automatically in the preview layer.
What Rekort does for YouTube workflows:
- Auto-zoom on click, applied without editing
- System audio and microphone captured without extra setup
- Export as MP4 (H.264) — YouTube-ready directly
- Adjustable zoom level and timing in preview before export
- GIF export for sharing clips in community posts and thumbnails
What Rekort doesn't do:
- No webcam overlay (screen only)
- No timeline editor for cuts, transitions, or text overlays
- No custom backgrounds or frame padding
- Requires macOS 14+
If your YouTube videos are primarily software walkthroughs — the kind where you're showing someone how to use a tool — Rekort produces clean results without any post-production. If you need to cut between segments, add lower thirds, or mix webcam with screen, ScreenFlow handles that better.
Pricing: $9/month or $79 lifetime.
ScreenFlow: for longer edited tutorials#
ScreenFlow ($169 one-time) is the most capable combined recorder and editor available on Mac. It records screen, webcam, and iOS device footage simultaneously, and includes a full multi-track timeline editor.
For YouTube tutorials where you need to:
- Cut out mistakes and pauses between takes
- Add text callouts, zooms (manually), and annotations
- Insert title cards and transitions
- Mix narration with on-screen action
ScreenFlow covers all of it in one app. The trade-off is the price and the learning curve — the timeline editor is real, and takes time to learn. And unlike Rekort, there's no auto-zoom: every zoom effect requires placing keyframes manually in the timeline.
If you're producing 5–15 minute tutorials with structured edits, ScreenFlow is worth the investment. For shorter demos where auto-zoom removes the need for a timeline, Rekort is faster.
Settings that improve YouTube quality#
Regardless of which tool you use, these settings improve how recordings look on YouTube:
Record at the highest resolution your display supports. macOS scales beautifully; record the native resolution and let YouTube's compression handle downsampling rather than pre-downsampling yourself.
Use 60fps for software demos. Scrolling, animations, and hover states look significantly better at 60fps than 30fps on YouTube. The file is larger, but YouTube handles it fine.
Pick up system audio without routing hacks. If your tool requires BlackHole or iShowU Audio Capture to record system audio, set that up before starting — otherwise you'll record narration over silence. Tools like Rekort, Screen Studio, and ScreenFlow handle this natively.
Keep your recording area tight. Record the relevant portion of your screen, not the whole desktop. A 1200×800 recording of the app window looks better than a 2560×1600 desktop recording scaled down. Most recorders let you drag to select an area before starting.
Export in H.264 MP4 at 1080p or above. YouTube recompresses everything it receives. Exporting at a higher bitrate than necessary doesn't hurt — YouTube discards the extra. Exporting at too low a bitrate gives YouTube less to work with and the recompressed output looks worse.
Workflow summary#
For a software demo YouTube video with no editing:
- Open Rekort, drag to select the app window
- Hit record, walk through the feature or workflow
- Stop recording — preview plays automatically with zoom applied
- Adjust zoom level if needed in the preview settings
- Export as MP4
- Upload directly to YouTube
For a longer edited tutorial:
- Record in ScreenFlow (screen + webcam if needed)
- Import into ScreenFlow timeline
- Cut mistakes, add callouts and transitions
- Export as MP4 1080p or 4K
- Upload to YouTube
Both paths produce YouTube-ready video without any external video editor.
If you're choosing a recorder based purely on YouTube use, the decision usually comes down to whether your content is demos (use Rekort for auto-zoom) or longer tutorials that need editing (use ScreenFlow). For the full picture of what's available on Mac, see our best screen recorder for Mac comparison.
Ready to record?
Rekort auto-zooms every click so your screen recordings look professional. No video editing required.
Download for MacmacOS 14+ · From $9/month or $79 lifetime
Related Articles
Best Screen Recorder for Mac (2026) — Honest Comparison
13 min read
AI Screen Recorder: Which Features Actually Matter (2026)
5 min read
Best Screen Recording Software in 2026
11 min read
Screen Recording for Presentations: A Practical Guide (2026)
7 min read
Best Screen Recorders with Webcam Overlay for Mac (2026)
8 min read