Screen Recording for Presentations: A Practical Guide (2026)
How to record your screen for presentations on Mac: narrated Keynote walkthroughs, software demos with auto-zoom, and the settings that actually matter.
Screen recording for presentations usually means one of two things: recording a narrated walkthrough of your slides, or capturing a software demo to embed in them. macOS handles the first case with built-in tools. The second is where most recordings fall apart — viewers can't read a full-screen capture of a 2560x1600 display without zoom.
This guide covers both use cases, the tools that work for each, and the settings that make a real difference.
Recording a narrated slide presentation#
If you want to record yourself walking through Keynote or PowerPoint slides with narration, you have three options on Mac.
Keynote's built-in recording (Play > Record Slideshow)
Keynote has a native slide-by-slide recording mode. Go to Play > Record Slideshow, and it enters a presenter view with a recording panel. You advance through slides at your own pace, and narration syncs exactly to each slide and its animations.
The practical advantage over recording your full screen: you can re-record individual slides without redoing the whole presentation. Record one slide, advance, record the next. Keynote saves timing per slide.
To export: File > Export To > Movie. Choose 1080p for standard presentations, 4K if the video will appear on large venue displays. The export includes all animations and narration synced to your slide advances.
PowerPoint's Record Slide Show mode
PowerPoint on Mac has a similar feature under Slide Show > Record Slide Show. It records narration and pointer movements per slide and embeds the audio in the .pptx file. Export to MP4 via File > Export.
PowerPoint's recording mode on Mac lags behind the Windows version. The interface works, but it's less polished than Keynote's. If you're recording a PowerPoint presentation and want more control over output quality, recording with QuickTime and advancing slides manually is a reasonable alternative.
QuickTime as a fallback
QuickTime Player is the right fallback for anything that isn't Keynote or PowerPoint — a web-based presentation, a Figma prototype, a dashboard walkthrough. File > New Screen Recording (or Cmd+Shift+5), select your area, record with microphone.
Limitations: no system audio without a workaround, no slide-by-slide sync, no editing beyond basic trim. It's fine for informal recordings where the output gets shared once and doesn't need to look professional.
For a complete guide to what QuickTime can and can't do, see our QuickTime screen recording guide.
The Screen Recorder That Zooms for You
Record your screen on Mac — every click auto-zooms to what matters. No manual keyframing.
Recording software demos for presentations#
This is where built-in tools hit their limits.
A software demo embedded in a slide needs to show what's happening on screen clearly — which button you clicked, what appeared, how the interface responded. On a Mac with a Retina display, a full-screen recording shrinks every UI element down to thumbnail size. Nobody can follow along.
The problem with flat recordings
Record a demo in QuickTime, embed it in a slide, and play it during a presentation. The video covers the slide, but viewers see a tiny browser window with unreadable text at whatever display size the projector is running. Without zoom, the demo requires the audience to take your word for it that something happened.
The workaround is manual zoom keyframing in a video editor — crop and scale the video at each click event so the viewer sees a close-up. A 60-second demo with a dozen clicks takes 20-30 minutes to key properly.
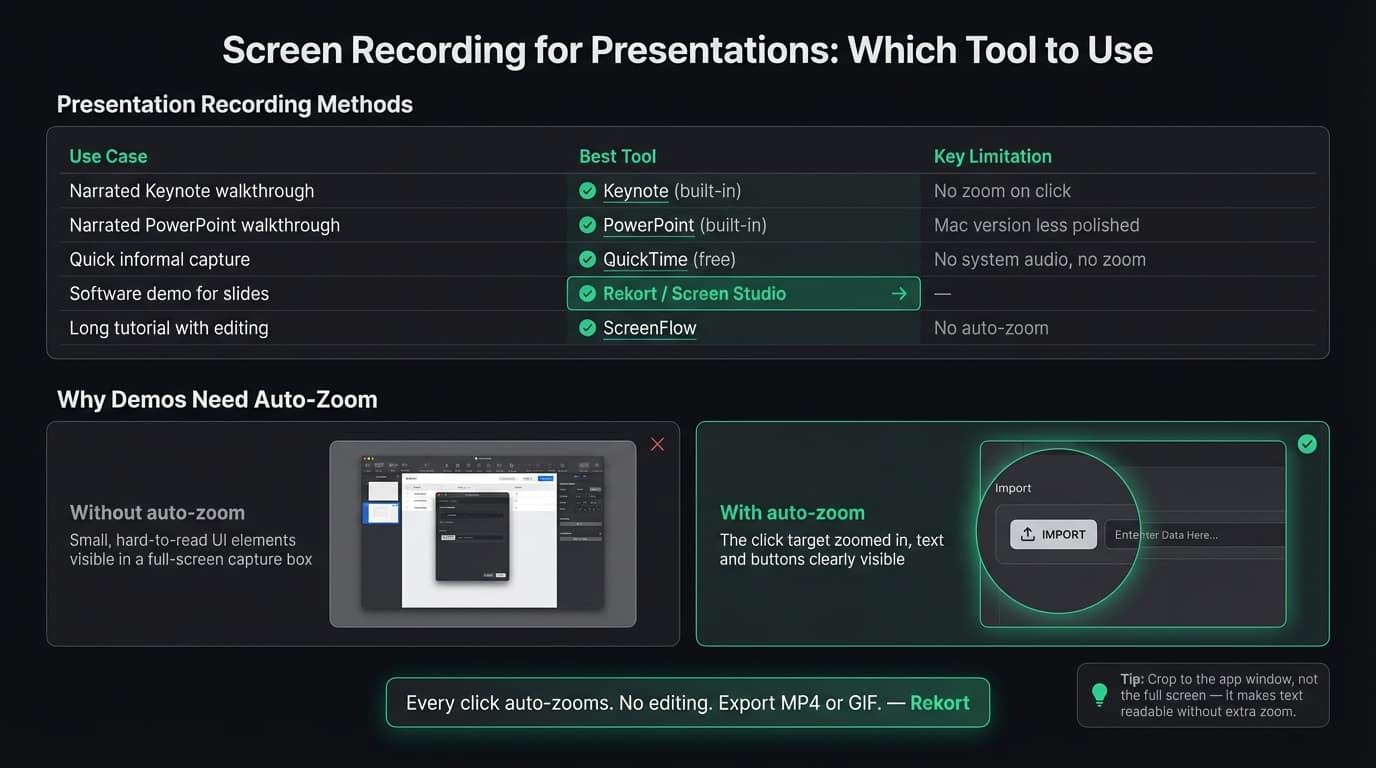
Auto-zoom on click
A screen recorder with auto-zoom handles this at the recording stage. When you click a button, the recording zooms in automatically. The viewer sees the click target at full size, follows the action, and the video reads clearly even on small presentation displays.
Rekort and Screen Studio both do this. Record normally — every click zooms in and out with smooth transitions. Preview the result, adjust the zoom level if needed, export as MP4. That video embeds in your slide and reads clearly without any post-production.
For a professional screen recording that's going into a presentation seen by customers or stakeholders, auto-zoom is the difference between a polished demo and one that needs a live presenter to narrate alongside it.
Settings that matter#
Resolution
Record at your Mac's native display resolution. The screen recorder captures full-quality pixels, and you scale down at export. For standard presentations: 1920x1080 (1080p). For large-venue displays or 4K projectors: export at 2560x1440.
Don't record at a reduced resolution to save file size. You lose the ability to zoom in during playback and the ability to crop at export without losing quality.
Frame rate
30fps is standard for screen recordings and sufficient for most presentation demos. If your demo includes fast UI animations, scroll events, or drag interactions, 60fps makes them easier to follow. Most Mac screen recorders default to 30fps. Rekort, Screen Studio, and OBS Studio all support 60fps.
Audio
For narrated presentations, microphone quality has more impact than any software setting. A USB condenser microphone in the $50-100 range sounds significantly better than a MacBook's built-in microphone. If the recording is going in a customer-facing presentation, it's worth the investment.
If your demo has app sounds — button clicks, notification tones, audio that's part of the product — you'll need a recorder that captures system audio alongside microphone. QuickTime only captures microphone audio. Rekort, Screen Studio, and ScreenFlow capture both natively without requiring a third-party audio routing tool. See our screen recording with audio on Mac guide for the full setup.
Screen prep before recording
- Crop to the app window, not the full screen. If your demo is in a browser that's taking up half your display, record the browser. Use the area selection in your recorder and crop tightly. This removes desktop clutter and means you need less zoom to make text readable.
- Turn off notifications. System Settings > Focus > Do Not Disturb before you hit record. A notification banner appearing at a key moment means you re-record the whole segment.
- Close unrelated browser tabs and apps. Anything visible in the recording becomes part of the presentation.
- Set your display to a consistent resolution before recording. If you record at one resolution and your audience views on another, proportions shift.
Which tool to use#
For narrated Keynote presentations: Keynote's built-in Play > Record Slideshow. Syncs narration to slides, handles export cleanly.
For narrated PowerPoint presentations: PowerPoint's Record Slide Show mode works. If you need more export control, QuickTime as a full-screen recorder with manual slide advancement.
For software demos in presentations: Rekort or Screen Studio. Auto-zoom makes demos watchable without post-production. Record, preview, export as MP4, embed in your slide. Rekort costs $79 lifetime. Screen Studio is $229 and adds camera overlay and background effects on top of the auto-zoom workflow.
For longer tutorial recordings that need editing: ScreenFlow. Full multi-track video editor with screen recording built in. No auto-zoom, but you can add zoom manually in the timeline. Good for tutorial content that needs cuts, callouts, and annotations.
A full comparison of all Mac screen recorders with pricing, features, and use cases: best screen recorder for Mac (2026).
The most common mistake#
Recording the full screen instead of the application window.
If your demo lives in a browser at half your display size, recording the full desktop means half the video is dead space — your desktop wallpaper and dock while the audience squints at the far corner where the browser is. Crop to the app.
Every screen recorder on Mac supports area selection. Drag a rectangle around the app, start recording. Your demo fills the frame, text is readable, and you need less zoom to see what's happening. It's the single highest-impact change for presentation recordings with no setup required.
Ready to record?
Rekort auto-zooms every click so your screen recordings look professional. No video editing required.
Download for MacmacOS 14+ · From $9/month or $79 lifetime
Related Articles
Best Screen Recorder for Mac (2026) — Honest Comparison
13 min read
AI Screen Recorder: Which Features Actually Matter (2026)
5 min read
Best Screen Recording Software in 2026
11 min read
How to Make YouTube Videos with Screen Recording (Mac, 2026)
8 min read
Best Screen Recorders with Webcam Overlay for Mac (2026)
8 min read